Free one hour async training!
Join me on Feb 6th as I present a one hour session on the new async feature of .NET 4.5. You can expect the full run through of how to use it, limitations and pitfalls. Since many people aren’t able to move to .NET 4.5 yet, I will also be covering what you should be doing now to make sure that you can easily take advantage of it in the future.
Async allows you to write code that runs across multiple threads in intelligent ways without the pains commonly associated with it!
- Date: Feb 6th 2013
- Time: 9am to 10am (South African time - so GMT +2)
- Where: Available over YouTube
- Audience: Anyone with .NET experience
Thanks and I hope to see your (virtually) on the 6th! Please follow me on Twitter for updates and links for this session!
Dealing with off by x issues when using the TextBox
Introduction
One of the toughest problems I faced when I built Notepad Classic was an issue where many functions like Go To & Find were always off a few characters. After a bit of experimenting I noticed a pattern, it was off by the number of characters equal to the line number (0 based).
i.e.: no issues on the first line (line index 0); Off by one on the second line (line index 1); Off by two on the third line (line index 2); Off by three on the forth line etc…
Problem
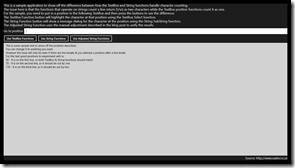
It turned out that the way the string functions count a line break (i.e. \r\n) as two characters, and rightly so – it is two characters a \r & a \n. However the TextBox functions like Select treat \r\n as a single character because that is what is displayed visually – a line break is one character visually. So there is a difference between the two scenarios and thus the “off by one x line count” error I found.
Solution
The solution I used is to compensate for it by working out the number of lines to the point (i.e. count all the line breaks before the point) and adjusting the results (adding +1 for each \r\n) as needed.
Sample application to show this problem and the solution can be found at: https://bitbucket.org/rmaclean/off-by-one-x-sample-code
How to update git-tf?
I love Git – it lets me work the way I want and where ever I may be. I love TFS – it has everything companies need for development projects. This is why I love Git-tf, it gives me git but with all the professional tooling from TFS serious development needs. However I have found that upgrading Git-tf isn’t obvious and in fact you may get it wrong without knowing!
I was doing it wrong
Since it is just a file copy deploy (i.e. drop files in a folder), I had assumed that you could just do a file replace of those files when a new version – however I noticed recently the version numbers after an “upgrade” didn’t match up.
Solution
The solution is to delete all the files in the folder FIRST – then you copy the files into that folder. Once you do that it just works!
It is odd to me, but it works and that is what matters.
Special thanks to Richard Banks for pointing out this solution to me ![]()
MVP Award Time Again
 January first - most people celebrate the ability of gravity working for another year and other physics related awesomeness at midnight however for 943 people they get a special celebration at about 5pm (SAST) when they are told they are MVPs.
For the forth time I have been honoured to be placed into that special group by being award a MVP for ALM.
Thank you to everyone who has been a part of helping me gain this award for the work I did in 2012!
NDepend + Windows Store apps = WINNING
I <3 NDepend, it is an amazingly powerful tool that is brutally honest & unforgiving, and the rewards it brings are massive. Building Windows Store apps without it has always worried me – how do I know if this is going right? Thankfully yesterday the NDepend team released 4.1 which includes support for Windows Store apps, which includes the ability to analyse the .winmd files too!
This not only means I have personal benefits, but it is a sign of something too. NDepend really is cutting edge, and so the sign that they professional tools are arriving for Windows Store apps really shows commitment from the community to the platform! This means it will get easier and better to develop Windows Store apps in the future!
You can download a trial of NDepend at http://www.ndepend.com/NDependDownload.aspx
Twitter Pro-trick: Refer to companies by stock codes
Twitter is filled with awesome little tricks, and I recently found a very cool one for referring to companies on Twitter. First though, lets see the existing two ways to refer to a company. First you can use the companies Twitter name for example:
I work for @bbdsoftware :)
— Robert MacLean (@rmaclean) November 29, 2012
Or your other option is to use a hashtag
So what is the new awesome trick? If the company has a stock ticker code, for example Microsoft has MSFT & Nokia has NOK then you can prefix that with $ on Twitter, i.e. $MSFT & $NOK.My mother is a happy #Bing user
— Robert MacLean (@rmaclean) November 29, 2012
I am hoping for a $NOK Lumia 920 phone :)
— Robert MacLean (@rmaclean) November 29, 2012
On the Twitter site you will note that $NOK is now a link to a search for all $NOK related items (it doesn't work on the embedded Tweet), which in many cases (like Nokia) can save you a little bit of text. For people monitoring companies social network this is also important as it is an another thing they need to monitor!
This feature is called a CTAG (maybe it isn’t - but that is the the source on the search).
Presenting on Windows 8 - Pro tip
This tip is aimed at presenting, but is just as useful to those who want to focus in Windows 8 without distractions!
Windows 8 is a great operating system to use, especially the background tasks system that ensures other applications are not destroying your CPU & memory. However, there is a downside to background tasks!
Previously, if I wanted to ensure no annoying Skype popups (during my talks for example) I just shutdown Skype and no popups could occur, but in Windows 8, since the application isn’t running, how do we stop the popups?
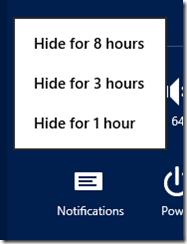
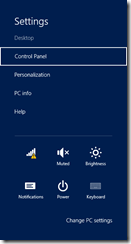
It is a simple solution, bring up the settings charm (see image on left) and in the bottom right hand corner is an option called Notifications. If you tap that, you will get options to block notifications for 1, 3 or 8 hours.
I am tending towards 3 hours for my 1 hour talks to allow for setup, clean-up etc.
Once you have disabled it, the icon will change to show you it is disabled! If you want them back, for example when you are finished, then you can tap the icon again to enable them!
What is great is that live tiles & the background tasks still occur, just no popups anymore.
Windows Store app Development Snack: File Type Association Icons
For more posts in this series, see the series index.
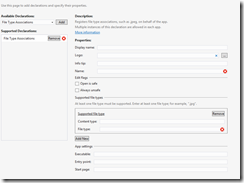
One of the declarations you can have with a Windows Store app is the file type association, which lets file types become associated with your application. This means you can customise the icon for the file type & if the user double clicks an associated file, it will launch the application.
One of the properties of declaration is the logo property which is the icon to use for the file type. Logo is optional and if you do not specify it, or you specify it incorrectly, it uses the applications small icon (i.e. the 30x30) one – which doesn’t look great.
The solution to this is to correctly specify the logo, but that isn’t as straight forward as it seems. Firstly you don’t just have a single image you need FOUR icons with different resolutions
- 16x16
- 32x32
- 48x48
- 256x256
Next you need to name them correctly, the format is <name>.targetsize-<resolution>.<extension>, so for example if we wanted to use MyLogo.png as the file name we would have:
- MyLogo.targetsize-16.png
- MyLogo.targetsize-32.png
- MyLogo.targetsize-48.png
- MyLogo.targetsize-256.png
Lastly is putting in the correct logo name in the manifest, since you have four icons what do you use? You use the name + extension components. Using the example about we would have MyLogo.png as the name & Windows 8 is smart enough to figure out the resolution, insert the target bit and get the right image for the right resolution!
Windows Store app Development Snack: Background Colour
For more posts in this series, see the series index.
When you are configuring the appxmanifest for your Windows Store app, one of the options is the background colour for the tile – YOU SHOULD ALWAYS SET THIS!
It is used for two things, firstly if your image is transparent this is the colour that will show through for example for Notepad Classic that is what I do – the actual image is just plain white & transparent.
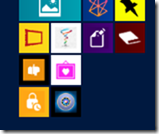
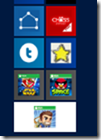
The second one, which is not always the most obvious is when a small icon is needed, for example you do a pinch gesture on the start screen (semantic zoom is the technical term for it), the background colour is what is used as a border around the image. Below you can see a screen shot from my machine, and note two of them have this ugly black border – that is because they do not have a matching background colour set!
It is not always possible, especially for games with rich tile icons (note Angry Birds in the screen shot below) but I would suggest trying to find a similar colour anyway for example the top two below have a similar colour & Jetpack Joyride (the last one) chose white (which is at least better than ugly grey).
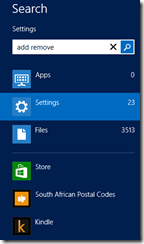
Another location for the small icon is the search charm
How rich are you?
How rich are you? Did you ever wonder that? I did, so I built this little tool to tell me exactly how rich I am! The tool uses data from the South Africa 2011 Census1 and nothing is sent or stored when you use this tool.
The tool
My thoughts
What really hit home to me is just how much better off I am than many people in South Africa. It is very sobering.
Footnotes
The numbers may seem off from the 51 million people that StatsSA reported, that is because I have removed people who answered "not applicable" or "not specified" which lowered the amount of the population to 46 867 063 - still enough of a data set to play with.

