Events you should attend
 What’s New Roadshow
Starting next week the What’s New Roadshow (or as it is officially called, Dev Day) will be happening in Johannesburg (already sold out), Durban & Cape Town. This should be a great fun event, where we will be covering some interesting concepts in the land of .NET which don’t get enough time, for example Machine Learning. We will also be looking forward with VS 2015 and C# 6 coverage! I will be tackling the C# 6 content (which has already wowed the internal teams) & also covering DevOps. The events are free but you need to register so catering & seating can be taken care of!
Developer User Group
Also next week, is the monthly developer user group meeting, and it looks fantastic! Each month, on the second Tuesday of the month, the DevUG meets from 16h30 to 18h00 to learn & share. Next week we will have topics ranging from Flying Quadcopters with Node & learning Go!
Any events you attend or want me to share? Send them over in the comments!
Xbox Live Gold? Don't forget this trick to get free games!
 Each month Xbox gifts their Xbox Live Gold members a number of free games. Something remember is that you get ALL the games, regardless of the console you own! That means, if you only have a Xbox 360 you still get the Xbox One game; so when you do get a Xbox One console you will have a LOT of free games already. To get your game, you need to go to the marketplace on the Xbox website to “purchase” your free game.
That’s it! What is your favourite Xbox game? Let us know in the comments!
I dropped a large binary object in Git ... now what?
 or how do I remove a file from Git, including the history. This came out of a discussion with some ALM Rangers (in fact the title was from Willy-Peter himself!) and I thought it is too good not to share. In addition I’ve added some other information I learnt since then!
Before you start
Make a copy of your git repo before you start! We are going to mess with your repo, so if you have a backup and something goes wrong you can just rollback.
Revert
If you have ever made a mistake on a computer, you know it the moment you finger lifts off the enter key. So you may just want to undo that last commit quickly and use the revert command in git, which appears to remove it, but the problem is that remains in the history. So this means that everyone needs to get it when the clone or pull the repo.
Amend
If the very last commit added the offending file and you NOT pushed your repo yet there is a simple process to solve it. First delete the file. Then run another commit with the --a and --amend switches.
- --a tells git to automatically stage all modified & delete files.
- --amend tells git to rewrite the last commit.
- if the only thing was that file, then you may need to add a --allow-empty switch to tell git to accept a commit with nothing in it.
For example, if I want to remove the password.txt file.
del password.txt
git commit --a --amend
Rebase
What if it isn’t the last commit, but a few back. Once again if you have not pushed your repo an option would be to rewrite history (you may want to look at that link, it goes in DEEP detail on what rewriting history means). Step one is to kick off a rebase and in the editor go to the commit with the issue and change it from a pick to an edit, for example:
git rebase -i origin/master
(in the picture above, I am going to remove the file added in commit 47f73e6)
You will then be dropped back to the command prompt, and you can step through the commits you set to edit. You can make the changes (either edit the file or delete it) and then use the same amend as before. Once you have finished that you step the rebase forward by doing rebase --continue.
For example:
del password.txt
git commit --a --amend
git rebase --continue
Filter-Branch
What if you have pushed? Or perhaps you need something more? Git includes a solution for this, called filter-branch which was totally unknown to me before this discussion. Filter-branch is not only useful to remove files but you could also change the details of a number of commits (for example: updating your email associated with your commits).
Lets get rid of the file, for example password.txt
git filter-branch --tree-filter "rm -f password.txt" HEAD
Note – on Windows you will use double quotes (“) like above, but on Linux it would be a single quote (‘). Once done you need to push to git, but you will need to use --force and --all switches to do it.
git push --force --all
Your next issue is that all your team members still have the file (if they already have pulled), so they need to clean up to. The way they do this is to run rebase but using the onto switch this time. For example:
git rebase --onto origin/master master
Those members who haven’t pulled since that file got into the repo, can pull as normal and do not need to worry about this.
BFG
There is also a stand alone tool called BFG Repo Cleaner. There is a nice set of documentation for it and it is blindingly fast! One nice thing is you can say remove all files above a certain size or or x number of the largest files.
GC
One thing to do once you have done all of this, is run a garbage collection by using the gc command, which may return disk space from orphaned files. To do this run:
git gc – --auto
That’s it! Have you ever messed up a file (I have, I committed my Azure password once in a file!)? Share what happened and how you fixed it!
Why I am proud of my planet sized unit test
 I am having a lot of fun with a new project, one where the customer said we had to do unit tests (how rare is that 😁). It is still VERY early days in the project so by the end maybe I will realise this is wrong but for now, but right I am pretty proud of one specific test. It is 50 lines long (C# + XUnit) and 18 of those lines are asserts. If the normal practice of unit tests produces asteroids, then this is a planet-sized unit test. When I wrote it, I immediately felt the weight of hundreds of purists telling me it was wrong or that it had too much complexity & will hurt me.
Is this the norm for the project?
No – it totally will not be. Most unit tests will be sub-10 lines and have one or two assertions. I believe planet-sized unit tests will account for 5% of the tests at the end of the day.
You’re doing unit tests wrong!
No – there is some advice I am choosing to ignore, but it is just advice. Why is that advice there in the first place? It is there because people with far more experience and knowledge have learnt that the larger a unit test becomes (for this just assume size = complexity), the more brittle it becomes and the more time will be spent trying to understand and maintain it. In short, the value vs. risk equation breaks down (i.e. high value & low risk is awesome but low value & high risk is a bad idea). So here is the rub, for 5% of the tests we have a very high risk but they exercise the code in ways that provide a massive amount of value.
So what does it do?
I think calling this a unit test is wrong, I feel that even though it uses unit test tools & is part of the unit test project it isn’t a unit test – it is more of a process test. We are testing how the user would run through a specific process from end to end. These process tests exercise the interactions between various pieces which a single unit test might not. I had thought to call these integration tests, but we aren’t integrating to any external systems – everything is still mocked out and injected in. Another way to look at this, and this is how we structured it, is multiple unit tests (each with an arrange, act, assert pattern in them) chained together.
I have used these in previous projects and the value of them is stupidly massive. They often find issues long before a unit test will because so much is coupled together, you could say that the increase in complexity increases their value.
Why so many asserts?
How I figure out who to assert is simple, I follow the advice: Assert all your assumptions. For unit tests, since they are simple, the assumptions can be simple. For a process test, since it is complex you should have more assumptions during each part of it.
This is what I am doing, have you ever tried a planet size test or a process test? What did you find in it?
My toughest bug of 2014!
The first sign of a problem was when the app crashed while I was testing a new feature I put in. The error in VS indicated a XAML issue which was odd, since I wasn’t working with XAML at that point. I restarted the app and no error occurred. “Meh, what ever” was my response. The second sign of a problem was when another developer on the team, a week later told me about the issue. My response – shrugged it off and told him to restart. The third sign was when the testers logged a bug about it – finally someone was making this a real issue. You may hear that a developer & tester are better than two developers – this is a great example of why: two different perspectives of what really is an issue does really help.
The app we were building was a Windows Store App for Windows 8.1 using XAML & C#. It was being built using the Universal App Framework. It was also big for an app with over 40 screens! The XAML for our custom controls & styles is over 2 000 lines of XAML! The bug could be anywhere, but it had four traits:
- The error which told us it was a XAML issue & related to a ContentPresenter: Failed to assign to property 'Windows.UI.Xaml.Controls.ContentPresenter.Content'
- It only happens when we navigate between pages.
- It was not limited to any one page. It could happen on any page.
- It is intermittent – very intermittent. Make you scream levels of intermittent. I’ll introduce you to Heather later, but she told us that it was 1 in 40 times on average it would happen!
So how did we fix this? This is a story of the dumb things I did followed by the smart thing I did.
Starting to understand the problem
Step one, we know it is XAML & it is on every page – so what is common on all pages? First is our styles.xaml where we store all the common colours & styles for the app. Second is a custom control we built, called PageLayout, which gives us a common layout and pieces of functionality (basically it is similar to the Frame control). If you are interested the XAML for that control is here. The key thing which suggested the XAML control was the cause was it has FOUR content presenters on it and the error suggested a content presenter was at fault. I reviewed the XAML & so did another dev – no problems found.
One thing happened, when we tweaked the XAML for PageLayout the line numbers in the error changed. So we knew the problem was there – but what was it?!
Windows Debugging
We were running the app outside of Visual Studio one day and it crashed. You know what is awesome in Windows? It will grab a memory dump for scenarios like this – so we got a memory dump of the error! This is awesome because we can use Visual Studio to work with those and there is a fantastic blog post on exactly how to work with it. You know what two hours of doing that told me… nothing. Come on, what is all that text below if we had the answer now. Keep up reader. All I could get was the following error message: Unhandled exception at 0x7582B152 (combase.dll) in triagedump.dmp: 0xC000027B: An application-internal exception has occurred (parameters: 0x055C31F8, 0x00000004).
I also got stuck since I didn’t have the Debugging Tools for Windows and over a gig of download wasn’t going to happen at work, but that may have been a blessing in disguise. Through this though, I did find this great Wintellect Now video on how to debug on a OS level.
The birth of Heather
So after spending hours of repeating the process of making a small change and then clicking through various screens over & over again (and thus making sure carpel tunnel syndrome was coming) – I wondered, can’t I automate the clicking. Actually I don’t need clicks, I just need navigations to a different page. So I created a new universal app, with a single page in it. I then copied PageLayout and everything it needed over – totalling 300 lines of XAML! I added a single button which automatically navigates to the mainpage over and over again. You can see this code base here.
This app is called Heather Speed Crash! and boy did it deliver, it could crash every time! It was still intermittent but it meant I could get it happen in < 60s with one click rather than > 20 clicks & 5 minutes. This helped a lot in getting work done. It also meant that the code base was less than 500 lines of code + XAML compared to the actual app of thousands of lines of code.
Now to iterate over Heather and clean it down and still get the errors which led to this version, which got us down to less than half the code + XAML & it also showed the exact issue was in the PageLayout. Not something which PageLayout used. This is one of the biggest learning's from this, intermittent issues aren’t some pain to resolve, the trick is just to make the scenario happen faster.
Two lines of XAML
Somewhere between starting to understand the problem & diving into Windows Debugging, I realised that I was struggling with the problem and I decided to post the issue to StackOverflow and then, a few days later, to MSDN forums. This is always a valuable exercise for me as it forces me to put down in a systematic way and often just the act of collecting, ordering and writing down the information shows me what the problem is. This time, writing didn’t help and after a few days I had no progress with it. On the MSDN forums, it was suggested that I try identify which of the four content presenters was the problem. Now that I had Heather to help, I could do this. The process I went through was:
- Comment all four ContentPresenters out – run – it works! This is great because we know it is one for four lines of XAML!
- Comment each one in individually and test. Of the four, only two crashed! So we are down to two lines of XAML!
These two content presenters were not used on ever page, so their binding to content was set to null by default. This was the only difference between these two & the other two. So I gave each a default piece of content and the problem stopped. Oddly, if I gave just one a default piece of content and left the other presenter null, it would also be resolved.
The issue turned out to be a layout bug somewhere deep in XAML which is triggered only when two content presenters both exist on a page with null content. When XAML tries to work out the sizes of the controls, having two nulled content presenters causes a crash.
The work around to resolve this was to have both content presenters visibility set to collapsed by default & only make them visible if they have content.
Rules for better email
tl;dr: Some one was dumb & used a good idea to excuse being lazy. It gave me an idea. I created a micro site to share simple rules for better email!
Sentenc.es is a novel idea to have more meaningful email communication by applying a discipline to how you respond. The suggestion it offers, is to limit your responses to certain number of sentences or less. They have pages for two, three, four and five sentence lengths.
Picture from Intersection Consulting
I am all for ideas to improve email – I GET A LOT OF IT, sometimes it feels like I am drowning in it. I use unroll.me and a million filters in my email client to try and cope. I also love the idea senten.ce offers of being disciplined to responding, but there is a problem.
The problem is people (when isn’t it). This was highlighted for me recently when I questioned someone on why their emails were short, rude & insulting. Their answer “You misunderstood my tone”. When pushed further it turns out the reason he couldn’t craft his emails to get the tone right, was because he blindly followed the three sentences rule.
Picture from darkuncle
The mistake made here, which is made not only with this idea but with many, is to be too focused on being disciplined that you lose sight of the bigger picture. Another place I’ve seen this is with scrum, where they “do it by the book” even when they are hurting because of it. Agile is helping with scrum, but what can we do for the “senten.ce sheep”?
The solution!
I decided to make a micro site called Rules for better mail, which like senten.ce, has what I think are better rules. Share it, put it at the bottom of your emails, ignore it, contribute to it or what ever you feel like, I am not your mom – you don’t need to listen to me.
Improve the embedded browser in Visual Studio
Visual Studio has an embedded browser, but it uses the IE 7 render path?! Really, that is pretty messed up.
and worse it can cause the Internet to break
Thankfully, you can fix this yourself with a quick registry addition. Note: Fiddling with the registry can break your device, so be careful and this carries the usual “this works on my machine” and it is your own risk for doing this.
The key you need to care about is:
HKEY_LOCAL_MACHINE\SOFTWARE\Wow6432Node\Microsoft\Internet Explorer\Main\FeatureControl\FEATURE_BROWSER_EMULATION
Note: the Wow6432Node bit is needed since Visual Studio is a 32bit process. In there, add a new registry key of DWORD type named: devenv.exe
I set the value to (HEX) 2af9 – since I have IE 11 on my Windows 8.1 machine, but you can pick from the list of options to best suit your needs and now it just works!
No issues on GitHub
The Rangers Treasure Map Updating System
In the next release of the ALM Rangers Treasure Map one of the new features is a way to update content remotely in the app. The mechanism chosen for this is intentionally simplistic as it allows us to run this with minimal infrastructure as well as focus on the app development and not building server side code.
How it works?
 The system is very simple, but first let’s look at how content is handled internally. We store all content in XML and we have a folder full of images (we will call this collectively Assets). One of the changes needed in this release was code that copies the assets from the install location to the sandbox location – the reason for this is because we cannot write to the install location.
The update mechanism really just connects to web server and downloads a zip file, extracts it and overwrites the XML and images. We do have some extra logic internally which ensures that we do not waste your bandwidth – this is done by checking the if modified since in our request and we can see if we have new content available.
Setting up Azure
Unfortunately not every server supports the if modified since headers, but thankfully Azure Websites do support it. Using Azure websites allow us many ways to push to it which makes the work flow for updating content very easy. It is also very easy to set up the site:
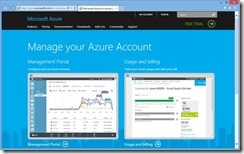
Login to the management portal: http://azure.microsoft.com/en-us/account/
In the management portal – go to websites
Click NEW (lower left hand corner). Website should be pre-selected, if not, select it. Click quick create and specify a URL and hosting plan. Click create website.
Next click on the website which was created and click Reset your deployment credentials.
Specify a username and password and click OK.
And that is it!
Crafting the content
So how do we build the ZIP file which needs to be uploaded? Since we have two different sets of assets; first the art (images, photos, logos etc…) and second the data (as XML). These are stored in two different locations for the app: DataProviders, which contains the data, and Assets, which contains the images. So we setup the two folders and put the new items and data to be replaced in the right folders:
We then compress those folders into a normal ZIP file and upload it. It is that simple.
Developer User Group 2014 Survey results
This year we launched the first annual user group and let me say thank you to every single one of you for taking the time to help us improve the group. For this survey all questions were optional so you may see some differences in the numbers. This post is meant to share the data and I am not going to speculation about what this could mean or how we will adjust the group based on it at this point. Lets have a look at the data!
Comments
The final item in the survey is the first I want to discuss – the comments. Many where along the line of congratulations which is awesome but there are four I want to highlight here.
more code please, e.g. everyone has talked about 'everything must be unit tested', yet not once have i seen the actual code. I AM UNIT TESTING, BUT I FEEL THE COVERAGE IS NOT ENOUGH, SO IT WOULD BE HELPFUL TO HAVE A REAL LIFE EXAMPLE OF 100% COVERAGE REGARDING TEST DRIVEN DEVELOPMENT.
We will be having the awesome Martin Cronje in June doing a talk exactly on this! Another idea would be to attend the CodeRetreats where this is a major focus of the events. A personal comment based on the talks I have given; the time for a presenter is limited so if they are talking on SignalR adding unit tests not only takes time away from the talk but can also confuse the audience.
A suggestion to some of the discussions is to have a practical aspect where coders can code
I love the scenario where the audience can code with the talk but there are logistical reasons this doesn’t work well in our format. The presentation style is the one that works best.
Have more advice for novice/beginners to programming
Below I will talk about what type of events we run most often, and while the bulk of our talks are technology focused which can be very tough for novices we have a big chunk that are about methodologies, theories, stories and patterns. These are PERFECT for a novice since they share valuable information which doesn’t rely on technical understanding.
I haven't attended for some time due to other commitments, but for some time I thought it would be beneficial to have a bit more conversation / talks about the open-source languages and projects. I understand that the group was initially primarily started around Microsoft products, and that's great, but in my field open-source is more dominant. It's just an observation, though, nothing against the setup of the group per sé
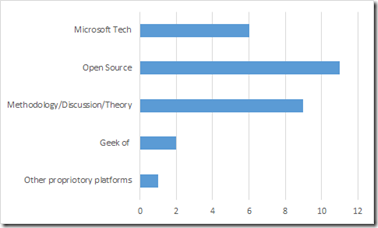
I disagree with this view – having a look at our past events the break down of the sessions is as follows:
- Microsoft tech = sessions looking at something from Microsoft (examples: LightSwitch, Windows Phone).
- Open source = sessions looking at using an open source technology (examples: Git, Rails)
- Methodology/Discussion/Theory = these are talks where we discuss a theory, pattern, someone shares their learning's or methodology which is unrelated to a specific group (examples: Lesson From philosophy-Empirism vs Rationalism in system design, Responsible Programming)
- Geek of = these are our yearly December event where we have some fun.
- Other proprietary platforms = It isn’t open source, nor is it Microsoft (example: Developing for iOS)
- There are a few events which I have put into multiple brackets since. A great example is Bringing hipsterism and skinny jeans to .Net with ScriptCS. This is a talk which is both about Microsoft technology (C# & .NET) but focused on an open source technology building on top of it (ScriptCS).
Looking at the numbers – we are more about open source technology and developer improvement than Microsoft.
Overall, how satisfied or dissatisfied are you with the Developer User Group?
The first and most important was how satisfied or dissatisfied people are, on a scale from 1 to 5 (1 being bad – 5 being great) and we hit at an average of just over 4! ![]()
How likely are you to recommend the Developer User Group?
Second is very important for us, because we want to grow the group and being recommended is the best way for that. Here we did a scale from 1 to 5 and did even better scoring over 4.4!
Overall, how do you find the complexity of the sessions?
Third is how members are finding the content – with this also on a 1 to 5 scale with 1 being too simplistic content and 5 being too complex content. 3 is the just right spot and we came in almost exactly at that!
Start time
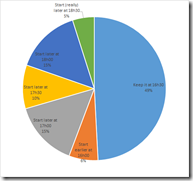 The most discussed issue in the group is the start time – it is brought up almost every month in the comments. Keeping the time the same really smashed the other options, both individually and if you group the times into early (16h00 + 16h30), medium (17h00 + 17h30) and late (18h00 + 18h30). We are planning to use the early start time to allow for longer sessions with multiple topics going forward so hopefully that will enable people to get the best of both worlds.
- Keep it at 16h30: 49%
Start earlier at 16h00: 6% Start later at 17h00: 15% Start later at 17h30: 10% Start later at 18h00: 15% Start (really) later at 18h30: 5%
What do you hope to gain from the developer user group?
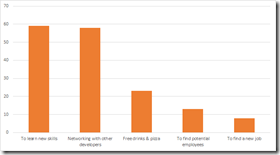 The only item to allow multiple options to be selected, is also one of the most important – what do you want? Almost everyone said learning new skills and networking.
- To learn new skills: 95%
- Networking with other developers: 93%
- Free drinks & pizza: 37%
- To find potential employees: 20%
- To find a new job: 12%
Age
 Moving into the demographics for the group – the first one is age with the majority between 26 – 35.
- 26 – 35:
75% 36 – 50: 16% 18 – 25: 6% 51 – 65: 1%
What is your level?
 The next item is the level, which shows a strong slant to the senior level.
- Senior:
70% Intermediate: 22% Junior: 6%
What is your primary programming language?
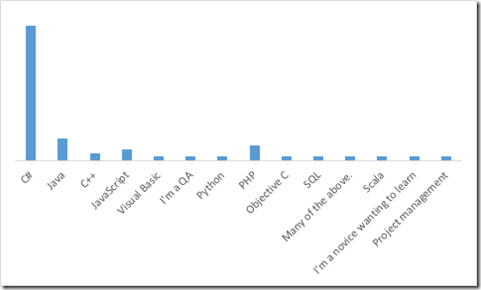 The third demographic which is vital for us in planning content is around primary development language and we have a GREAT mix of languages but the strongest community is c#.
- C#: 59%
- Java: 9%
- C++: 3%
- JavaScript: 4%
- Visual Basic: 1%
- I'm a QA: 1%
- Python: 1%
- PHP: 1%
- Objective C: 1%
- SQL: 1%
- Many of the above: 1%
- Scala: 1%
- I'm a novice wanting to learn: 1%
- Project management: 1%
What is your primary type of development work?
 In line with planning content, knowing what people are doing is vital. Web work (internal and external) is a strong lead followed by integration and mobile.
- Mobile apps: 11%
- Internal web sites or Intranets: 30%
- Integration projects: 19%
- External/Public web sites: 27%
- Coaching: 1%
- UI/DB/Platform: 1%
- Many of the above: 1%
- Internal Projects: 1%
- I'm a Novice wanting to learn: 1%
- Server side development: 1%
- Data warehousing: 1%
Organisation size
 How big are the companies that developers come from? Here it looks like a strong split between small (less than 20) and large (more than 90). Which I think is pretty accurate for the industry as a whole in South Africa.
- >200: 25%
- 11-20: 8%
- 1-10: 29%
- 21-40: 12%
- 91-200: 14%
- 41-80: 9%
Role in purchasing?
 Finally, a question we can use when discussing with sponsors is what role people have in purchasing. Here there is some influence or none.
- None: 37%
- I can suggest/influence purchases: 51%
- I make the final say: 11%
Raw data?
Want the raw data – you can download it below.
Why is it called the GAC?
 In .NET we have a GAC or global assembly cache – which you may think describes it well and that is why we call it the GAC, but that isn’t true. One of the many things I’ve learnt since joining Microsoft last year is the real story of the GAC’s name and the fact that the acronym was chosen after the name to please legal. Think about it, the GAC is neither a cache (it is really a repository – a cache implies a temp nature to it’s contents) nor is it global (it is local to the machine) – that acronym just doesn’t make any sense.
The origin of the name is that Anders Hejlsberg when naming it wanted something to represent the only location on the device for assemblies. In addition Anders is a massive Dr Seuss fan and chose the name from the so in Cat in the Hat book. (emphasis below is mine).
At our house we play out back. We play a game called Ring the Gack. Would you like to play this game? Come down! we have the only Gack in town.
The name was used in the team until legal got hold of it and worried that Microsoft maybe sued, so it was shortened and an acronym made up to explain it. The original name does appear in the original beta documentation for .NET 1.0 which you can find here.


