On Saturday I did a 20-minute (which is basically nothing) presentation on what’s new in SQL Server Reporting Services (SRS) 2008 at Dev4Devs! The feedback I’ve gotten has been very positive, and I personally learned more about what it takes to present well. That said, some people asked me afterward about the slides and content I used, and the reality is that I didn’t have a single slide! The truth was Eben indicated when I volunteered that developers don’t like slides, so I took it as a challenge and did all my “slides” in SRS! For those who couldn’t attend, here’s a rundown of what I covered!
Introduction
The first “slide” was really about what I was covering and also some of the user groups out there! I must say sorry to Craig for leaving out www.sadeveloper.net. For those wanting the links to the groups, they are:

For the Designers
Building the slide also gave me the platform for the first section: what’s new for designers! So, switching to edit mode, I was able to demo the fact that textboxes can now contain rich text, so the entire title and agenda was a single textbox with different font styles and positioning. Below that, you can see the communities worth supporting, highlighted with two different colors! In SQL 2005, you were limited to a single font configuration per textbox, so to replicate this in 2005 would have required seven textboxes!
Next, I showed off the new design surface improvements, which make it no longer feel like an annoying grid but a real smooth surface. There are also enhancements like guide lines that snap you to other design elements and distance tooltips that show your distance from other elements (see below).

I then demonstrated my favorite feature: UNDO and REDO. It seems small, but in 2005, the UNDO feature reloaded entire reports and took forever to do—now there is a real instance-based UNDO!
We’ve Been Robbed
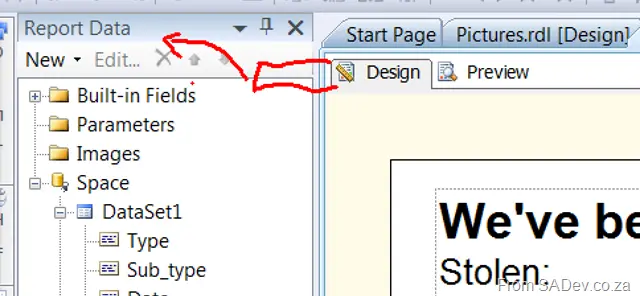
Next, I discussed what had been removed (or moved) — kind of! First was the Data tab, which has moved to its own window and now feels much slicker there! Then I talked about the removal of Table, Matrix, and List controls and what the Tablix tools are now. I won’t retell the story—Teo Lachev has a better description on his blog.
Pretty Pictures
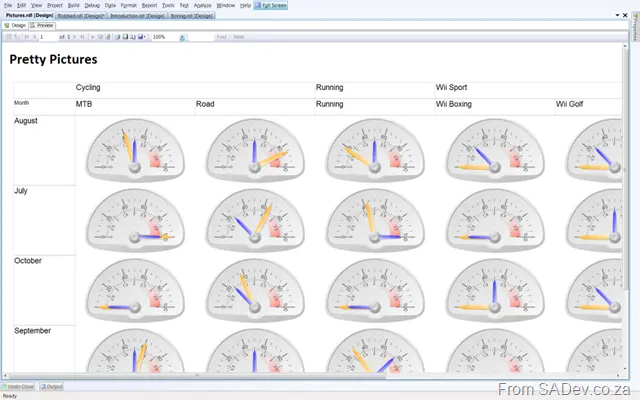
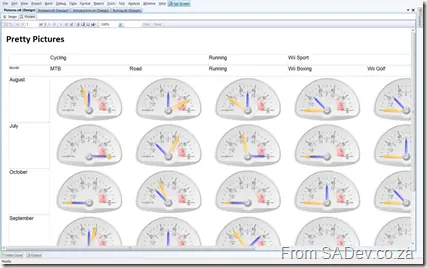
From there, I moved into showcasing the new Dundas-based charting and gauge controls, which make reports look super slick. I also demonstrated why gauges are great for showing multiple pieces of data at once (in my demo, distance and time from my exercising).
The Boring Slide
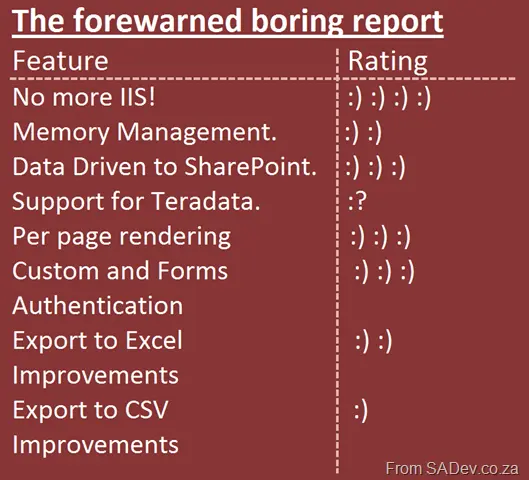
Lastly, I ended with a “slide” on things I couldn’t demo but are noteworthy, including a smiley-based rating scale for how noteworthy they are:
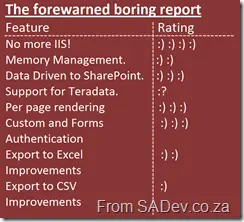
- No More IIS: SRS 2008 no longer requires IIS to run—it has its own web server, meaning it scales better and is a true middle-tier application.
- Memory Management: Because SRS 2008 manages everything independently and no longer relies on IIS, you can now limit RAM usage.
- Data-Driven to SharePoint: You can now use a data-driven subscription (based on data in the database) to publish to SharePoint.
- Support for Teradata: While much has been said about this, I assume it’s important (I saw heads nodding when I mentioned it), but since I’ve never used Teradata, it got a confused smiley.
- Per-Page Rendering: This is huge—it no longer renders the entire report at once. Now, it renders one page at a time! Great for massive reports.
- Custom and Forms-Based Authentication: A fantastic feature for hybrid environments! Combined with the removal of IIS, Kerberos issues between CRM and SRS should be a thing of the past.
- Export to Excel: In my series on complex report building, the last part highlighted the nightmare of exporting to Excel and how subreports generated ugly gray blocks—this is no longer the case. Yay!
- Export to CSV: Improved to export just data, though with limitations (e.g., gauge values won’t be included if you use CSV), so proceed with caution.
I also mentioned Report Builder, an 18MB download that provides an Office (ribbon-based) experience for building 2008 reports. It’s great for low-overhead scenarios (no Visual Studio required) and includes all the design surface features I mentioned earlier. It’s easy to get started but requires a full SRS server to run reports—no preview mode like in SQL BI Studio. That said, it’s ideal for power users and will be invaluable in the future for working with old reports without needing old versions of Visual Studio, like we do with 2003 and 2005! I mentioned on Saturday that it was RC1, but guess what—at 3:30 AM Saturday, they released the RTM version!!! For more and to download it (it’s free), see: http://blogs.msdn.com/robertbruckner/archive/2008/10/17/report-builder-20-release.aspx
Finally, thanks to Eben and Ahmed for arranging the event and EVERYONE who attended!
Today is NOT my day for things just working. Besides the demo gods eating every demo I did today and presenting me with excrement to work with, I found out that the super cool WSS audience targeting is broken in every browser except IE. There is no use in complaining, so the silver lining is that I do get a chance to solve the problem and learn something new about browsers.
First off, XmlHttpRequest is supported by all browsers, but the XML DOM implementation is not compatible—so even though you can get the data, you can’t work with it easily. The cause? Firefox and Chrome do not support the _selectNodes or _selectSingleNodes methods, while IE has unique methods that no other browser supports (depending on which camp you're in). _selectSingleNode is what I use to parse my results! To solve this, I found some code at http://km0.la/js/mozXPath/, which adds the methods to the JavaScript classes. This was great in theory, but it didn’t work because my XML had a default namespace being returned. The code didn’t work as selectSingleNode always returned null because it needed the namespace prefix on the XPath (e.g., /default:user), which IE can’t handle. So, that meant not only implementing a new resolver—which I found out about on developer.mozilla.org—but also doing a check and running two XPath queries.
Something I didn’t mention in the first post is security—and how secure or insecure this method is. Your biggest attack vector is that it runs client-side, and methods like LoadXmlDoc or even a length check on the username can be easily modified to show content for logged-in users to users who are not logged in. Basically, it is not secure, but that doesn’t mean it opened a security hole—you need to think about what is shown. In my case, I made sure only the bare minimum was displayed: links to other pages. If an attacker somehow gets these links, it doesn’t worry me because the change-password page—which only signed-in users can access—is protected by WSS’s security. So even if someone were to try accessing it, they would be denied! The page itself also has security measures in place to help prevent issues. The point I want to emphasize is that this is not a security model, but rather a model for a better user interface.
<script type="text/javascript">
// Created by RMacLean - for comments email drpsupport@bbd.co.za
// Partially from http://www.w3schools.com/XML/xml_http.asp
// Partially from http://en.wikipedia.org/wiki/Xmlhttprequest
// Partially from http://km0.la/js/mozXPath/
// Partially from http://developer.mozilla.org/en/Introduction_to_using_XPath_in_JavaScript#Implementing_a_User_Defined_Namespace_Resolver

// check for XPath implementation
if (document.implementation.hasFeature("XPath", "3.0")) {

// prototyping the XMLDocument.selectNodes
    XMLDocument.prototype.selectNodes = function(cXPathString, xNode) {
    if (!xNode) { xNode = this; }

    var oNSResolver = document.createNSResolver(this.ownerDocument == null ? this.documentElement : this.ownerDocument.documentElement);
    function resolver() {
        return 'http://schemas.saarchitect.net/ajax/2008/09/user';
    }

    var aItems = this.evaluate(cXPathString, xNode, resolver, XPathResult.ORDERED_NODE_SNAPSHOT_TYPE, null);
    var aResult = [];
    for (var i = 0; i < aItems.snapshotLength; i++) {
        aResult[i] = aItems.snapshotItem(i);
    }
    return aResult;
}

// prototyping the Element
    Element.prototype.selectNodes = function(cXPathString) {
    if (this.ownerDocument.selectNodes) {
        return this.ownerDocument.selectNodes(cXPathString, this);
    }
    else { throw "For XML Elements Only"; }
}

// prototyping the XMLDocument.selectSingleNode
    XMLDocument.prototype.selectSingleNode = function(cXPathString, xNode) {
    if (!xNode) { xNode = this; }
    var xItems = this.selectNodes(cXPathString, xNode);
    if (xItems.length > 0) {
        return xItems[0];
    }
    else {
        return null;
    }
}

// prototyping the Element
    Element.prototype.selectSingleNode = function(cXPathString) {
    if (this.ownerDocument.selectSingleNode) {
        return this.ownerDocument.selectSingleNode(cXPathString, this);
    }
    else { throw "For XML Elements Only"; }
};

}

// Provide the XMLHttpRequest class for IE 5.x-6.x:
if (typeof XMLHttpRequest == "undefined") XMLHttpRequest = function() {
    try { return new ActiveXObject("Msxml2.XMLHTTP.6.0"); } catch (e) { }
    try { return new ActiveXObject("Msxml2.XMLHTTP.3.0"); } catch (e) { }
    try { return new ActiveXObject("Msxml2.XMLHTTP"); } catch (e) { }
    try { return new ActiveXObject("Microsoft.XMLHTTP"); } catch (e) { }
    throw new Error("This browser does not support XMLHttpRequest.");
};

var xmlhttp;

function loadXMLDoc(url) {
    xmlhttp = new XMLHttpRequest();

    if (xmlhttp != null) {
        xmlhttp.onreadystatechange = state_Change;
        xmlhttp.open("GET", url, true);
        xmlhttp.send(null);
    }
    else {
        alert("Your browser does not support XMLHTTP.");
    }
}

function state_Change() {
    if (xmlhttp.readyState == 4) {// 4 = "loaded"
        if (xmlhttp.status == 200) {// 200 = OK
            var username = "";

            if (xmlhttp.responseXML.selectSingleNode('//user') == null) {
                username = xmlhttp.responseXML.selectSingleNode('//myns:user').getAttribute('username');
            }
            else {
                username = xmlhttp.responseXML.selectSingleNode('//user').getAttribute('username');
            }

            if (username.length > 0) {
                // user logged in
                document.getElementById('resultText').innerHTML = '<P><A href="/memberPages/changepassword.aspx">Change Password</A></P>';
            }
            else {
                // anonymous
                document.getElementById('resultText').innerHTML = '<P><A href="/Pages/signup.aspx">Signup</A><BR><A href="/Pages/forgotpassword.aspx">Lost Password</A></P>';
            }
        }
        else {
            alert("Problem retrieving XML data");
        }
    }
}

loadXMLDoc("/Pages/loggedinuser.aspx");
</script>

<span id="resultText">Loading...</span>
Recently I aged about a hundred years due to my intention to deploy the August 2008 release of the Podcasting Kit for SharePoint on a sub-site due to the fact that there is so much hard coded into it (you can vote on that link for the work item to be done to fix this) that expects it to be at the root. Being stubborn and trying to show my elite SharePoint skills to all around me, I did not let little things like hard-coded values stop me. No, I gave up a few years of my boyish good looks to get it working—and in the end, I did! It’s not elegant, but it works and should tide you over until the fixed release comes along.
First off, let me say how great the August release is compared to the July release—it’s great. I actually don’t think you could’ve got this to work on the July release; there’s that much cleanup and streamlining in it. One of the things they did was streamline the documentation from a monolithic single beast to a lot of smaller, edible chunks. This is also a double-edged sword for first-timers, because it means you go through the install doc and think you’re done… when you aren’t. But I’ll cover that later on.
For the tale, assume the following facts:
- SharePoint is deployed to a site available at http://intranet
- We want the Podcasting Kit to be available at http://intranet/sites/multimedia
- I have created a life jacket file, which contains versions of all the files I changed and may be of use to you. Note: I have not tested it, so it may not work. Best case is a simple find-and-replace and upload, and you’re in business—but worst case, you need to follow the steps to get your files done.
- I am insane, and this could all be wrong. My mind might have made me believe it works.
Now, I want to tell my tale of heroism in defeating bugs so that future crazy people don’t need to do this themselves. If you have the August 08 install guide and are following along (good idea—since that’s what I’m doing to write this), I assume you’ve done your prerequisites and have a site collection as a sub-site (i.e., http://intranet/sites/multimedia) and are at Installation Method #1 (Easy Method). Easy method—that in itself should be a sign of the devil which awaits, because anything labeled easy never is. What you need to do is run the install to the root site (i.e., ssm.exe install PKSFull.xml http://intranet) and then uninstall it (i.e., ssm.exe uninstall PKSFull.xml http://intranet). I know it seems pointless, but the installer doesn’t clean up well and leaves a few files behind (the key stuff it leaves are CSS, XSL, and some JS files). Having these files at root helps us later. Now run the installer again but now to your site collection (i.e., ssm.exe install PKSFull.xml http://intranet/sites/multimedia).
The next steps in the guide—ratings DB, media encoder, and feature activation—work as documented. The user interface steps also work as expected, but make sure you “fix” their links to have your site collection. Here are a few examples:
- SmartPhone access: Make the URL /sites/multimedia/mobilepages/pksmobilehome.aspx
- Upload Podcasts: Make the URL [/sites/multimedia/PKS Podcasts/NewForm.aspx?RootFolder=%2FPKS%20Podcasts&Source=/sites/multimedia/pages/pkshomepage.aspx](https://intranet/sites/multimedia/PKS Podcasts/NewForm.aspx?RootFolder=%2FPKS%20Podcasts&Source=/sites/multimedia/pages/pkshomepage.aspx)

Moving swiftly along, the master and welcome pages instructions should work fine—until the first big hurdle: the SmartPhone page, where the hard coding comes in. The PKS uses a special web part called the Content Query Override Web Part, which is like the out-of-the-box Content Query Web Part but allows access to properties you normally couldn’t get. However, the PKS team configured it on their side, and importing it ensures doom and destruction if you’re on a sub-site. One of the properties that’s hard-coded is the path to the web URL for the site. If you simply open pksmobilehome.aspx, find the weburl tag, and change it to your site path (in my case, /sites/multimedia) prior to uploading, as per the document, you’ll be fine and can continue through the document happily, following the sections on Profiles, Silverlight 2.0, Ratings and Commenting, External File Store, and Media Encoder Service—bringing yourself merrily to the Pages section.
Before heading into the Pages section, we need to fix the XSL files so they point correctly. You can find these in All Site Content → Style Library → XSL Style Sheets. Best is to switch to Explorer view, get all the files out, and open them in a text editor that allows Find & Replace across multiple files (I used Visual Studio—how developer of me) to fix the URLs. There are hundreds of URLs, so I suggest doing a find-and-replace to fix them. As I said earlier, all changed files are in the life jacket file, including these. It may be easier to use mine—you just need to search for /sites/multimedia and replace it with whatever your URL is. Use it, don’t use it—whatever. Once done, re-upload the files and then check each one in as a major version.
The reporting page works great, but you’ll be stuck at the podcasterdetail.aspx page because you can’t actually get to those settings. Again, this is due to the Content Query Override Web Part, which has been pre-configured incorrectly. To solve it, export the web part before editing, save it to disk, then open it in a text editor and fix the paths. The key properties are:
- ItemXslLink
- WebUrl
- MainXslLink
- ItemXslLinkOverride
- MainXslLinkOverride
- Xsl
Once done, upload the web part (either to the Web Part gallery or directly onto the page), and you should now be able to work with it successfully.
Moving to podcastdetail.aspx, ensure the URL is correct for the XSLT Override Location on the Content Rating-Review Results Web Part. You can skip steps 9–15 (about the Content Editor Web Part, which shows the edit link), since it references a JS file I haven’t yet found or fixed—it’ll point to the wrong URL and won’t work. If you fix it, let me know! Setting up the web connections and search should be fine. If you lack metadata properties (like in my case), please read the troubleshooting guide—you assumed too much and thought life was easy… easy install, all that!
That should take you to the end of the guide, but not the end of our tale. Remember the double-edged sword of splitting the documentation? The next step isn’t obvious: go through the How To Apply Security Settings file and follow it—otherwise, you’ll end up with lots of mess. Also, be aware of a bug in PKS that can prevent non-admin users from viewing/downloading content. See here for details.

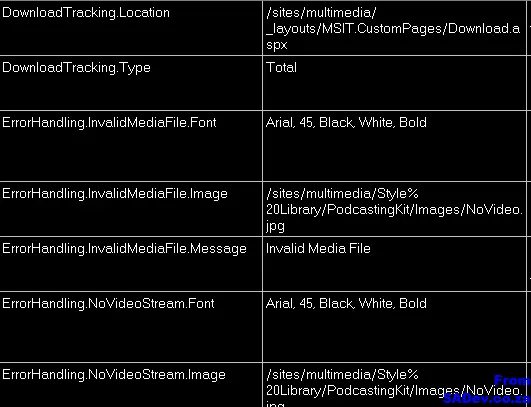
Now that security is sorted, we can fix the configuration. Go to All Site Content → Content Rating Configuration Settings. You were here earlier and need to ensure the item (the one with a GUID@GUID) points correctly. Then, head back to All Site Content → PKS Configuration Settings and set the following values to point to the correct URLs:
- DownloadTracking.Location
- ErrorHandling.InvalidMediaFile.Image
- ErrorHandling.NoVideoStream.Image
- Thumbnail.Custom.Images (note: you have multiple URLs in this value—get them all correct).
The main page pkshomepage.aspx suffers from the same issue as podcasterdetail.aspx—the Content Query Override Web Part is incorrectly configured. You can follow the same procedure (export, edit, upload) to solve it.
At this point, everything should work fine—but there’s a lurking bug. Anytime someone watches a video, it increments the download count stored in the PKS Podcasts list, which causes the File URL to update. Even though it originally pointed correctly to [/sites/multimedia/_layouts/MSIT.customfiles/Download.aspx](https://intranet/sites/multimedia/_layouts/MSIT.customfiles/Download.aspx), it gets updated to point to the root site again: [/_layouts/MSIT.customfiles/Download.aspx](https://intranet/_layouts/MSIT.customfiles/Download.aspx).


I’m not sure about all the circumstances around the bug (it doesn’t seem to affect admins). To fix it, I wrote a quick ASP.NET page that redirects requests back to the correct URL. The file is in the life jacket file and is called downloads.aspx. If you have a different sub-site path (e.g., not /sites/multimedia), open it and update the URL as needed.

Important Notes:
- You do not need Visual Studio for this. The file is a single ASPX page with inline code—the server will compile it at runtime.
- The fact that it points to a file called
realdownload.aspx is intentional.
Now, get to your SharePoint server (if you aren’t already) and navigate to: C:\Program Files\Common Files\Microsoft Shared\Web Server Extensions\12\TEMPLATE\LAYOUTS\MSIT.CustomPages. Rename the single file download.aspx to realdownload.aspx, then copy the download.aspx file from the life jacket file into this folder. Now, all requests will hit the custom file, which will redirect them back to the correct URL—fixing the bug.
Now, finally, you’re done! You can go through the workflow and series docs to get all your content up and (hopefully) enjoy your Podcasting Kit!
I want to thank a few people who helped me along: Michael Gannotti, Zlatan Dzinic, and of course the PKS team, who responded to my posts on the site!
This is a multi-part series. The other parts can be found at:
In Part I, we focused on getting Slide.Show to work with the Content Editor Web Part (CEWP). The next step is extracting the image information from the picture library so Slide.Show can display it. The first point to understand is how Slide.Show locates the images. It does this using a DataProvider, which is essentially an XML file reader. By default, it looks for a file named Data.XML in the same directory as the configuration file. However, this can be overridden with a custom DataProvider—for example, the Flickr provider used in Part I.
Unfortunately, there is no SharePoint DataProvider yet, so we have two options:
- Create a custom provider, or
- Format SharePoint data into a format that Slide.Show can natively process.
Both require development, but I prefer the second option. This way, I’m not heavily investing in Slide.Show itself—I’m investing in a tool to extract the data and then formatting it for Slide.Show. If a better solution emerges in the future, I can easily adapt the formatting part without major changes.
Another advantage is personal: I prefer C# development (which I’ll use for the provider) over JavaScript, thanks to Visual Studio’s robust documentation and tooling.
The Required XML Format
Slide.Show expects XML structured like this:
<data>
    <album ...>
        <slide .../>
        <slide .../>
        <slide .../>
        ...
    </album>
</data>
SharePoint doesn’t provide data in this exact format, so I wrote an ASP.NET page to handle this:
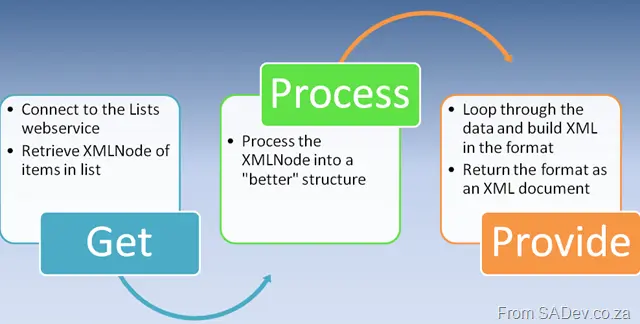
Step 1: Retrieving Data
The _Get_stage stage is straightforward: we connect to SharePoint’s Lists web service using the GetListItems method. The result is an XMLNode, which is tricky to work with due to:
- SharePoint’s heavy use of XML namespaces, making XPath queries cumbersome.
- The need for easier data manipulation before output.
For the first issue, I used John Wood’s solution to handle XMLNamespaceManager. The second issue led me to prefer C# over JavaScript for this task.
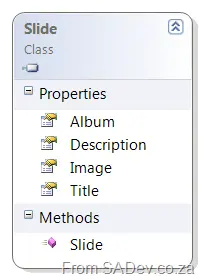
I converted the raw data into a simple class with slide properties, stored in a List<T> for easy LINQ queries (I avoid LINQ to XML due to SharePoint’s messy structure).
Step 2: Generating XML
The _Provide stage takes my List<T> of slides and builds an XMLDocument for output. The process isn’t complex—just looping through slides and constructing the XML—but returning it requires a detour into ASP.NET’s page lifecycle.
Instead of relying on Page_Load, I override Render to:
- Set
Response.ContentType = "text/xml" (informing the caller—Slide.Show in this case—that the response is XML). - Write the final XML using
Response.Write(XMLDocument.OuterXML).
With this in place, visiting the ASP.NET page should display the formatted XML.
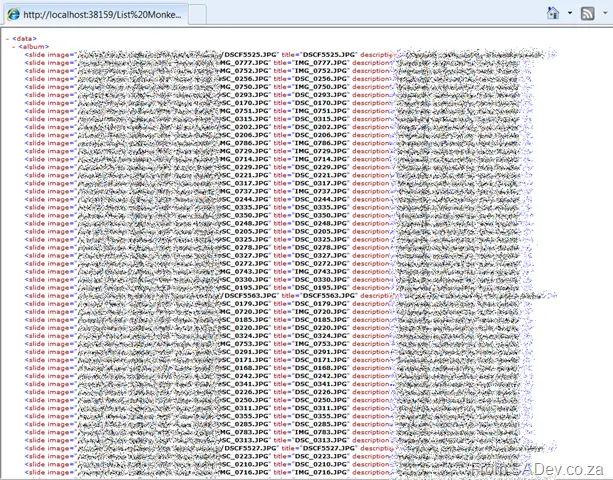
Reusability & Configuration
To make this reusable, I added:
- Security: Windows Authentication (ideal for intranet sites) via IIS configuration and
Lists.UseDefaultCredentials = true. - Query Parameters: Mandatory parameters for the Lists web service URL and picture library name/GUID, with optional filters:
view: Specifies a custom view (defaults to the default view).limit: Restricts the number of returned items (defaults to all).recurse: Toggles folder recursion (defaults to true).group: Organizes slides into albums by folder (defaults to false).random: Randomizes item order (defaults to true).
Example query: [http://sharepoint/addons/slideshow.aspx?url=http://sharepoint/site/_vti_bin/lists.asmx&list=Photo%20Gallery&group=true&random=false&limit=20](https://sharepoint/addons/slideshow.aspx?url=http://sharepoint/site/_vti_bin/lists.asmx&list=Photo%20Gallery&group=true&random=false&limit=20)
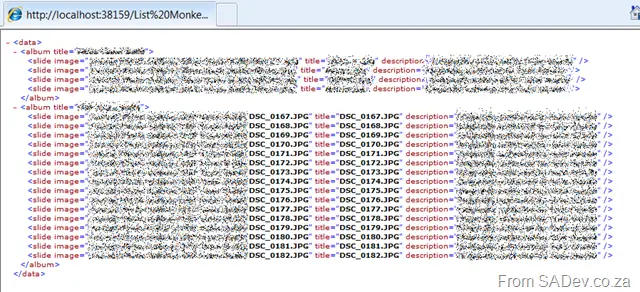
By default, this retrieves all images (across folders) in random order—a great fit for Slide.Show’s default settings (randomized display, large image sets).
The heavy lifting is done. The final steps—deploying the web app and configuring Slide.Show—are surprisingly simple and covered in Part III.
An email asking for help on a problem floated by me and I thought it was interesting enough to blog about. First of all, I had the following error message from the Microsoft Dynamics 365 CRM Exchange router:
#61042 - An error occurred while processing the outgoing e-mail message with subject "CRM ADMIN TEST MAIL CRM:0004015" for SMTP: http://crmserver/tenant/ for delivery through exchangeserver. System.Net.Mail.SmtpException: Mailbox unavailable. The server response was: 5.7.1 Client does not have permissions to send as this sender.
The guy asking the question was trying to figure out what was wrong with CRM because that’s where the error was coming from. The problem is that he was looking in the wrong place. If you read the error carefully, the most important part is the last bit:
The server response was: 5.7.1 Client does not have permissions to send as this sender.
It actually states that the server (not CRM, but Exchange) responded with the client not having permissions to send. This is a fairly common issue, and the resolutions fall into one of two options:
- The email address in the From field can’t be used because you don’t have permission to use it (obviously), and you merely need to change the address to one you do have permission to use.
- The second option is to enable SMTP authentication, which should give you the permissions to send mail.
I am a fan of virtualization—my comments on an earlier post about it being the future should be a giveaway. As such, I have a “few” VHDs around, and sometimes I have problems the out-of-the-box technology can’t solve. A few of these are:
- I sometimes need code, a sample, or a file to fix something that’s sitting in the VHD file. The pain here is that to do that, you need to boot up the VM, log in to it, find the file, and copy it to the host machine.
- As pointed out before, I work in a team that does not prescribe to a single best tool. I personally use Hyper-V, but that’s just me. VirtualPC is used by some who run Vista or XP, VMWare is popular (duh), and so is Xen—so how do I get my files to them?
- Sometimes I need to test something on a live system and require a VM of that system.
- Other times, I want to deploy what I’ve done on a VM to a physical machine.
All the above are just plain annoying, but thankfully there’s a program called WinImage! (It comes with a 30-day fully functional evaluation edition, so don’t worry if you need to test it out before buying.) So how does it solve my problems? (The numbering below matches the issues listed above.)
It allows you to open VHDs directly, as well as other formats like ISO or VMWare’s formats! It’s very simple to use—similar to most compression tools like WinRAR or WinZIP—so you just go to File → Open, select the VHD, and it displays the contents almost instantly (the 47GB one from the previous example in about 2 seconds on my standard-spec laptop). Now you browse it like any other file system, find the file, right-click, and hit Extract! There are even options to extract multiple files while keeping the folder structure.
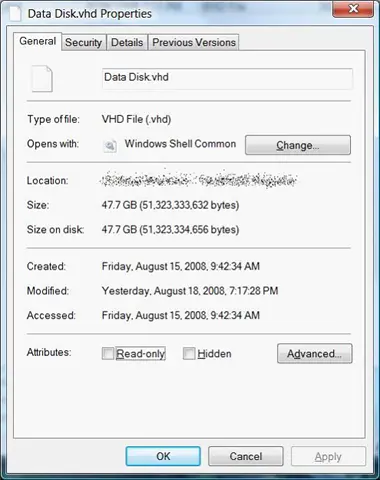
Moving between Hyper-V and VirtualPC is fine (VHD is compatible between them)—all I have to do is uninstall the additions before transferring it. I keep VirtualPC installed for this purpose, but that’s all it gets used for. WinImage lets me convert between VHD (Virtual Server, VirtualPC, and Hyper-V) and VMDK (VMWare). I can also convert from an IMA (image) file to VHD and VMDK, but not the other way around. Unfortunately, there’s nothing for Xen yet—but hopefully, as it becomes more widely used, we’ll see support for it.
I can rip an image of a real hard drive to a VHD or VMDK format! And since WinImage doesn’t need installation (it’s a single .exe that can run directly from a ZIP archive), it’s easy to get onto a server.
The same is true if I have an image—I can write it directly to a physical hard drive, so no more extracting, copying, and rebuilding. Once your environment works, just deploy it!
I have been spoiled for a long time by living in an Exchange environment, so when I recently had to use a POP3 environment (even if it was just temporarily), I felt like I had gone back 15 years. One of the reasons it feels like I have gone from Vista to Windows 3.1 is that Exchange pushes mail down (or at least that is how it appears to work—I’m no Outlook expert), so mail arrives instantly when someone sends it. Unfortunately, POP3 is pull-based and doesn’t come down until Outlook checks for mail. The horrible part is that by default it is configured to check only every 30 minutes 😒 That could mean if someone misses your check window (like they would know) you could wait almost forever for their mail.
Thankfully, you can change that. First, go to Tools → Options [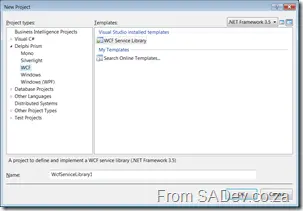 ]. Next, go to Mail Setup and click the Send/Receive button. [
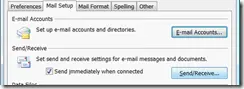 ]
]
By default, you should have one group (called All Accounts), and below that, there is an option to schedule an automatic send/receive every x minutes. In the picture below, you’ll see it is set to 1 minute, which really helps (close enough to instant that it doesn’t matter). However, if you are like me, you also use Outlook for RSS feeds, and that change will mean you will now be downloading feeds every 1 minute!
You can fix that easily by splitting RSS and email check times. To do that, click the Edit button and remove RSS from being included, then click OK. If you are a perfectionist (which you may gather I am from my picture below), you could also click Rename to make it easier. Next, click the New button and, instead of selecting Email, just include RSS. Click OK, and now you should have two Send/Receive groups.
You can now click on RSS in the list and set a separate interval for how often it should check (once an hour is good). Click Close, OK, and you are done 😊 [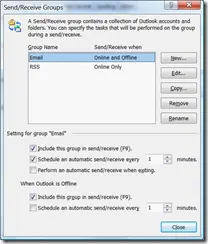
I work with great people who are open-minded (none of this "my brand is better than your brand" thinking), so much so that they are IMHO the driving force behind interoperability in South Africa. When I recently presented a session on Microsoft CRM and said that it couldn’t be used on other operating systems, Henk, our Linux expert, took it as a challenge to get it to work.
The main issue is that for MSCRM to work, it needs Internet Explorer—and it needs IE because of the million lines of JavaScript that exist, and a lot of it makes use of MSXML, which is not available cross-platform. Henk did some magic and found a program/tool/package called IE4Linux! What is IE4Linux?
IEs4Linux is the simpler way to have Microsoft Internet Explorer running on Linux (or any OS running Wine). No clicks needed. No boring setup processes. No Wine complications. Just one easy script, and you'll get three IE versions to test your sites. And it's free and open source.
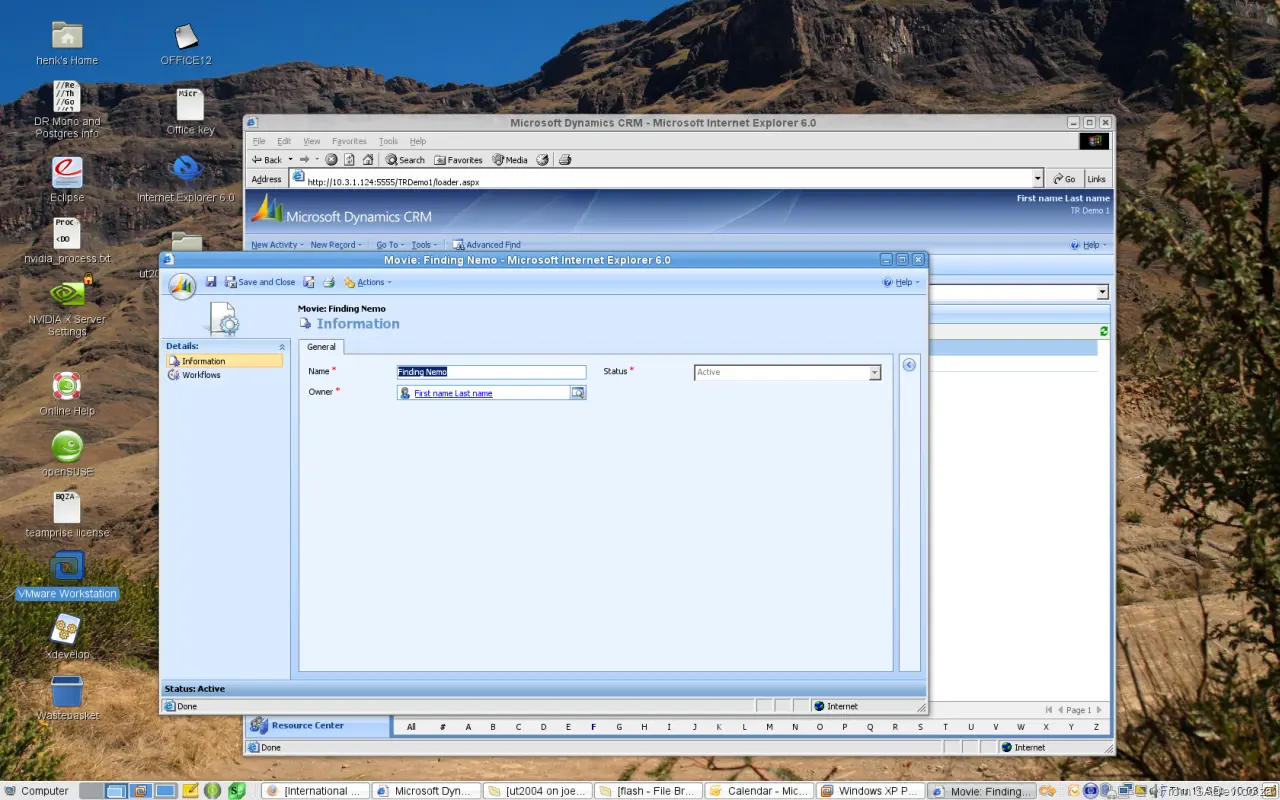
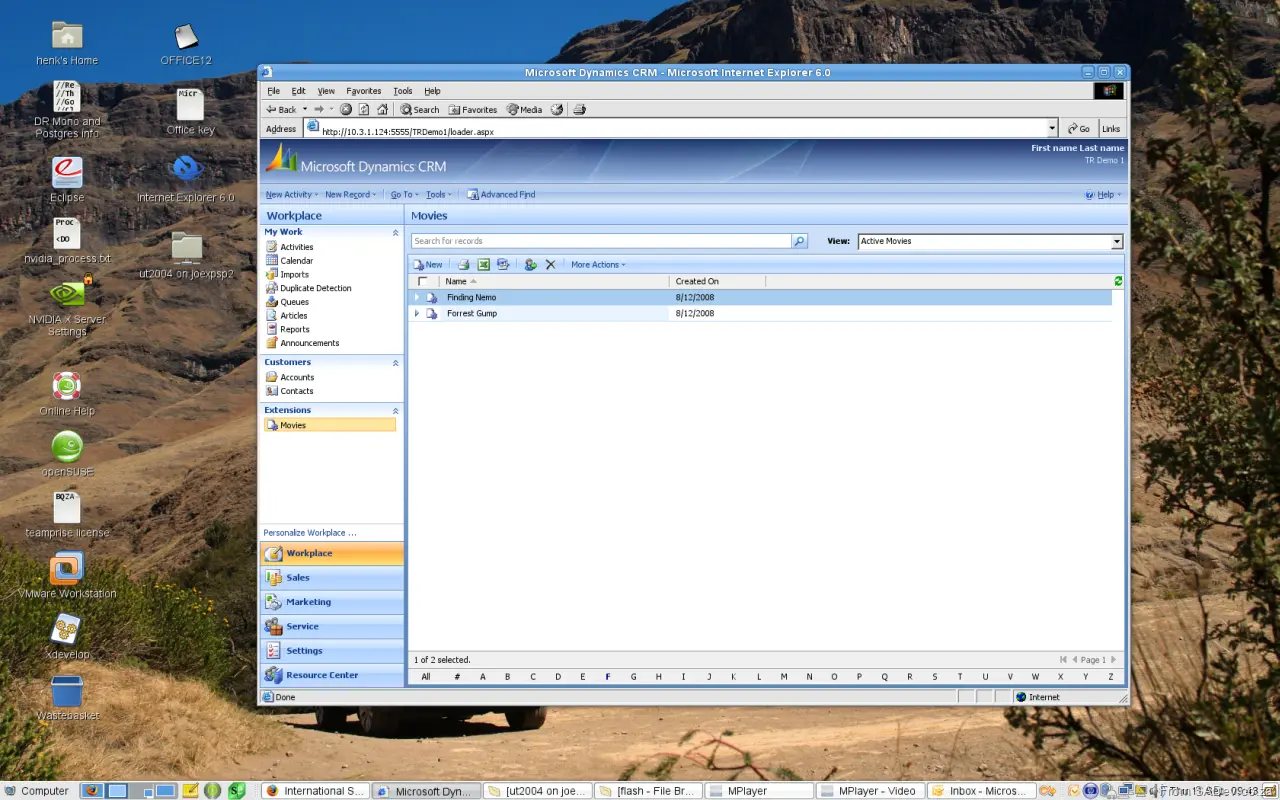
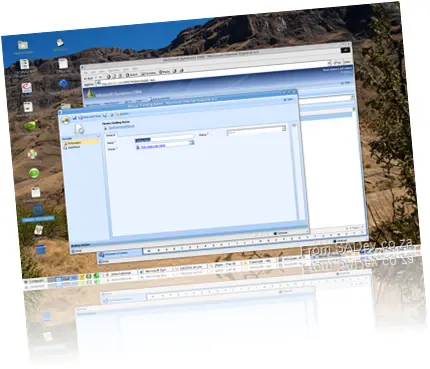
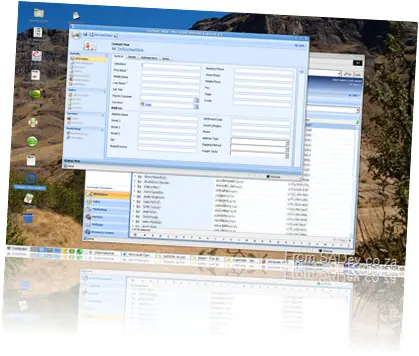
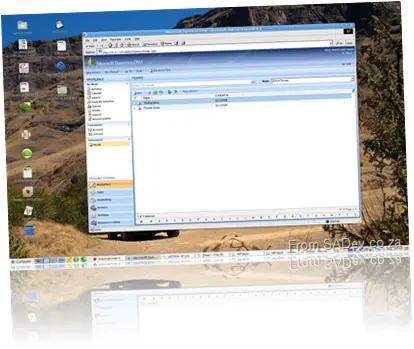
They mention three versions, which are 5.0, 5.5, and 6.0; however, 7.0 is in beta. Since MSCRM needs 5.5 or higher, it just might work! Henk did his magic to get it working, and I did mine (which was very easy—just making sure my VM was running and getting the firewall configured). Without much fuss, he got Microsoft CRM running on Linux!!! He has promised a whole post on IE4Linux, so if you want to know more, please watch his site; otherwise, enjoy the pictures taken from his Linux box below of MSCRM!
Virtualization is the way of the future—whether for demos, testing, or production systems—it is the future, and that means VHD files will be everywhere. However, VHD files grow and grow but never shrink because of how they’re designed to work. For example, if you put a 10GB file on a VHD, it expands the VHD by 10GB (for the disk), but if you delete a file, the space isn’t reclaimed automatically. This is fine for production systems (your VHDs live on a SAN with lots of disk—or they should, for a lot of good reasons). However, if it’s on your laptop for training, R&D, or sending to customers, being able to reclaim disk space can be valuable, and the advantage is that it can be done manually. So let me show you how it’s done in Hyper-V.
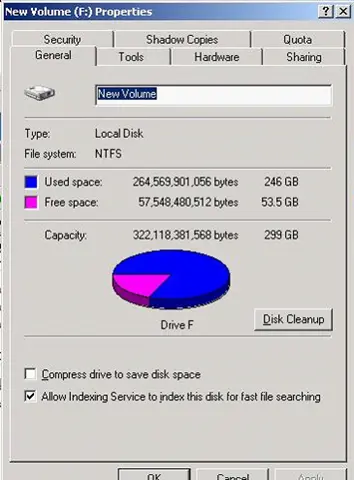
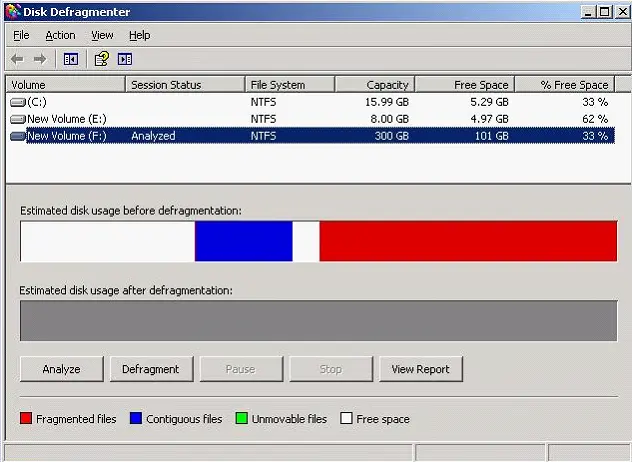
For this post, I have a VHD that contains an MSSQL database (MDF and LDF files). The disk space usage on the VHD looks like this:
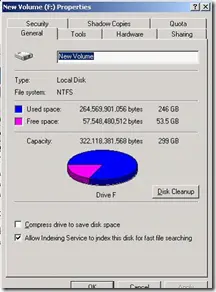
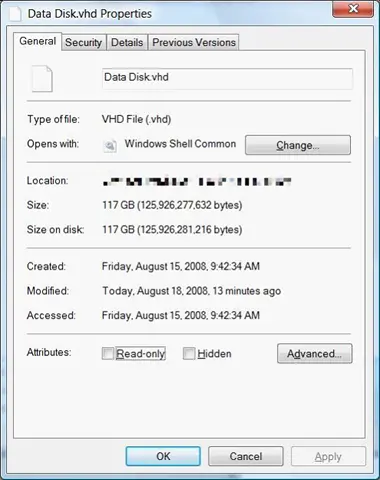
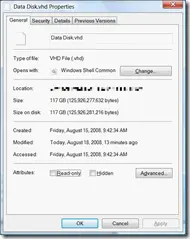
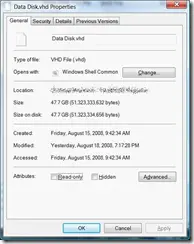
So the VHD is supposedly a max of 300GB, and I’ve never copied that much onto it. Right now, it contains a simple 53GB (plus some change). The actual VHD file on my laptop looks like this, using a whopping 117GB of real disk space. So there’s at least 64GB I could get back!
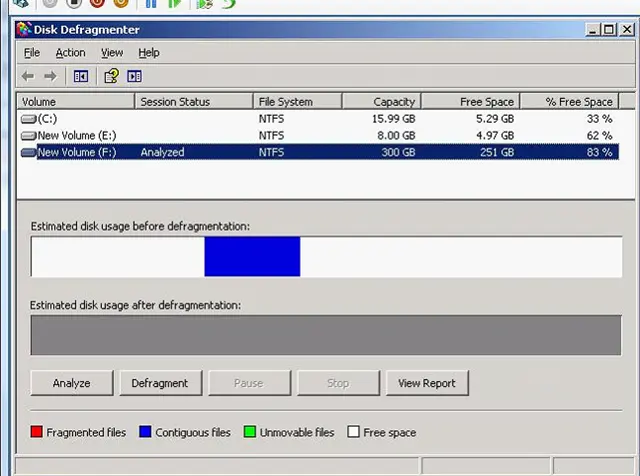
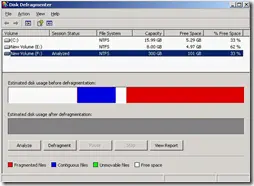
The first step in shrinking the disk is to defrag it inside the virtual machine, as the shrinking process only cleans space from the end of the disk. So if you have any data at the end (like I did—see below), you’ll need to remove it. Unfortunately, I had an “unmovable” piece of data—conveniently at the end of the disk—turning out to be the LDF file for the SQL database.
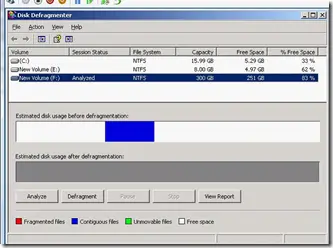
A quick truncate/empty of the LDF file (don’t do this in production) made it easier to defrag the disk—especially freeing up space at the end. Since I didn’t have much free time, I skipped the defrag and worked on the now-empty space available before the MDF (blue) file.
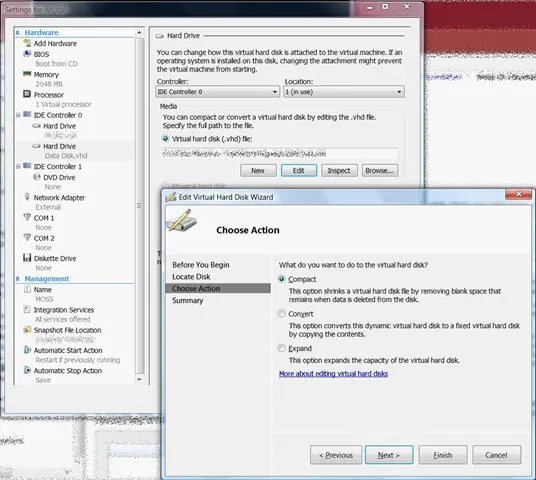
Step two: Shut down the VM, go to its settings, and select the disk settings, then click Edit. This will bring up the disk edit wizard, where you keep the first option selected: Compact.
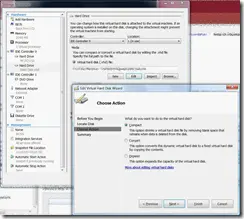
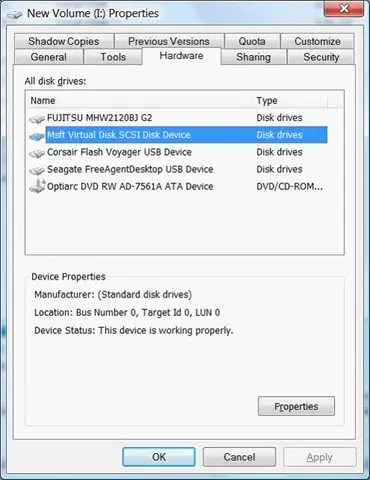
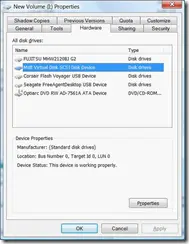
This is very cool—because it actually loads the VHD as a disk in the host operating system! In fact, you can browse and edit it (though I’d guess that might screw up the compact operation). This is similar to the VHDMount tool in Virtual Server. I’m not sure how to do this manually in Hyper-V yet, but it would be really cool to be able to do that.
After some time—let me rephrase that as a significant amount of time, which in my case took over six hours—the process finished, compacting the VHD to 60GB less!
First let me start with an introduction to set the scene, which could be summarized in 5 words😉 If you are in a hurry, skip below to the smiley face. So I started at my new employment at the beginning of the month and got a new laptop—a HP EliteBook 8510w (with all the top-end options, in case you care)—which gave me the chance to think about what OS to use. My focus at BB&D is primarily around Microsoft technologies, so using a Microsoft OS as my base OS made sense. I’ve used Vista for a long time and am happy with it, so that was my initial plan. However, since I’d be doing a lot of demos and R&D, I thought about the virtual machines I’d run and decided that running Windows Server 2008 would be better because I could then use Hyper-V for VMs and avoid the issues that plague Virtual PC (cough performance cough).
Summarized version: This is on Windows Server 2008. (Told you it was five words.)
Anyway, on this machine, I wanted to upload a bunch of files to a MOSS 2007 site, so I went to the action menu → File Upload, and—dum dum dum!—the multiple file upload was gone! So I switched to Cool Explorer View and tried dragging the files in that way—nice, quick, and WRONG! It was broken too 😒 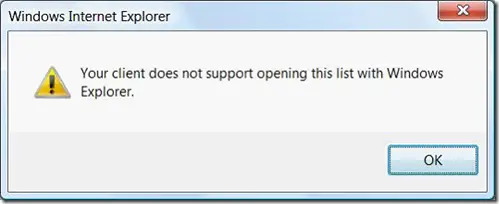
Since I really didn’t want to upload each file individually (it would take forever), I needed to fix one of them. This kicked off my usual troubleshooting: try this, Google that, tweak this—but nothing worked. After a while, I suspected the server might be the issue, but no one else reported problems, so it had to be my machine. More troubleshooting for my machine eventually revealed the root cause: Windows Server 2008 (for Hyper-V) was running 64-bit. In 64-bit Windows, there are two versions of Internet Explorer—a 32-bit and a 64-bit version—and I’d been using the 64-bit one. Switching to the 32-bit version fixed the problem instantly.