Intro
The final post in the series 😊 Get the code here, read comments on unit testing with DI, thanks, references, and further reading!
This is a multi-part series, so here’s the series guide in case you’re looking for the rest:
This is just a final post to wrap up the series—you really should use the above links to get the actual value out of it.
Download the Final Code
Click Here for Download
You’ll need 7-Zip to open it.
My View on Unit Testing with DI
What excited me about DI initially is that it makes testing—and unit testing, in particular—so much better. The problem with any system you want to test is that if it’s tightly coupled, you can’t unit test; you can only do integration testing. By following DI, you’re forced into a loosely coupled architecture, which means you can very easily test your individual components.
Let me give you a real-world story on this, which involved the enterprise system I mentioned in the very first post. It read from system A, did processing, and wrote to system B. The fact that it was tightly coupled meant I couldn’t even fake a message into the system—I had to generate real messages in system A and watch the flow of those messages. After a long time, I dropped MSMQ between system A, the processing, and system B to enable me to fake messages, but even then it wasn’t great—because I needed to rewrite so much code to talk to these new interfaces. Lastly, the processing took many hours to run to completion, so proper end-to-end testing took days. And if a crash occurred, certain processes needed to be started from scratch again.
If I’d used DI for the system, the first thing I could’ve done is written up two mock interfaces and swapped them with real ones using the config. That would mean I could simulate messages easily. System B was in fact MSCRM, which I couldn’t run on my machine (I was using a laptop with Windows XP at the time), so being able to mock the interface to it could’ve meant I could’ve worked on the processing engine without needing MSCRM—i.e., a VM or server.
Next, the tight coupling of methods meant the process had to run its full time, but if I’d implemented DI, I would’ve had each of the individual components of the processing separated out and could’ve tested them individually. Yes, end-to-end processing would still be needed, but I could’ve saved days of testing with this.
I haven’t actually done enough to write a post on this specific topic, so maybe once I’ve done more I’ll be more sure—or maybe I’ll just tell you I was wrong.
Thanks, References, and Further Reading
First off, thanks to you, the reader, for spending time on this series. I hope you drop me a mail / @rmaclean / comment if this has helped you or if you have any questions.
That said, I couldn’t have done it without the great posts I found on this subject—so here are my references:
(Note: Unity is an implementation of this—there are many out there. Scott Hanselman has a list at List of .NET Dependency Injection Containers / IoC.)
Lastly, I couldn’t end this series without linking to the definitive theory on DI by Martin "Wolfman" Fowler—Inversion of Control Containers and the Dependency Injection Pattern. This is a must-read for everyone.
The other must-read is Jacob Proffitt (The Runtime Blog), who is a .NET expert/guru—but not a fan of DI. The reality check you’ll get from him should help balance the DI fanboy crowds.
Recap + Intro
In part 1, we looked at the problem with just adding logging code and how it quickly gets messy. We also saw how the more loosely coupled the code is, the easier it is to effect changes painlessly. Then in part 2, we took that code and added Unity, giving us control via a config file as to what class our logging should use. In part 3, we saw some benefits of dealing with this overhead. Previously, we actually got our logging nicely sorted, but there were a few extra details worth mentioning, so here goes.
Note: You can get Unity with the Enterprise Library from the p&p group.
As I said in part 1:
What I am going to do is look at a practical approach to using Unity. I will not be going into DI or IoC—those topics have been covered far better by smarter people than me. If you want the theory, look elsewhere; if you want to get running with Unity, this is for you.
This is a multi-part series, so here’s the series guide in case you’re looking for the rest:
Circular References
DI is actually a minefield, since you can cause a circular reference easily, but injection makes that even easier to shoot yourself in the foot. What is a circular reference? The documentation (shockingly) describes it well:
- Objects generated through constructor injection that reference each other in their constructor parameters
- Objects generated through constructor injection where an instance of a class is passed as a parameter to its own constructor
- Objects generated through method call injection that reference each other
- Objects generated through property (setter) injection that reference each other
For example, the following code shows two classes that reference each other in their constructors:
public class Class1
{
    public Class1(Class2 test2) { ... }
}

public class Class2
{
    public Class2(Class1 test1) { ... }
}
It is the developer’s responsibility to prevent this type of error by ensuring that the members of classes they use with dependency injection do not contain circular references.
I’ve bolded that last line to emphasize the point. You’ve been warned!
Reflection
It’s not just interception that uses reflection—other parts do as well, so make sure you understand the security implications: http://msdn.microsoft.com/en-us/library/9syytdak.aspx
Interceptors
I used the TransparentProxyInterceptor in my previous post, but there are two others. Each has pros and cons, which the documentation summarizes in a simple table:
| Type | Description | Use |
|---|
| TransparentProxyInterceptor | An instance interceptor. The proxy is created using the .NET TransparentProxy/RealProxy infrastructure. | When the type to intercept is a MarshalByRefObject or when only methods from the type's implemented interfaces need to be intercepted. |
| InterfaceInterceptor | An instance interceptor. It can proxy only one interface on the object and uses dynamic code generation to create the proxy class. | When resolving an interface mapped to a type. |
| VirtualMethodInterceptor | A type interceptor. It uses dynamic code generation to create a derived class that gets instantiated instead of the original, intercepted class and to hook up the call handlers. | When only virtual methods need to be intercepted. |
Selection of a specific interceptor depends on your needs, as each has trade-offs. The following table summarizes the three interceptors and their advantages and disadvantages:
| Type | Advantages | Disadvantages |
|---|
| TransparentProxyInterceptor | Can intercept all methods of the target object (virtual, non-virtual, or interface). | The object must either implement an interface or inherit from System.MarshalByRefObject. If the marshal-by-reference object is not a base class, you can only proxy interface methods. The TransparentProxy process is much slower than a regular method call. |
| InterfaceInterceptor | Proxy supports casting to all interfaces or types of the target object. | It only intercepts methods on a single interface. It cannot cast a proxy back to the target object’s class or to other interfaces on the target object. |
| VirtualMethodInterceptor | Calls are much faster than the TransparentProxyInterceptor. | Interception only happens on virtual methods. You must set up interception at object creation time and cannot intercept an existing object. |
Rules
There is an entire rules framework available in interception, letting you enable/disable interception based on rules. The idea is that you annotate methods and then use the rules to filter which ones to actually run. As with everything in Unity, this can be configured in code or in the configuration file. Here’s a list of the rules (you can probably guess what they do by their names):
- The Assembly Matching Rule
- The Custom Attribute Matching Rule
- The Member Name Matching Rule
- The Method Signature Matching Rule
- The Namespace Matching Rule
- The Parameter Type Matching Rule
- The Property Matching Rule
- The Return Type Matching Rule
- The Tag Attribute Matching Rule
- The Type Matching Rule
And, as always, you can develop your own custom rules too.
Recap + Intro
In part 1, we looked at the problem with just adding logging code and how it quickly gets messy. We also explored how the more loosely coupled the code is, the easier it is to effect changes painlessly. Then, in part 2, we took that code and added Unity, giving us control via a config file over what class our logging should use. In part 3, we saw some benefits of dealing with this overhead, but now, dear reader, we get into the real issue I wanted to solve: having logging be more elegantly applied.
Note you can get Unity with the Enterprise Library from the p&p group.
As I said in part 1:
What I am going to do is look at a practical approach to using Unity. I will not be going into DI or IoC—those topics have been covered far better by people smarter than me. If you want the theory, look elsewhere. If you want to get running with Unity, this is for you.
This is a multi-part series, so here is the series guide in case you are looking for the rest:
Works better than Vader’s interceptor
(Once again, I shine my knowledge of Star Wars in a title… which maybe is why my friends and family think of me as a geek. I see myself as cool, but anyway, it’s not important to the post.)
The Mary Poppins bag-like magic that is happening with Unity is not just limited to controlling the lifetime of objects—it’s actually about controlling the objects themselves. There’s an invisible layer there that allows us to do something very smart called Interception. In this scenario, we intercept calls to classes or methods and apply additional code to them! Importantly, we can only do this with objects that Unity manages, so for our example, we can’t directly intercept the main method or the DoSomething method. However, we can refactor DoSomething into its own interface and class and have Unity own it, as shown below. The key changes from our previous code are:
- We create an instance of
IWorker and call its DoSomething method, passing it the logger (lines 14 and 15). - We introduce a new interface,
IWorker, and a new class based on it, called Worker (lines 43 to 55). - We’ve removed the
Lolzcat’s constructor from the logging (it’s no longer relevant).
class Program
{
    static IUnityContainer container = new UnityContainer();

    static void Main(string[] args)
    {
        UnityConfigurationSection section = (UnityConfigurationSection)ConfigurationManager.GetSection("unity");
        section.Containers.Default.Configure(container);

        ILogger logger = container.Resolve<ILogger>();

        logger.LogThis("Application started");

        IWorker worker = container.Resolve<IWorker>();
        worker.DoSomething("Robert", logger);

        Console.ReadKey();
        logger.LogThis("Application Completed");
    }
}

public interface ILogger
{
    void LogThis(string Message);
}

public class DebugLogger : ILogger
{
    public void LogThis(string Message)
    {
        System.Diagnostics.Debug.WriteLine(String.Format("{0}: {1}", DateTime.Now, Message));
    }
}

public class ConsoleLogger : ILogger
{
    public void LogThis(string Message)
    {
        Console.WriteLine("{0}: {1}", DateTime.Now, Message);
    }
}

interface IWorker
{
    void DoSomething(string Username, ILogger logger);
}

public class Worker : IWorker
{
    void IWorker.DoSomething(string Username, ILogger logger)
    {
        logger.LogThis("DoSomething Called with Username Parameter set to:" + Username);
        Console.WriteLine("Hello {0}", Username);
        logger.LogThis("DoSomething Completed");
    }
}
This runs nicely, but we’re still explicitly using the logger everywhere, and it’s not much better than before.
Setup the Interception
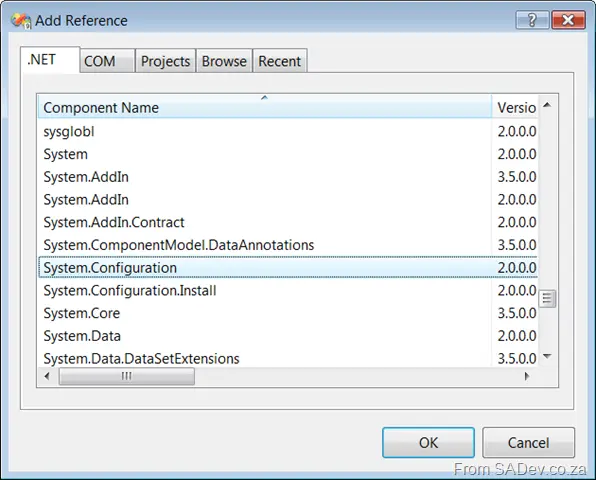
So to fix this, we’ll use interception—meaning we need to add two more references to our solution:
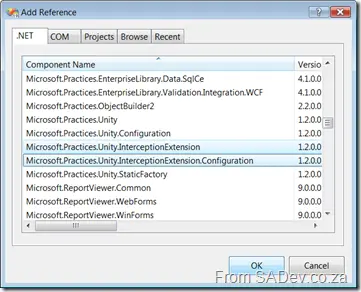
Next, we add a new using to our code:
using Microsoft.Practices.Unity.InterceptionExtension;
using System.Reflection;
Yes, that’s System.Reflection. We’ll use reflection to figure out values at runtime.
Now, we’ll add code to allow us to attribute our methods so that logging happens automatically. For those unfamiliar, I’m referring to the Decorator Pattern, which is familiar to anyone using WCF or LINQ, even if they didn’t know it by name.
To implement this, we first create another new class derived from HandlerAttribute. It simply provides the attribute to decorate our code with (lines 1 to 7 below). It returns a LoggingHandler (via the container), and LoggingHandler is the other new class. Here, we have a constructor that takes an instance of ILogger (lines 13 to 16) and an Invoke method (starting on line 18). The Invoke method is the core logic—it runs when we call our method. It starts by using reflection to determine parameters (lines 20 to 25), then calls the logger to write a pre-method message (line 27). Next, it calls getNext to get the next handler in the stack (in our case, there’s none). Note that the order of handlers is controlled via the Order parameter (line 34). After all handlers finish their pre-method processing, the method executes, and after getNext, we can perform post-method logging (line 29).
public class LoggingAttribute : HandlerAttribute
{
    public override ICallHandler CreateHandler(IUnityContainer container)
    {
        return container.Resolve<LoggingHandler>();
    }
}

public class LoggingHandler : ICallHandler
{
    ILogger _logger;

    public LoggingHandler(ILogger logger)
    {
        _logger = logger;
    }

    public IMethodReturn Invoke(IMethodInvocation input, GetNextHandlerDelegate getNext)
    {
        string parameters = string.Empty;
        for (int counter = 0; counter < input.Inputs.Count; counter++)
        {
            ParameterInfo parameterInfo = input.Inputs.GetParameterInfo(counter);
            parameters += parameterInfo.Name + " = " + input.Inputs[counter].ToString() + Environment.NewLine;
        }

        _logger.LogThis(String.Format("About to call {0} with the following parameters: {1}", input.MethodBase.Name, parameters));
        IMethodReturn msg = getNext()(input, getNext);
        _logger.LogThis(String.Format("Call completed to {0}", input.MethodBase.Name));

        return msg;
    }

    public int Order { get; set; }
}
One thing I want to highlight—it’s super cool! Note that I never explicitly specify what to pass into LoggingHandler’s constructor (it requires an ILogger parameter). Unity is smart enough to recognize that there’s an ILogger in the container and a matching constructor, so it automatically wires them together for you! 🎉
Now, how does this affect our other code? Our DoSomething method now looks like this:
[Logging]
void IWorker.DoSomething(string Username)
{
    Console.WriteLine("Hello {0}", Username);
}
If you think that, in a massive system, the ability to simply annotate methods to inject functionality is amazing—it cleans up the code and allows developer X to change logging without any code changes. Rock on!
Configuration for Interception
Our code doesn’t run yet because we need to add some details to the app.config file for the system to use configuration. First, we add an alias for our chosen method of interception on line 14. Then, we extend the Unity config (similar to how we extended the .NET config with a config section) on lines 28 to 30. Finally, we configure the extension we added. The most important part is how we link an interceptor to a class (lines 35 and 36). This allows us to enable or disable interception via configuration.
<?xml version="1.0" encoding="utf-8" ?>
<configuration>
    <configSections>
        <section name="unity" type="Microsoft.Practices.Unity.Configuration.UnityConfigurationSection, Microsoft.Practices.Unity.Configuration" />
    </configSections>

    <unity>
        <typeAliases>
            <typeAlias alias="Logger" type="BigSystem.ConsoleLogger, BigSystem"/>
            <typeAlias alias="ILogger" type="BigSystem.ILogger, BigSystem"/>
            <typeAlias alias="singleton" type="Microsoft.Practices.Unity.ContainerControlledLifetimeManager, Microsoft.Practices.Unity" />
            <typeAlias alias="Worker" type="BigSystem.Worker, BigSystem"/>
            <typeAlias alias="IWorker" type="BigSystem.IWorker, BigSystem"/>
            <typeAlias alias="transparentProxy" type="Microsoft.Practices.Unity.InterceptionExtension.TransparentProxyInterceptor, Microsoft.Practices.Unity.Interception" />
        </typeAliases>

        <containers>
            <container>
                <types>
                    <type type="ILogger" mapTo="Logger">
                        <lifetime type="singleton" />
                    </type>
                    <type type="IWorker" mapTo="Worker">
                        <lifetime type="singleton" />
                    </type>
                </types>

                <extensions>
                    <add type="Microsoft.Practices.Unity.InterceptionExtension.Interception, Microsoft.Practices.Unity.Interception" />
                </extensions>

                <extensionConfig>
                    <add name="interception" type="Microsoft.Practices.Unity.InterceptionExtension.Configuration.InterceptionConfigurationElement, Microsoft.Practices.Unity.Interception.Configuration">
                        <interceptors>
                            <interceptor type="transparentProxy">
                                <default type="IWorker"/>
                            </interceptor>
                        </interceptors>
                    </add>
                </extensionConfig>
            </container>
        </containers>
    </unity>
</configuration>
And that’s it! It’s been a long post, so I won’t go into specifics of the interception type here. I’ll cover that in a supplementary post next.
Recap + Intro
In part 1 we looked at the problem with just adding logging code and how it quickly gets messy, and we looked at how the more loosely coupled the code is, the easier it is to effect changes painlessly. Then in part 2 we took that code and added Unity, which gave us control via a config file as to what class our logging should use. Now we are going to look at a benefit of having this Mary Poppins bag of magic controlled for us.
Note you can get Unity with the Enterprise Library from p&p group.
As I said in part 1:
What I am going to do is look at a practical approach to using Unity. I will not be going into DI or IoC—those topics have been covered much better by people smarter than me. If you want the theory, look elsewhere. If you want to get running with Unity, this is for you.
This is a multi-part series, so here is the series guide in case you are looking for the rest:
The time of your life
In our code we created a global variable for the logging and just called that—but that isn’t always a good idea. Logging is a poor example of this; security is a better one. If you wanted to do a security check in some methods but not others, why waste time with a global variable? Why not reach into the bag each time it’s needed and pull one out? The problem can come in when performance drops because you’re calling the constructor each time you need the object. The reality is, this issue was solved years ago with the Singleton pattern.
So can we apply that to Unity? Yes—Unity is smart enough to give us a way to do that thanks to its built-in lifetime management! To demo this, I’ve modified the code from part 2 as follows:
- Removed the global variable for the logger and replaced it with a global variable for the container (line 3 below).
- In
_DoSomething, I now ask for a logger at the start (line 7 below). - I got a Lolzcat to add a constructor to my
_ConsoleLogger class to slow it down.😉 Lines 45–49. - A new
using was added for System.Threading so we could use Thread.Sleep on line 48.
class Program
{
  static IUnityContainer container = new UnityContainer();

  static void DoSomething(string Username)
  {
    ILogger logger = container.Resolve<ILogger>();
    logger.LogThis("DoSomething Called with Username Parameter set to:" + Username);
    Console.WriteLine("Hello {0}", Username);
    logger.LogThis("DoSomething Completed");
  }

  static void Main(string[] args)
  {
    UnityConfigurationSection section = (UnityConfigurationSection)ConfigurationManager.GetSection("unity");
    section.Containers.Default.Configure(container);
    ILogger logger = container.Resolve<ILogger>();
    logger.LogThis("Application started");
    DoSomething("Robert");
    Console.ReadKey();
    logger.LogThis("Application Completed");
  }
}

public interface ILogger
{
  void LogThis(string Message);
}

public class DebugLogger : ILogger
{
  public void LogThis(string Message)
  {
    System.Diagnostics.Debug.WriteLine(String.Format("{0}: {1}", DateTime.Now, Message));
  }
}

public class ConsoleLogger : ILogger
{
  public ConsoleLogger()
  {
    Console.WriteLine("I iz in yourz codez, slowingz its downz");
    Thread.Sleep(5000);
  }

  public void LogThis(string Message)
  {
    Console.WriteLine("{0}: {1}", DateTime.Now, Message);
  }
}
What happens if my code runs slowly now and the Lolzcat message appears twice (since I created the object twice)? If I assume that it’s just an example of the overhead of the constructor—which it is—and that I need to live with it at least once, implementing the singleton pattern is the solution. To do this actually means two lines of changes to the app.config (one line if you want to be messy). First, I add a new type alias for the _ContainerControlledLifetimeManager_, which I’ve called singleton (line 11 below). Then, I expand my type with a lifetime tag linking back to it (line 18 below).
<?xml version="1.0" encoding="utf-8" ?>
<configuration>
  <configSections>
    <section name="unity" type="Microsoft.Practices.Unity.Configuration.UnityConfigurationSection, Microsoft.Practices.Unity.Configuration" />
  </configSections>

  <unity>
    <typeAliases>
      <typeAlias alias="Logger" type="BigSystem.ConsoleLogger, BigSystem" />
      <typeAlias alias="ILogger" type="BigSystem.ILogger, BigSystem" />
      <typeAlias alias="singleton" type="Microsoft.Practices.Unity.ContainerControlledLifetimeManager, Microsoft.Practices.Unity" />
    </typeAliases>

    <containers>
      <container>
        <types>
          <type type="ILogger" mapTo="Logger">
            <lifetime type="singleton" />
          </type>
        </types>
      </container>
    </containers>
   </unity>
</configuration>
Now I just rerun my application, and it runs twice as fast with only one Lolzcat message, since the container (the magic bag) has now created the object once. When I ask for it a second time, it provides the already created one! This is an amazingly useful system because it’s per mapping, and out of the box are three lifetime managers, and you can build your own.
For the sake of ease, here’s a copy-paste from the documentation on those three lifetime managers:
ContainerControlledLifetimeManager Unity returns the same instance of the registered type or object each time you call the Resolve or ResolveAll method or when the dependency mechanism injects instances into other classes. This lifetime manager effectively implements a singleton behavior for objects. Unity uses this lifetime manager by default for the RegisterInstance method if you do not specify a different lifetime manager. If you want singleton behavior for an object that Unity creates when you use the RegisterType method, you must explicitly specify this lifetime manager. The behavior is as follows:
- If you used the RegisterType method to register a type, Unity creates a new instance of the registered type during the first call to the Resolve or ResolveAll method or when the dependency mechanism injects instances into other classes. Subsequent requests return the same instance.
- If you used the RegisterInstance method to register an existing object, Unity returns this instance every time you call the Resolve or ResolveAll method or when the dependency mechanism injects instances into other classes.
ExternallyControlledLifetimeManager This lifetime manager allows you to register type mappings and existing objects with the container so that it maintains only a weak reference to the objects it creates when you call the Resolve or ResolveAll method or when the dependency mechanism injects instances into other classes based on attributes or constructor parameters within that class. Unity returns the same instance of the registered type or object each time you call the Resolve or ResolveAll method or when the dependency mechanism injects instances into other classes. However, the container does not hold onto a strong reference to the object after it creates it, which means the garbage collector can dispose of the object if no other code is holding a strong reference to it.
PerThreadLifetimeManager Unity returns, on a per-thread basis, the same instance of the registered type or object each time you call the Resolve or ResolveAll method or when the dependency mechanism injects instances into other classes. This lifetime manager effectively implements a singleton behavior for objects on a per-thread basis. PerThreadLifetimeManager returns different objects from the container for each thread. The behavior is as follows:
- If you used the RegisterType method to register a type, Unity creates a new instance of the registered type the first time the type is resolved in a specified thread, either to answer a call to the Resolve or ResolveAll methods for the registered type or to fulfill a dependency while resolving a different type. Subsequent resolutions on the same thread return the same instance.
- Using the RegisterInstance method to register an existing object results in the same behavior as if you just registered the lifetime container with RegisterType. Therefore, it is recommended that you do not use the RegisterInstance method to register an existing object when using the PerThreadLifetimeManager.
- PerThreadLifetimeManager returns the object desired or permits the container to create a new instance if no such object is currently stored for the current thread. A new instance is also created if called on a different thread than the one that set the value. This lifetime manager does not dispose of the instances it holds.
Recap + Intro
In part 1, we looked at the problem with simply adding logging code and how it quickly becomes messy. We also explored how the more loosely coupled the code is, the easier it is to effect changes painlessly. Now, we’ll take that “nicer” code (compared to the first version) and integrate Unity into the mix. Note: You can get Unity with the Enterprise Library from the p&p group.
As I mentioned in part 1:
What I’m going to do is walk through a practical approach to using Unity. I won’t delve into DI or IoC, as people smarter than me have covered those topics far better. If you want theory, look elsewhere—if you want to get running with Unity, this is for you.
This is a multi-part series, so here’s the series guide in case you’re looking for the rest:
Applying Unity
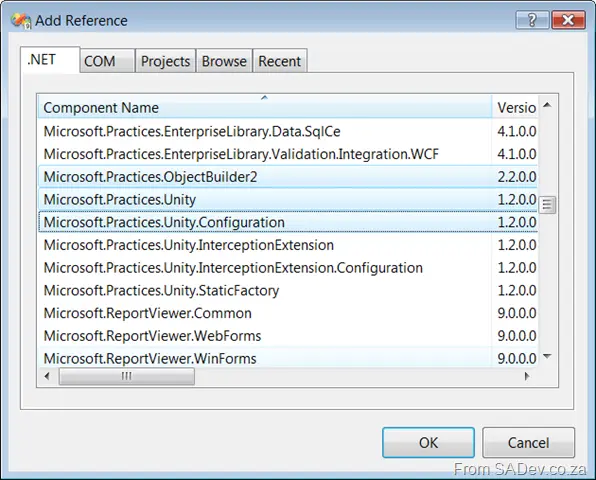
The first step to using Unity is setting it up. To do this, you need to add three references to your solution (highlighted below):
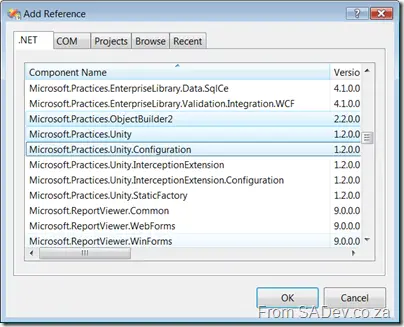
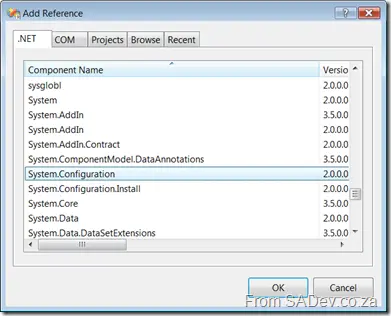
Unity has two configuration options: one in code and one in an external configuration file (typically your app/web.config). Both serve their purpose, but for this series, I’ll use the configuration file—which means you’ll also need to add a reference to:
I generally prefer the config file approach in production while using the in-code configuration for unit tests (often to override config settings).
Now, add the references to your code:
using System.Configuration;
using Microsoft.Practices.Unity;
using Microsoft.Practices.Unity.Configuration;
In the Main method of your application, I’ll create an instance of a UnityContainer (line 21 below). Think of it as a “magic bag”—you reach in, specify what you want, and it delivers it, just like Mary Poppins. Before doing that, we configure it to read the settings (lines 23–24) and then pull out the logger (line 26). Note that we do not manually instantiate a logger (as we did before)—instead, resolving it from the container creates it.
   1: using System;
   2: using System.Configuration;
   3: using Microsoft.Practices.Unity;
   4: using Microsoft.Practices.Unity.Configuration;

   5:
   6: namespace BigSystem
   7: {
   8:     class Program
   9:     {
  10:         static ILogger logger;

  11:         static void DoSomething(string username)
  12:         {
  13:             logger.LogThis($"DoSomething called with Username Parameter set to: {username}");
  14:             Console.WriteLine($"Hello {username}");
  15:             logger.LogThis("DoSomething completed");
  16:         }

  17:         static void Main(string[] args)
  18:         {
  19:             IUnityContainer container = new UnityContainer();

  20:             UnityConfigurationSection section =
  21:                 (UnityConfigurationSection)ConfigurationManager.GetSection("unity");
  22:             section.Containers.Default.Configure(container);

  23:             logger = container.Resolve<ILogger>();

  24:             logger.LogThis("Application started");
  25:             DoSomething("Robert");
  26:             Console.ReadKey();
  27:             logger.LogThis("Application completed");
  28:         }
  29:     }

  30:     public interface ILogger
  31:     {
  32:         void LogThis(string message);
  33:     }

  34:     public class DebugLogger : ILogger
  35:     {
  36:         public void LogThis(string message)
  37:         {
  38:             System.Diagnostics.Debug.WriteLine($"{DateTime.Now}: {message}");
  39:         }
  40:     }

  41:     public class ConsoleLogger : ILogger
  42:     {
  43:         public void LogThis(string message)
  44:         {
  45:             Console.WriteLine($"{DateTime.Now}: {message}");
  46:         }
  47:     }
  48: }
Finally, we dive into the app.config (add one if you’re following along) to configure Unity.
Unity Config
Start by adding a configSection to register Unity (lines 3–5). Then, on line 7, open the <unity> tag. The first key element is <typeAliases> (line 8). I recommend using type aliases—they let you map a type (e.g., BigSystem.ILogger) to a friendly name. In this example, it’s minor (since we could directly reference ILogger on line 16), but as your solution grows, type aliases become invaluable for avoiding tedious find-and-replace operations.
Lines 9–10 alias the DebugLogger and ILogger to friendly names. On line 13, we define the <containers> section, which holds settings for a container (in this case, our single unnamed container). Inside, <types> (line 15) maps interfaces to their implementing classes. When we call container.Resolve<ILogger>() (line 23 in the code above), Unity knows which class to return.
   1: <?xml version="1.0" encoding="utf-8" ?>
   2: <configuration>
   3:     <configSections>
   4:         <section name="unity"
   5:                  type="Microsoft.Practices.Unity.Configuration.UnityConfigurationSection,
   6:                  Microsoft.Practices.Unity.Configuration" />
   7:     </configSections>

   8:     <unity>
   9:         <typeAliases>
  10:             <typeAlias alias="logger" type="BigSystem.DebugLogger, BigSystem" />
  11:             <typeAlias alias="ILogger" type="BigSystem.ILogger, BigSystem" />
  12:         </typeAliases>

  13:         <containers>
  14:             <container>
  15:                 <types>
  16:                     <type type="ILogger" mapTo="logger" />
  17:                 </types>
  18:             </container>
  19:         </containers>
  20:     </unity>
  21: </configuration>
When you run the code, it logs to Visual Studio’s Output window! If you change line 10 to use ConsoleLogger instead:
<typeAlias alias="logger" type="BigSystem.ConsoleLogger, BigSystem" />
It will now log to the console.
This isn’t revolutionary yet—we’ve just made it possible to switch implementations externally without recompiling. But Unity truly shines in part 4, where we’ll unlock its full potential. For now, we’re moving in the right direction!
Welcome to the first part in my series on using Unity, which is a Dependency Injection or Inversion of Control tool/framework/thing from the p&p group. It’s a big and (over)complicated topic, so if what I have just said means nothing, fear not—it will all make sense soon. I have broken this into a series to make it easier to digest. What I am going to do is look at a practical approach to using Unity. I will not be going into DI or IoC—those topics have already been covered better by smarter people than me (links in Part 6). If you want the theory, look elsewhere; if you want to get running with Unity, this is for you.
This is a multi-part series, so here’s the series guide in case you’re looking for the rest:
The Problem
A few years back, I was developing an enterprise solution for a bank that integrated MSCRM](https://www.microsoft.com/dynamics/crm/default.mspx) into a number of systems—and so I needed to make sure I did logging (that’s what enterprise apps have, right?). Initially, I had a simple “write to text file” logging system, which worked fine on my machine. That is, until we started testing, ramped up usage, and hit concurrency and locking issues. That prompted me to rip out all the logging and use the logging within System.Diagnostics.Trace, as it seemed like it would work better—and it did, for a long time. At some point, I was pulled back into the project (I had left it for a while) and needed to change the logging to use the p&p [Enterprise Library logging. It was only then that I stopped calling System.Diagnostics.Trace directly in each place for logging and started calling a custom method. This is what it sort of looked like—except, I had many more parameters on the logging (log level, source component, etc.)—and we logged every time something changed, not just entry and exit:
public void DoSomething()
{
LogThis("Do Something Start");
LogThis("Do Something End");
}
When I changed it out, I did some number-crunching and realized that 40% of all the lines of code were these logging calls! I remember thinking how proud I was of my logging skills. Nowadays, I look back at that and laugh—not because I did logging, but because of how much code was spent on it and how tightly coupled it was. So how could I do it better today? Well, through a principle called Dependency Injection and an implementation of it called Unity (from the p&p team in their Enterprise Library).
Note: I’m using logging as the problem to solve, but really, DI can be applied anywhere.
I must admit that Unity is anything but simple—it’s one of the hardest things I’ve had to learn in a while. What made it tough was understanding the documentation, which enables you to learn Unity, but you need to understand Unity first to understand the documentation—talk about a catch-22! It’s odd because other blocks in EntLib are easy to get up and running, but with Unity, the samples are confusing and the documentation even more so. In the end, some search kung fu + luck + patience seems to be what’s needed to get through it. That said, I feel a simple series of blog posts may help others out—which is exactly what this is!
Starting Block
A special note: this series is heavy with code, making the articles look long—but actually, I’m repeating the code each time so you can compare the changes easily.
Let’s start with a simple application as our base to make it clear what we have and what we’ll change to get Unity working. As those who attend any of my sessions know, I love console apps—so I’ve whipped up a simple one that writes to the screen. The code looks like this:
using System;

namespace BigSystem
{
    class Program
    {
        static void DoSomething(string Username)
        {
            Console.WriteLine("Hello {0}", Username);
        }

        static void Main(string[] args)
        {
            DoSomething("Robert");
            Console.ReadKey();
        }
    }
}
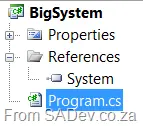
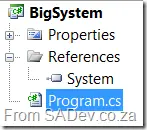
And the solution looks like this (note the references—super clean):
 View full image
Now, using my “enterprise skills” from earlier, we add some logging like so:
static void LogThis(string Message)
{
    System.Diagnostics.Debug.WriteLine(String.Format("{0}: {1}", DateTime.Now, Message));
}

static void DoSomething(string Username)
{
    LogThis("DoSomething Called with Username Parameter set to:" + Username);
    Console.WriteLine("Hello {0}", Username);
    LogThis("DoSomething Completed");
}

static void Main(string[] args)
{
    LogThis("Application started");
    DoSomething("Robert");
    Console.ReadKey();
    LogThis("Application Completed");
}
Right, so that code isn’t bad—it works, which makes the (imaginary) customer happy. But it’s also not good, because if we want to change anything, it’s a huge issue—likely solved by a global find-and-replace. A better approach would be to extract logging into a separate class that implements an interface. That way, we create the class once and change it in a single place to affect all the code. So, it would look like this:
class Program
{
    static ILogger logger = new DebugLogger();

    static void DoSomething(string Username)
    {
        logger.LogThis("DoSomething Called with Username Parameter set to:" + Username);
        Console.WriteLine("Hello {0}", Username);
        logger.LogThis("DoSomething Completed");
    }

    static void Main(string[] args)
    {
        logger.LogThis("Application started");
        DoSomething("Robert");
        Console.ReadKey();
        logger.LogThis("Application Completed");
    }
}

public interface ILogger
{
    void LogThis(string Message);
}

public class DebugLogger : ILogger
{
    public void LogThis(string Message)
    {
        System.Diagnostics.Debug.WriteLine(String.Format("{0}: {1}", DateTime.Now, Message));
    }
}
Note the logger constructor and the interface/class below. The reason this is powerful is that if I wanted to change this to output to the console, I could spin up a new class and just change the constructor for logger, as shown below:
class Program
{
    static ILogger logger = new ConsoleLogger();

    static void DoSomething(string Username)
    {
        logger.LogThis("DoSomething Called with Username Parameter set to:" + Username);
        Console.WriteLine("Hello {0}", Username);
        logger.LogThis("DoSomething Completed");
    }

    static void Main(string[] args)
    {
        logger.LogThis("Application started");
        DoSomething("Robert");
        Console.ReadKey();
        logger.LogThis("Application Completed");
    }
}

public interface ILogger
{
    void LogThis(string Message);
}

public class DebugLogger : ILogger
{
    public void LogThis(string Message)
    {
        System.Diagnostics.Debug.WriteLine(String.Format("{0}: {1}", DateTime.Now, Message));
    }
}

public class ConsoleLogger : ILogger
{
    public void LogThis(string Message)
    {
        Console.WriteLine("{0}: {1}", DateTime.Now, Message);
    }
}
This is great—but to change the type of logger, I still need to change the code. Wouldn’t it be better if:
- I could specify in a configuration file what should be used?
- Instead of instantiating a logger (like with the constructor), I could have a central “bag” where code could ask for a logger?
This is exactly what Unity provides at a basic level—and we’ll implement it in the next post. Trust me, it goes much further and becomes much more powerful.
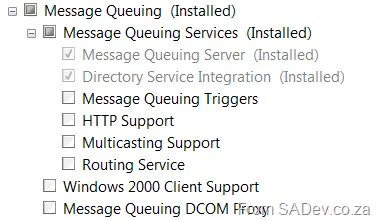
Yesterday I needed to install MSMQ on my laptop, which runs Windows Server 2008—a choice that wasn’t as logical as it first appeared. I simply fired up the Server Manager tool, went to Features, selected Message Queuing, and clicked Next. However, my code kept giving me an error:
“This operation is not supported for Message Queuing installed in workgroup mode.”
So I went to find out what this meant, and it turns out MSMQ has two modes: workgroup and domain. Domain mode is the “yes, you can” mode, where everything works, while workgroup mode has restrictions:
The following restrictions exist when using Message Queuing in workgroup mode:
- Computers in workgroup mode require direct connectivity with a destination computer and only support direct message transmission. Messages sent by such computers cannot be routed.
- There is no access to Active Directory Domain Services. As such, you can create and manage private queues only on a local computer. You can view the list of private queues on another computer, and the messages in them, using the Computer Management snap-in. For information about managing queues on remote computers, see Verwalten von Warteschlangen auf anderen Computern. You cannot view or manage public queues or any other information in Active Directory Domain Services. You can, however, send messages to or retrieve messages from private queues if there is direct connectivity.
- Internal certificates cannot be used for sending authenticated messages; an external certificate must be used. For more information about user certificates, see User Certificates.
- Messages cannot be encrypted. For more information about encryption, see Encryption for Message Queuing.
- There is no support for dependent clients. For more information about restrictions on the deployment of dependent clients, see Dependent Clients.
- Cross-platform messaging is not supported. For more information, see Cross-Platform Messaging.
That is taken from the helpful TechNet page Deploying in Workgroup Mode, which also states:
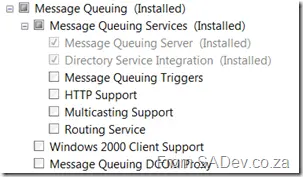
The default installation setting is that the Directory Service Integration feature is installed.
Oddly enough, though, that is not what I got. In fact, when I went to check, Directory Service Integration had not been installed—even though I was on a domain (and connected to the network at the time)! To fix it, I had to go back to the Server Manager tool, Features, Message Queuing, and manually select it.
Being on the southern tip of the world—and with the slowest bandwidth anywhere (confirmed by Scott himself)—we seldom get the greats like Scott Hanselman out to talk to us, let alone for free, and when he is on holiday… but that’s what the S.A. Developer community got last night, and what a night it was! He spoke last night on MVC, and I made some notes I thought I would share.
The first concept is that:
- ASP.NET > Web Forms
- ASP.NET > MVC
It’s an interesting way of thinking that ASP.NET isn’t just Web Forms, since we normally use those two terms interchangeably. ASP.NET is a framework for building web applications; if we use Web Forms on that framework, it’s a choice, not a requirement. Web Forms, in itself, is a lie—it tries to make us believe the web is stateful, so we get the RAD/VB6 experience for development. The problem? Like the Matrix, the lie constrains us. MVC, in a way, is the anti-RAD: it opens up far more to the developer than Web Forms traditionally does. Knowing there’s a lie—and knowing the truth—can hurt (the same way Neo knew there was no gravity, yet fell). And so MVC can hurt you. MVC is not a replacement for Web Forms; it’s another way to solve a set of problems. Some problems are better solved in Web Forms, while others fit MVC (or ASP.NET Dynamic Data) better.
MVC is made up of models, views, and controllers—and all of these are changeable. The views use Web Forms to render HTML, but other options exist. One is NHaml, a very different way to generate HTML (you can read about it here). Views should contain no logic—they should focus solely on rendering HTML. What’s nice is that, for the rendering side, jQuery is bundled directly into MVC!
Separate from the views are the controllers, which leverage ASP.NET’s Routing feature (introduced in 3.5 SP1) heavily. Its implementation is elegant, showcasing a "convention over configuration" approach. For example, if you type a URL like http://test/account/view, it first checks the Views\Account folder for View.aspx or .ascx, then the Views\Shared folder. No config is needed to map the URL to a file. Controllers should hold most of the logic but avoid web-specific concepts (like the Request object). You could use it, but that breaks MVC’s separation of concerns. The beauty of MVC’s design is that it enforces separation, making unit testing astonishingly simple. With the full version of Visual Studio, it even generates unit tests for you! While it’s easy to add authentication checks in a controller, you must decide how much "code smell" you can tolerate.
Still separate are the models, which represent your data (e.g., LINQ to SQL). The purest form of MVC involves a data model and a model to interact with controllers—keeping them distinct. In the real world, that separation doesn’t always pay off, but because you have the power (you took the red pill), you can share models between the data layer and controllers.
Afterward, Scott showcased his latest project: NerdDinner, an MVC-based app set to become an open-source solution on CodePlex. He walked through the code, highlighting both strengths and pitfalls, making it clear what MVC challenges—and rewards—look like. The session wrapped up with Q&A over pizza.
Definitely one of the best talks I’ve attended in a long time! And here’s a bonus: Scott’s on his way to Cape Town—taking a day out of his holiday to fly in specially—so if you’re in CT, you must go see him! Check S.A. Developer for details.
Part 1, which covers permissions to allow users to vote but not edit the website, can be found here.
For the second post, I thought I would share the most confusing issue I’ve personally had with SharePoint survey permissions: namely, on a website where anonymous users will be voting, how do you let them participate? Since they are not members of the site, you need to take a few extra steps to get it working. Before I continue, I recommend you read the first post since I’ll refer back to some parts of it.
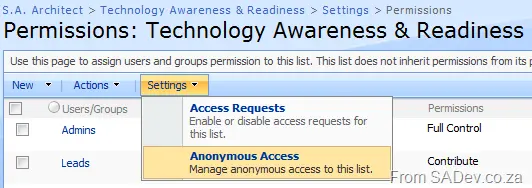
The first thing is: if you go to the permissions, you need to give anonymous users permission. However, there is no direct "anonymous user" option like we had with the domain group NT AUTHORITY\AUTHENTICATED USERS previously. But if you’ve configured anonymous access correctly, you’ll find a menu option under Settings that allows you to configure Anonymous Access.
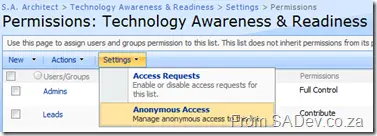 Settings → Anonymous Access.
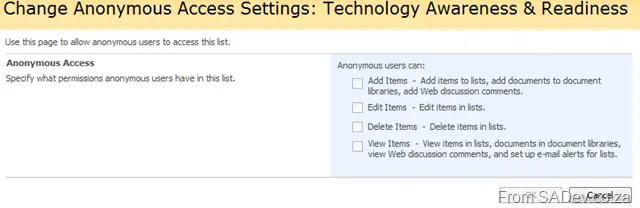
You may find that it doesn’t work immediately—as it didn’t in my case—because everything is set to read-only. So you can’t give anonymous users permissions yet.
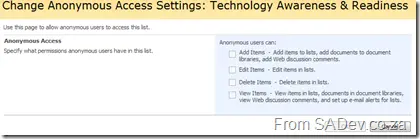 Read-only settings
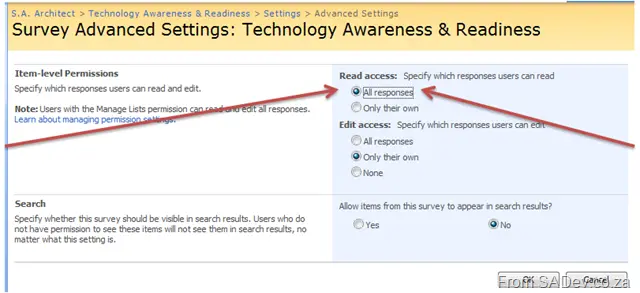
To resolve this, go to the Advanced Settings for your survey and set Read Access to All Responses, then click OK. Don’t worry—you’ll revert this shortly.
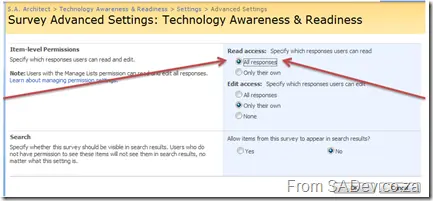 Survey advanced settings.
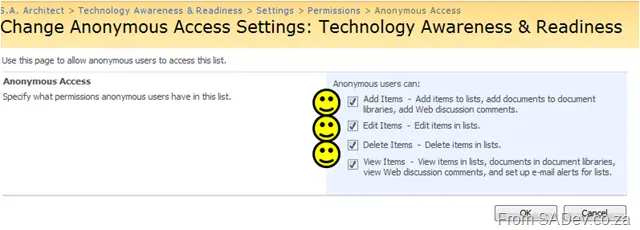
Now, if you return to the anonymous access settings section of the permissions, you’ll see that those options are no longer read-only! You can now configure anonymous access for your survey and click OK.
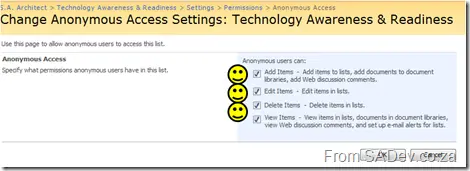 Settings now available
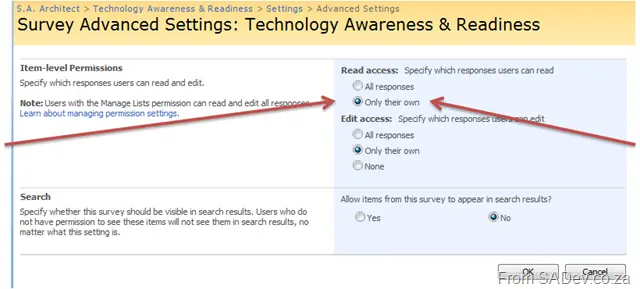
Finally, if you wish, you can go back to the Advanced Settings page and set Read Access to Only Their Own. Note: The anonymous settings you configured are preserved—they’re just set to read-only again, but your survey remains accessible to anonymous users.
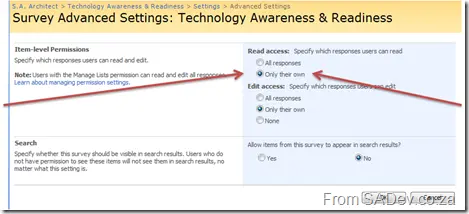
Part 2, which covers permissions for anonymous users, can be found here.
Surveys are a nice feature of SharePoint, however their security is not the easiest to understand. I thought it was just me who didn’t take to it straight away, but seeing Veronique’s post on Information Worker made me think it’s not just me. So for this post, I’ll answer her question—summarized as: "How do you enable a user to respond to a survey but not edit the site (the survey sits in) content?"
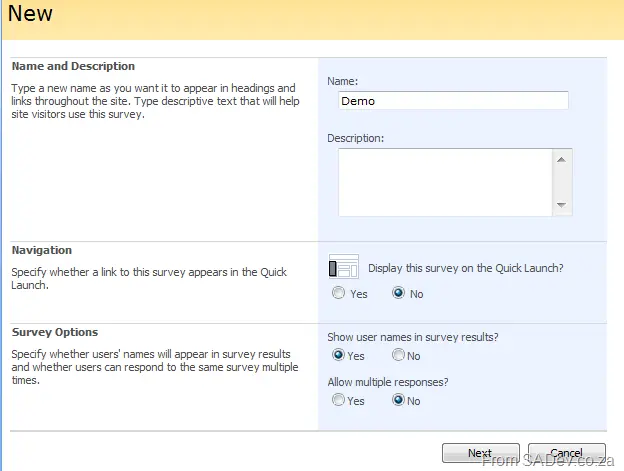
First off, we need a survey:
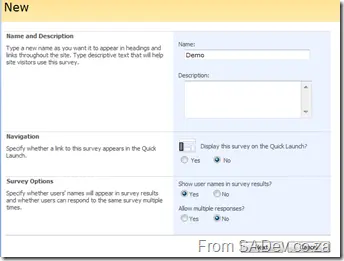 Creating a new survey.
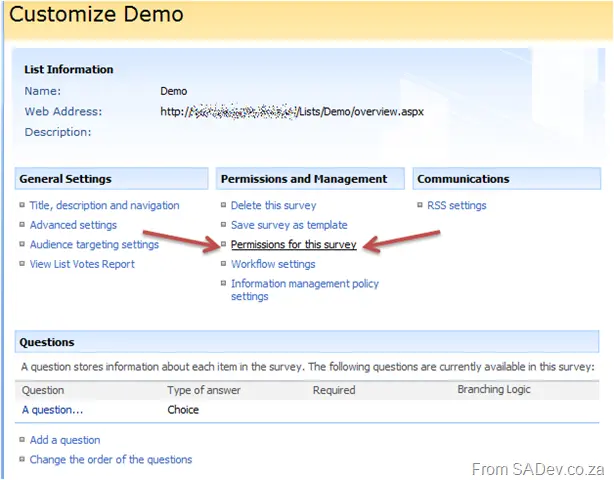
On the settings, you need to click the permissions for the survey:
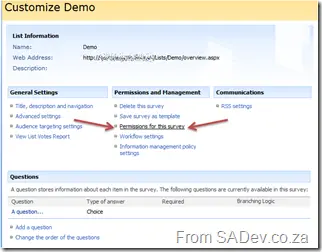 The survey settings page.
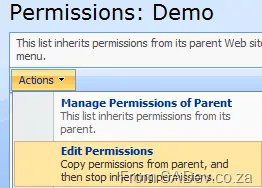
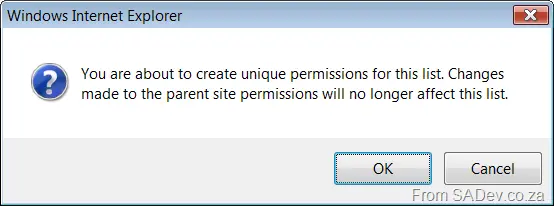
On the list permission settings, click Actions → Edit Permissions. At this point, you’ll be asked to confirm whether you want to create unique permissions for the survey (short: it will no longer inherit from its parent security permissions in the future).
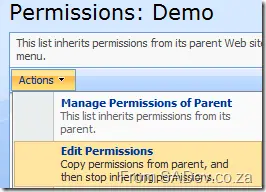 Actions → Edit Permissions on the survey permissions.
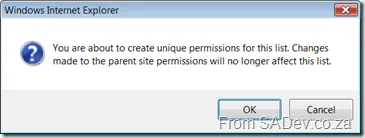 The confirmation prompt.
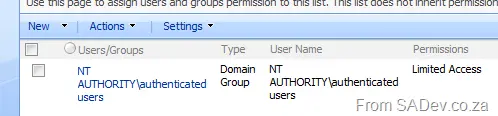
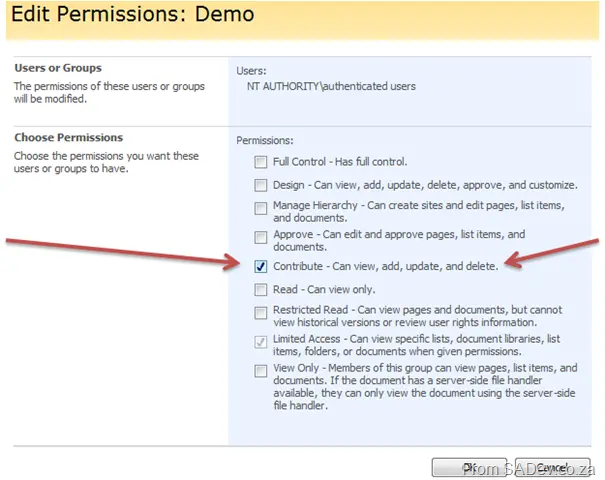
For my example survey, I’m assuming you want to allow all logged-in users to complete it. So, find the NT AUTHORITY\AUTHENTICATED USERS group, click on it, and ensure they have Contribute permissions, then click OK. Now return to the survey settings page.
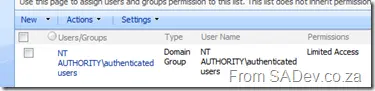 The user listing.
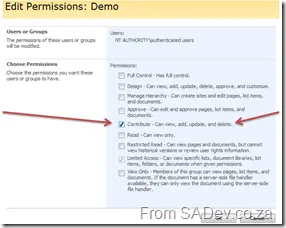 Managing user permissions.
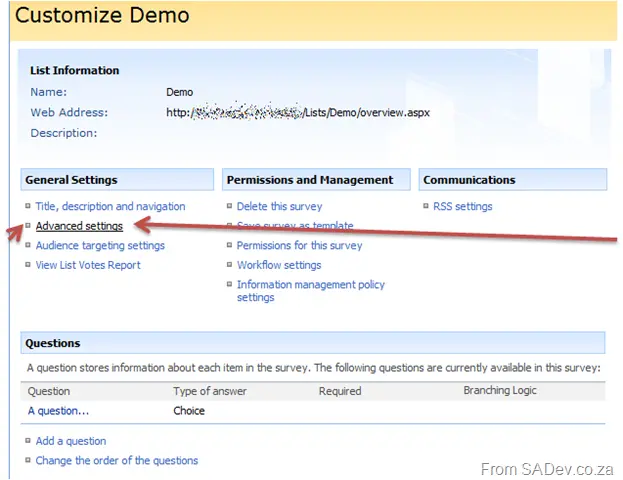
Now, click Advanced settings on the settings page.
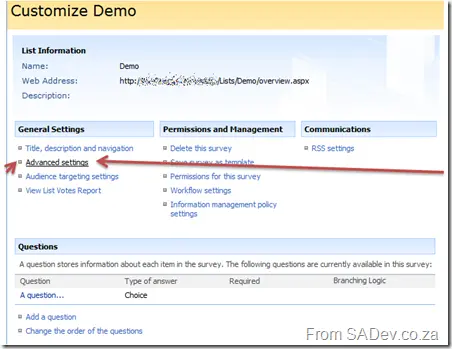 The settings page.
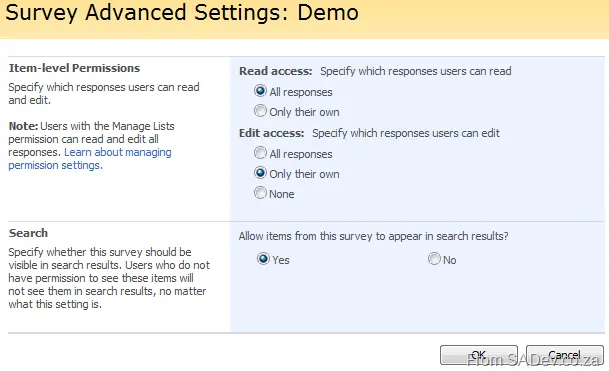
The Advanced settings page lets you configure who can view responses and what they can edit. Note: Edit here means changing their votes after submission—not editing the survey or website. The Contribute permission already allows them to add (submit) votes.
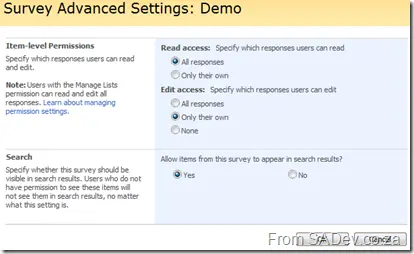 Advanced survey settings.
Once done, users should be able to complete the survey—but because the list/survey has unique permissions, they won’t be able to edit the site hosting it.