I’ve been working on an interesting project recently and found that I needed two pieces of code a lot, so what better than wrapping them as snippets?
What are snippets?
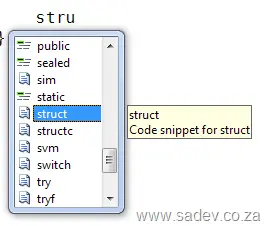
Well, if you start typing in Visual Studio, you may see some options with a torn paper icon. If you select that and hit Tab (or hit Tab twice—once to select and once to invoke)—it will write code for you! These are contained in .snippet files, which are just XML files in a specific location.
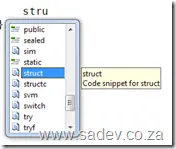
To deploy these snippets, copy them to your C# custom snippets folder, which should be something like: C:\Users<Username>\Documents\Visual Studio 2008\Code Snippets\Visual C#\My Code Snippets
You can look at the end of this post for a sample of what the snippets create, but let’s have a quick overview of them.
Snippet 1: StructC
DOWNLOAD STRUCTC SNIPPET (Right-click → Save As)
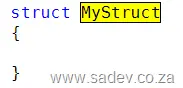
Visual Studio already includes a snippet for creating a struct (which is also the snippet), but it is very basic:
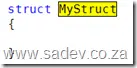
StructC is a more complete implementation of a struct, mainly to comply with FxCop requirements. It includes:
- A
GetHashCode method - Both
Equals methods - The positive and negative equality operators (
== and !=) - Lots of comments
All of which adds up to 74 lines of code, rather than the three you’d get previously.
Warning – the GetHashCode uses reflection to determine a unique hash code, but this may not be ideal for all scenarios. Please review before use.
Snippet 2: Dispose
DOWNLOAD DISPOSE SNIPPET (Right-click → Save As)
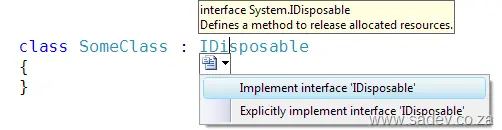
If you’re implementing a class that needs to inherit IDisposable, you can use the option in Visual Studio to generate the methods.
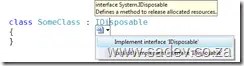
Again, from an FxCop perspective, it’s lacking since you only get the Dispose method. Instead, you can use the dispose snippet, which generates 41 lines of code, including:
- A
#region for the code (same as if you used the VS option) - A properly implemented
Dispose method that calls Dispose(bool) and GC.SuppressFinalize - A
Dispose(bool) method for cleanup of managed and unmanaged objects - A private
bool variable to ensure Dispose isn’t called multiple times
StructC Sample
struct MyStruct
{
public override int GetHashCode()
{
int valueStorage = 0;
object objectValue = null;
foreach (PropertyInfo property in typeof(MyStruct).GetProperties())
{
objectValue = property.GetValue(this, null);
if (objectValue != null)
{
valueStorage += objectValue.GetHashCode();
}
}
return valueStorage;
}
public override bool Equals(object obj)
{
if (!(obj is MyStruct))
return false;
return Equals((MyStruct)obj);
}
public bool Equals(MyStruct other)
{
return true;
}
public static bool operator ==(MyStruct first, MyStruct second)
{
return first.Equals(second);
}
public static bool operator !=(MyStruct first, MyStruct second)
{
return !first.Equals(second);
}
}
Dispose Sample
#region IDisposable Members
private bool disposed;
private void Dispose(bool disposing)
{
if (disposed)
{
return;
}
if (disposing)
{
}
disposed = true;
}
public void Dispose()
{
this.Dispose(true);
GC.SuppressFinalize(this);
}
#endregion
PowerShell is magically powerful—besides the beautiful syntax and the cmdlets (not "commandlets"), there is the ability to invoke .NET code, which can lead you down a treacherous path of trying to do the "super solution" by using these, writing a few (hundred) lines of code, and ignoring some old-school (read: DOS) ways of solving a problem. This is similar to the case of "when you only have a hammer, everything looks like a nail"—except this is the alpha-developer (as in alpha male) version, where you have 50 tools but one is newer and shinier, so that’s the tool you just have to use.
So with the VSTS Rangers virtualization project, we’re creating a VM that’s not meant for production (in fact, I think I need to create a special bright pink or green wallpaper for it—with "NOT FOR PRODUCTION" written over it), and we want to make it super easy for connections and the users of this VM. So one example where the PowerShell version of a command and the DOS version differs drastically is allowing all connections via the firewall.
In this case, there’s a command-line tool called netsh (not "netshell"), and if you type just netsh, you get a special command prompt where you can basically change every network-related setting. However, the genius who designed this (and it’s so well designed) is that you can type a single command at a time—or chain commands together in the netsh interface (which makes testing easy)—and then, once you have a working solution, you can provide it as a parameter to the netsh command. So to allow all incoming connections, the command looks like this:
> netsh advfirewall firewall add rule name="Allow All In" dir=in action=allow
Once I had that, I slapped it into a PowerShell script—because PowerShell can run DOS commands—and voilà, another script added to the collection, done in one line!
Another example is that I need the machine hostname for a number of things used in PowerShell. In DOS, there’s a command called hostname. Well, you can easily combine that with PowerShell by assigning it to a variable:
> $hostname = hostname
Now I can just use $hostname anywhere in PowerShell, and everything works well.

As Willy-Peter pointed out, a lot of my evenings have been filled with a type of visual cloud computing—that being PowerShell’s white text on a blue (not quite azure) background—that makes me think of clouds. This is for automating the virtual machines that the VSTS Rangers are building.
So how are we doing this? Well, there’s a great team involved—it’s not just me—and we’re working on a few key scripts, which, as you might expect, involve pre- and post-installation configuration for VSTS/VS/required software, tailoring the environment, and installing additional software.
The Structure
How have we structured this? Since each script is developed by a team of people, I didn’t want one massive script that everyone would fight over for conflicts and merges. At the same time, I didn’t want to ship 100 tiny scripts that call each other—so I wanted to ship one script but allow development by many. How did we achieve this? Step one was breaking down script tasks into functions, assigning them to team members, and giving them reference numbers:
Note: This is close to reality, but the names and tasks have been changed for the sake of innocent team members.
| Task | Assigned To | Reference Number |
|---|
| Install SQL | Team Member A | 2015 |
| Install WSS | Team Member B | 2020 |
| Install VSTS | Team Member C | 2025 |
From this, people produce the smallest scripts possible, naming them with the reference number—for example:
2015-InstallSQL.ps12020-InstallWSS.ps12025-InstallVSTS.ps1
The Build Script
These scripts go into a folder, and I wrote another PowerShell script to combine them into a single "super script" used for execution. The build script is simple: it uses PowerShell commands to fetch the content of all .ps1 files in the directory and outputs them into a single file, like this:
Get-Content .\SoftwareInstall\*.ps1 | Out-File softwareInstall.ps1
This combines the scripts while keeping their order intact thanks to the reference numbers.
As an aside, I didn’t originally use PowerShell for the build script—I tried the old-school DOS copy command—but it had a few bugs.
The Numbering
What’s the deal with the numbering? For those who’ve never coded with line numbers and GOTO statements, leaving gaps might seem odd—why not sequential numbering? Well, what if we missed something later and had to add a new script? Imagine renumbering all files after that—EEK! Leaving gaps makes it easy to insert new scripts without disrupting the system.
As for why I start at 2015—well, each script gets a range of 1000 numbers (pre-install: 1000, software install: 2000, etc.). This way, I can glance at a script and know its purpose and placement at once. The starting point is 15 because 00, 05, and 10 are already reserved for:
- 00 – Header. Explains what the file is.
- 05 – Functions. Common functions used across all scripts.
- 10 – Introduction. A brief description of the script’s purpose, displayed before execution, followed by a pause. This pause is crucial because if you accidentally run the wrong script, you can hit Ctrl+C at that point before anything executes.
This concludes part I. In future parts, I’ll dive deeper into some of the scripts and the lessons I’ve learned along the way.
Update 11 August 2011: Want this as an app for your smartphone? Click here Update 30 March 2012: Details of the racial identifier can be found at this page.
Cecil Tshikedi a great question—what is actually in an ID number:
- The first six numbers are the birth date of the person in YYMMDD format—so no surprise that my ID number starts 820716.
- The next four digits are a gender identifier: 5000 and above indicates male, below 5000 indicates female. So my ID number would have a value of 5000 or greater.
- The next digit is the country ID, 0 for South Africa and 1 for others. My ID number would have 0 here.
- The second-to-last number was previously a racial identifier but now means nothing.
- The last number is a check digit, which verifies the rest of the number.
So for my ID number, it would look something like: 820716[5000-9999]0??
There you go—it’s that easy.
[Note: See the series index for a list of all parts in this series.]
In part III, we looked at the interesting part of Excel—Shared Strings—which is just a central store for unique values that the actual spreadsheet cells can map to. Now, how do we take that data and combine it with the sheet to get the values?
What makes up a sheet?
First, let's look at what a sheet looks like in the package:
<?xml version="1.0" encoding="UTF-8" standalone="yes" ?>
<worksheet xmlns="http://schemas.openxmlformats.org/spreadsheetml/2006/main" xmlns:r="http://schemas.openxmlformats.org/officeDocument/2006/relationships" xmlns:mc="http://schemas.openxmlformats.org/markup-compatibility/2006" mc:Ignorable="x14ac" xmlns:x14ac="http://schemas.microsoft.com/office/spreadsheetml/2008/2/ac">
    <dimension ref="A1:A4" />
    <sheetViews>
        <sheetView tabSelected="1" workbookViewId="0">
            <selection activeCell="A5" sqref="A5" />
        </sheetView>
    </sheetViews>
    <sheetFormatPr defaultRowHeight="15" x14ac:dyDescent="0.25" />
    <sheetData>
        <row r="1" spans="1:1" x14ac:dyDescent="0.25">
            <c r="A1" t="s">
                <v>0</v>
            </c>
        </row>
        <row r="2" spans="1:1" x14ac:dyDescent="0.25">
            <c r="A2" t="s">
                <v>1</v>
            </c>
        </row>
        <row r="3" spans="1:1" x14ac:dyDescent="0.25">
            <c r="A3" t="s">
                <v>2</v>
            </c>
        </row>
        <row r="4" spans="1:1" x14ac:dyDescent="0.25">
            <c r="A4" t="s">
                <v>3</v>
            </c>
        </row>
    </sheetData>
    <pageMargins left="0.7" right="0.7" top="0.75" bottom="0.75" header="0.3" footer="0.3" />
</worksheet>
Well, there’s a lot to understand in the XML, but for now we care about the <row> (which represents the rows in our spreadsheet) and within that, the cells, which the first one looks like this:
<c r="A1" t="s">
    <v>0</v>
</c>
First, that t="s" attribute is very important—it tells us the value is stored in the shared strings. Then, the index to the shared string is in the <v> node; in this example, it is index 0. It is also important to note that the r attribute for both rows and cells contains the position in the sheet.
As an aside, what would this look like if we didn’t use shared strings?
<c r="A1">
    <v>Some</v>
</c>
Now, the <v> node contains the actual value, and we no longer have the t attribute on the <c> node.
The foundation code for parsing the data
Now that we understand the structure—and we have this Dictionary<int, string> that contains the shared strings—we can combine them. But first, we need a class to store the data in, then we need to locate the correct worksheet, and a way to parse the column and row info—once we have that, we can parse the data.
Before we read the data, we need a simple class to hold the information:
public class Cell
{
    public Cell(string column, int row, string data)
    {
        this.Column = column;
        this.Row = row;
        this.Data = data;
    }

    public override string ToString()
    {
        return string.Format("{0}:{1} - {2}", Column, Row, Data);
    }

    public string Column { get; set; }
    public int Row { get; set; }
    public string Data { get; set; }
}
How do we find the right worksheet? In the same way as we did to get the shared strings...
In the last week I decided to add some flair to my site, as I am spending a lot of time in various communities—whether they’re online, like StackOverflow, or offline, like InformationWorker—so I wanted to add flair for those communities to my website.

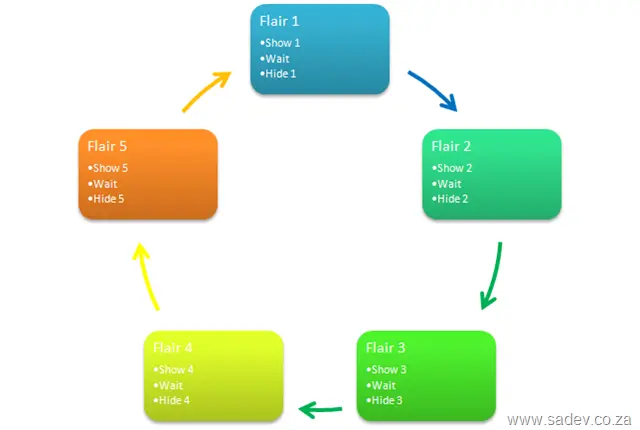
However, the problem is that I’m in a lot of them and don’t want a page that just scrolls and scrolls, so I decided to make a rotating flair block—i.e., it shows a piece of flair for a few seconds and then rotates to another one. Thankfully, I already have jQuery set up on my site, so this was fairly easy. One thing that caused some headache was getting away from the idea of having a loop, where I’d show one flair, wait, hide it, and show the next one. This is a very bad idea because it means that it runs forever—which is what I want—but not an endless loop, because browsers will detect that and stop the script. Also, from a performance point of view, JavaScript in a loop tends to make a browser run slowly.
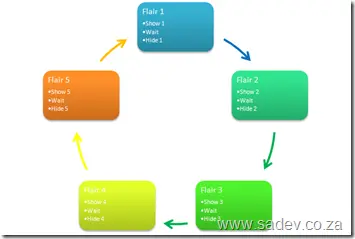
The solution is to use events and kick them off in a staggered fashion—thankfully, JavaScript natively has a function for that: setTimeout, which takes a string that it will execute and an integer representing the milliseconds delay to wait for. Then, on its turn, show it, wait (using setTimeout again), hide it, and finally wait again to show it. Because that cycle is the same for each item, the staggering ensures that they do not overlap, and you get a nice, smooth, flowing, and non-loop loop. 😊
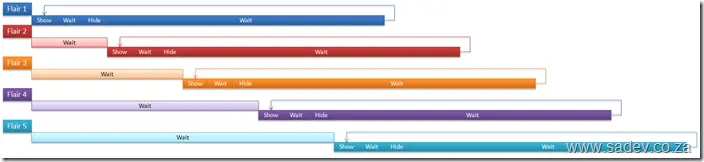
The technical bits
My HTML is made up of a lot of <div>s—each one for a flair:
<div class="flair-badge">
    <div class="flair-title">
        <a href="http://www.stackoverflow.com">StackOverflow.com</a>
    </div>
    <iframe src="http://stackoverflow.com/users/flair/53236.html" marginwidth="0" marginheight="0" frameborder="0" scrolling="no" width="210px" height="60px"></iframe>
</div>
A dash of CSS for styling, most importantly hiding all of them initially.
And the JavaScript:
var interval = 5000;

$(document).ready(function() {
    var badges = $(".flair-badge").length;
    var counter = 0;
    for (var counter = 0; counter < badges; counter++) {
        setTimeout('BadgeRotate(' + counter + ',' + badges + ')', counter * interval);
    }
});

function BadgeRotate(badge, badgeCount) {
    $(".flair-badge:nth-child(" + (badge + 1) + ")").fadeIn("slow");
    setTimeout('BadgeRotateEnd(' + badge + ',' + badgeCount + ')', interval);
}

function BadgeRotateEnd(badge, badgeCount) {
    $(".flair-badge:nth-child(" + (badge + 1) + ")").hide();
    setTimeout('BadgeRotate(' + badge + ',' + badgeCount + ')', (badgeCount * interval) - interval);
}
[Note: See the series index for a list of all parts in this series.]
[ ]
]
Excel’s file format is interesting when compared to the rest of the Office Suite because it can store data in two places—where most others store it in a single place. The reason for this dual approach is performance optimization while keeping the file size small. For example, let’s consider a scenario with a single sheet containing some data:
[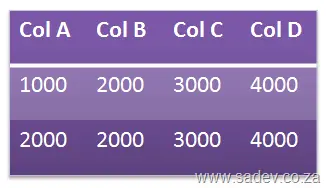 ]
]
If each cell is processed individually, the total size would be 32 characters of data. However, with a shared strings model, the result looks like this:
[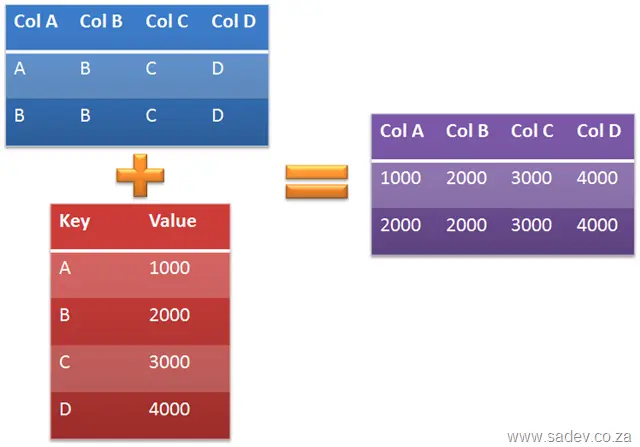 ]
]
The output remains the same, but values are processed only once, reducing the size—in this case, to 24 characters.
The Excel format is flexible: it allows either method. Note that the Excel client always uses shared strings, so for reading, you should support it. This raises an interesting question: what happens if you fill a spreadsheet via direct input and then open it in Excel? Well, Excel detects the structure, remaps it automatically, and—regardless of whether changes were made—prompts the user to save the file when they try to close it. The element we loaded at the end of...
[Note: See the series index for a list of all parts in this series.]
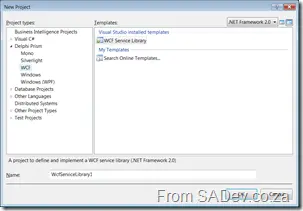
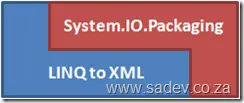
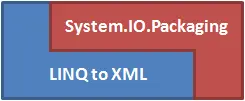
To get support for the technologies we’ll use in this series, we need to add a few assembly references to our solution:
WindowsBase.dllSystem.XmlSystem.Xml.LinqSystem.Core
Next, make sure you have the following namespaces added to your using/imports:
System.IO.Packaging: This provides the functionality to open the files.System.XmlSystem.Xml.LinqSystem.LinqSystem.IO
Right next, there’s an XML namespace (not to be confused with .NET code namespaces) we need to use for most of our queries: http://schemas.openxmlformats.org/spreadsheetml/2006/main and a second one we’ll use seldom: http://schemas.openxmlformats.org/officeDocument/2006/relationships. I dumped this into a nice static class as follows:
namespace XlsxWriter
{
    using System.Xml.Linq;

    internal static class ExcelNamespaces
    {
        internal static XNamespace excelNamespace = XNamespace.Get("http://schemas.openxmlformats.org/spreadsheetml/2006/main");
        internal static XNamespace excelRelationshipsNamespace = XNamespace.Get("http://schemas.openxmlformats.org/officeDocument/2006/relationships");
    }
}
Next, we need to create an instance of the System.IO.Packaging.Package class (from WindowsBase.dll) and instantiate it by calling the static method Open:
Package xlsxPackage = Package.Open(fileName, FileMode.Open, FileAccess.ReadWrite);
Note: This is where the file is opened—important because Excel locks an open file. If you try to open a locked file, a lovely exception is thrown. Always call the Close method on the package, for example:
xlsxPackage.Close();
When you open the XLSX file manually, the first file you’ll see is [Content_Types].xml, a manifest of all the files in the ZIP archive. Using Packaging, you can call the GetParts method to get a collection of Parts—essentially the files within the XLSX file.
 The contents of the XLSX if renamed to a ZIP file and opened.
The various files listed in the [Content_Types].xml file.
We’ll use the ContentType parameter to filter parts to the specific item we want to work with. In the second image above, note the ContentType for a worksheet: application/vnd.openxmlformats-officedocument.spreadsheetml.worksheet+xml.
Once we have all the parts of the XLSX file, we can navigate through it to extract the bits we need to read the content, involving two steps:
- Finding the shared strings part: Another XML file that allows shared strings between worksheets. While optional for writing, it’s required for reading values.
- Locating the worksheet: A separate part from the shared strings.
Let’s start with reading the shared strings part—the basis for reading any part later in this series. We need to get the first PackagePart with the type: application/vnd.openxmlformats-officedocument.spreadsheetml.sharedStrings+xml:
PackagePart sharedStringsPart = (from part in allParts
    where part.ContentType.Equals("application/vnd.openxmlformats-officedocument.spreadsheetml.sharedStrings+xml")
    select part).Single();
Next, we extract the XML content from the PackagePart using GetStream, load it into an XmlReader, and then into an XElement—a slightly convoluted but efficient process:
XElement sharedStringsElement = XElement.Load(XmlReader.Create(sharedStringsPart.GetStream()));
Now we can work with the XElement to perform real operations. In the next parts, we’ll explore what we can do with it and how to translate a single part into an actual sheet.
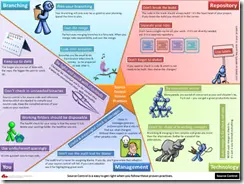
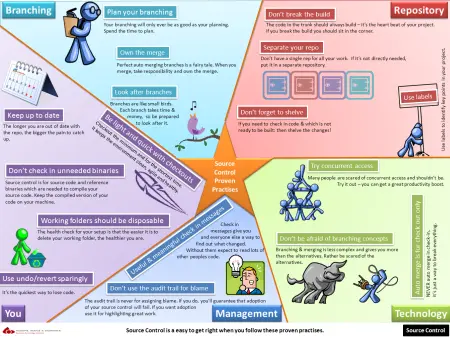
Maybe one of the toughest things in software development to get right all the time: source control. Well, now with this nice bright A3 poster printed on your wall (or maybe above the monitor of the person who breaks the builds daily), you’ll never go wrong again.
It covers 17 proven practices, broken into 5 key areas:
Things you should do
- Keep up to date
- Be light and quick with checkouts
- Don’t check in unneeded binaries
- Working folders should be disposable
- Use undo/revert sparingly
Branching
- Plan your branching
- Own the merge
- Look after branches
Management
- Useful & meaningful check-in messages
- Don’t use the audit trial for blame
Repository
- Don’t break the build
- Separate your repo
- Don’t forget to shelve
- Use labels
Technology
- Try concurrent access
- Don’t be afraid of branching concepts
- Automerge for checkout only
Direct Download
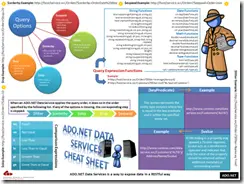
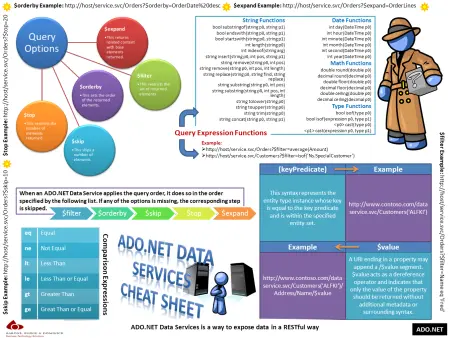
Above is a screenshot of an A3 cheat sheet I created for ADO.NET Data Services (version 1). The poster covers filters, methods, and provides plenty of examples in a bright, nicely formatted design.
Direct Download