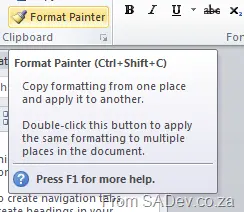
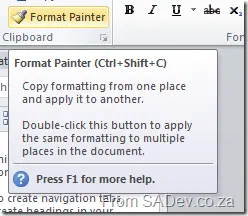
I spend a significant amount of time in PowerPoint, and to get a consistent look and feel in my slides, I often use the Format Painter option. Using this tool, you highlight some text/image/video, click the Format Painter button, and then paint over some other text/image/video. It applies the format settings from the first group to the group you paint.
What if you want to do this over and over? You might think you need to highlight → click → paint repeatedly, but Office has a trick—double-click the button! Then you can highlight → double click → paint → paint → paint.
So how does this help in Visual Studio? I’m working with UML diagrams at the moment and needed to connect a bunch of items. The first few times, I did the following:
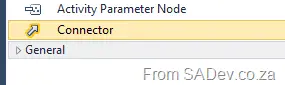
- Click the connector in the toolbox → click the source item → click the destination, then repeat from the start.
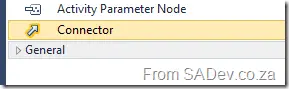
Suddenly, I thought—maybe it works like Office—and you know what? It does! You can double click a toolbox item, and then it becomes sticky. Adding lots of them is easy!
Note: This post is part of a series and you can find the rest of the parts in the series index.
For my WI adapter, I needed an implementation of Dictionary<T, V> which could be serialized, and unfortunately, the .NET one can’t. So I threw together a simple implementation using two List<T>. It is not perfect for every possible use case where you might need an alternative to Dictionary<T, V>—for example, the only item manipulation I have is to add an item and clear all items—but it is great for my needs in this case:
[XmlRoot("simpleDictionary")]
public class SimpleDictionary<Key, Value> : IEnumerable, IXmlSerializable
{
private List<Key> keys = new List<Key>();
private List<Value> values = new List<Value>();
public List<Key> Keys
{
get
{
return keys;
}
}
public List<Value> Values
{
get
{
return values;
}
}
public IEnumerator GetEnumerator()
{
return (IEnumerator)new SimpleDictionaryEnumerator(this);
}
public void Add(Key key, Value value)
{
keys.Add(key);
values.Add(value);
}
public void Add(object o)
{
KeyValuePair<Key, Value>? keyValuePair = o as KeyValuePair<Key, Value>;
if (keyValuePair != null)
{
this.Add(keyValuePair.Value.Key, keyValuePair.Value.Value);
}
}
public void Clear()
{
keys.Clear();
values.Clear();
}
private class SimpleDictionaryEnumerator : IEnumerator
{
private SimpleDictionary<Key, Value> simpleDictionary;
private int index = -1;
public SimpleDictionaryEnumerator(SimpleDictionary<Key, Value> simpleDictionary)
{
this.simpleDictionary = simpleDictionary;
}
public object Current
{
get
{
return new KeyValuePair<Key, Value>(simpleDictionary.keys[index], simpleDictionary.values[index]);
}
}
public bool MoveNext()
{
index++;
return !(index >= simpleDictionary.keys.Count);
}
public void Reset()
{
index = -1;
}
}
public System.Xml.Schema.XmlSchema GetSchema()
{
return null;
}
public void ReadXml(XmlReader reader)
{
if (reader.IsEmptyElement)
{
return;
}
XmlSerializer keySerializer = new XmlSerializer(typeof(Key));
XmlSerializer valueSerializer = new XmlSerializer(typeof(Value));
reader.Read();
while (reader.NodeType != System.Xml.XmlNodeType.EndElement)
{
reader.ReadStartElement("keyValuePair");
reader.ReadStartElement("key");
Key key = (Key)keySerializer.Deserialize(reader);
reader.ReadEndElement();
reader.ReadStartElement("value");
Value value = (Value)valueSerializer.Deserialize(reader);
reader.ReadEndElement();
this.Add(key, value);
reader.ReadEndElement();
reader.MoveToContent();
}
reader.ReadEndElement();
}
public void WriteXml(XmlWriter writer)
{
XmlSerializer keySerializer = new XmlSerializer(typeof(Key));
XmlSerializer valueSerializer = new XmlSerializer(typeof(Value));
for (int counter = 0; counter < this.keys.Count; counter++)
{
writer.WriteStartElement("keyValuePair");
writer.WriteStartElement("key");
keySerializer.Serialize(writer, this.keys[counter]);
writer.WriteEndElement();
writer.WriteStartElement("value");
valueSerializer.Serialize(writer, this.values[counter]);
writer.WriteEndElement();
writer.WriteEndElement();
}
}
}
The team has released a new version of the tools, which solves a lot of the issues and provides a bunch of great new features. Please make sure you see and use the latest version.
At Tech·Ed North America on Monday, the Visual Studio Pro Power Tools were announced, and they are fantastic. A full rundown of them can be found on Brian Harry’s blog. However, there are some tips in the usage that may not be immediately obvious, so this post will explain some additional tips.
Add Reference Dialog
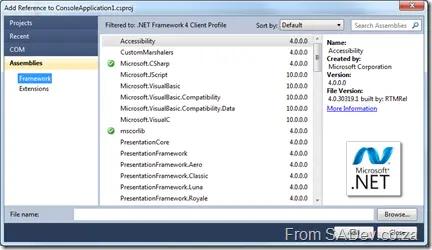
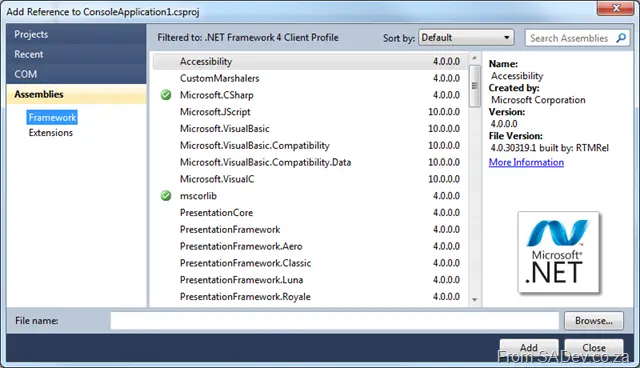
The new dialog is amazing and fits the UI experience of VS2010 far better than the out-of-the-box one. One thing to be aware of is that when you hit Add, it does not close the dialog—it marks the selected assembly and adds it in the background. This is great for adding multiple assemblies. If you want to remove an assembly, you can do it here too—just select an already added assembly (green checkmark), and the Add button becomes a Remove button.
Document Tab Well
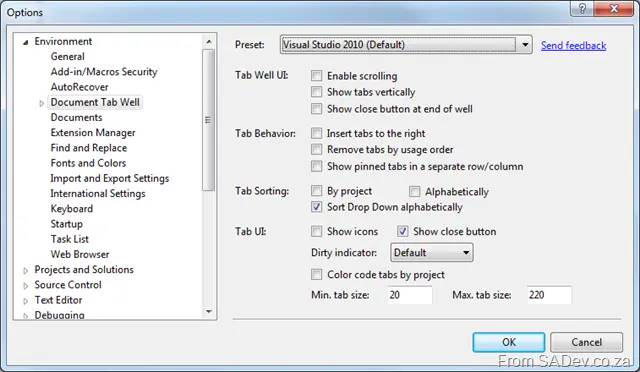
This is one of the first things you’ll see, because the tabs are now a variety of colors. How can you control this? Go to Tools → Options → Environment → Document Tab Well to customize the settings. Setting the preset to Visual Studio 2010 is the same as disabling it.
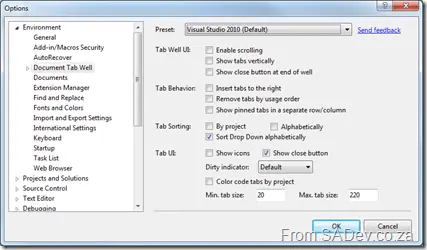
As a side note, if you’re thinking of disabling it, try the Dynamic Tab Well preset first. It is very similar to the standard VS2010 tabs but adds more features without overdoing it.
The shortcut to get to this part of the settings is to right-click on any blank space in the tab well and click Customize…

Highlight Current Line
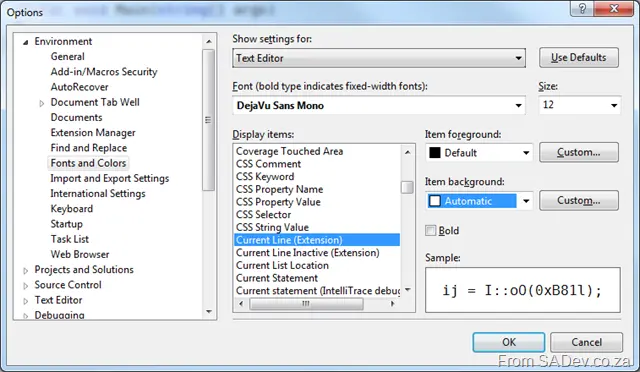
Another feature that is immediately obvious—the gray background behind your current line of code. If this color doesn’t align with your color scheme, you can tweak it using Tools → Options → Environment → Fonts & Colors → Display Items → Current Line (Extension).
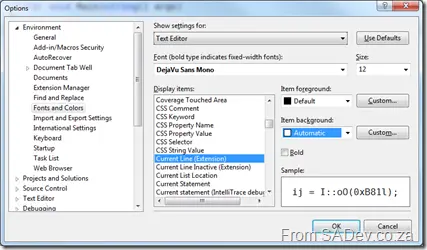
To “disable” it, set the background to Automatic.
Align Assignments
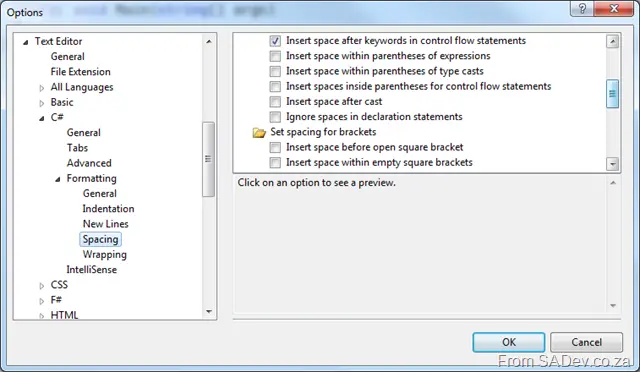
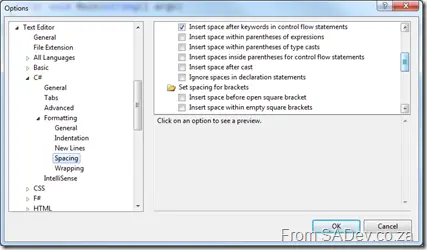
If this isn’t working for you, it might be because your C# settings are preventing it. To fix this, uncheck: Tools → Options → Text Editor → C# → Formatting → Spacing → Ignore spaces in declaration statements.
Colorized Parameter Help
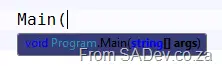
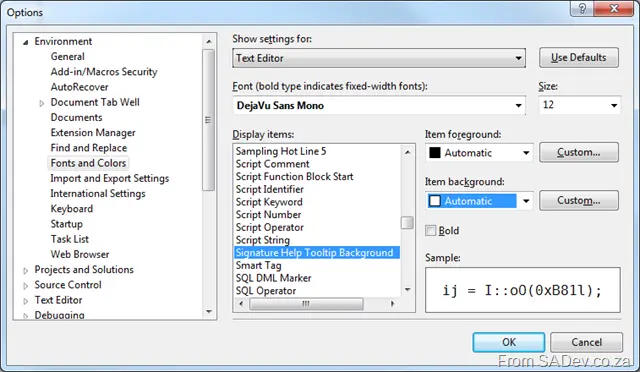
Don’t like the colors of the new tooltips? Want them to match your theme?
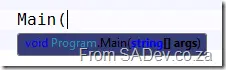
You can customize this via Tools → Options → Environment → Fonts & Colors → Display Items → Signature Help Tooltip Background.
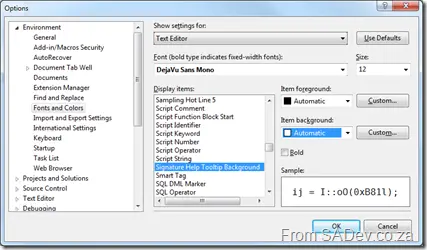
Note: The foreground color cannot be changed—only the background color.
Move Line Up/Down Commands
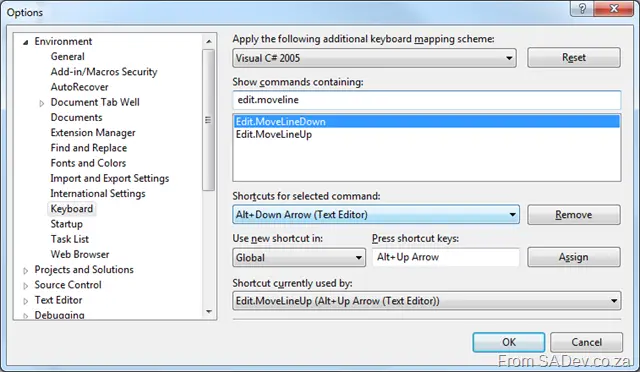
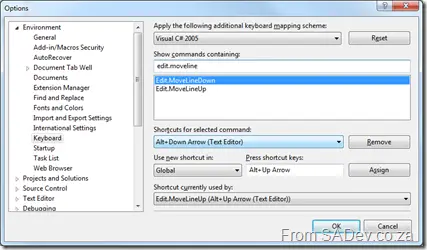
Already using Alt+↑ or Alt+↓ for something else? Or want to rebind these commands? You can do this in Tools → Options → Environment → Keyboard. The commands are:
Edit.MoveLineDownEdit.MoveLineUp
The Hack
Should you really dislike an extension—or a specific extension is conflicting (e.g., the tab well conflicts with another tab-management extension)—there is a completely unsupported hack to remove a specific feature while keeping others intact. Note that you’ll need to perform this for every update, and it is unsupported. If something goes wrong, you’re on your own. In short: only do this if you’re desperate.
Hack #1
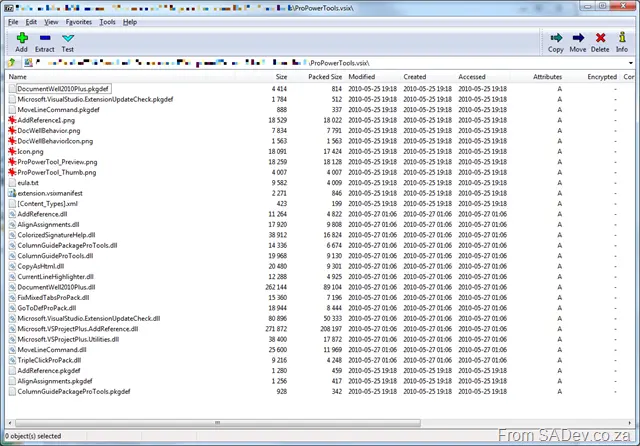
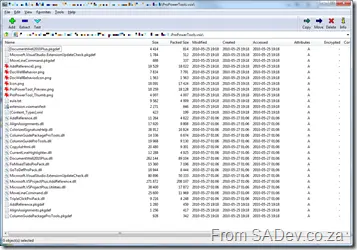
The VSIX file is just a ZIP file, which you can open in any archive tool. From there, you can see the assemblies for each extension and remove them if needed.
Hack #2
When an extension is installed, it is unpacked to: C:\Users\<Username>\AppData\Local\Microsoft\VisualStudio\10.0\Extensions Here, you’ll find directories for various authors, and under those, the extensions. To find the Pro Power Tools, go to: \Microsoft\Visual Studio 2010 Pro Power Tools\10.0.100525.1000 Here, you’ll see all the files. Simply delete or move out the assembly of the feature you don’t want—this will disable it.
Note: This post is part of a series and you can find the rest of the parts in the series index.
Throughout the series, I’ve shared a bunch of power tips for making this easier—and here’s a quick cheat sheet of them all.
From Part II: Getting Started
- Power Tip: Once you’ve completed the tools install, go into SQL Server and back up the TFSIntegrationPlatform database immediately. There aren’t just a few odd bugs lurking that may require it, but if you want to test in a clean environment, a restore is quicker than a reinstall.
- Power Tip: Make a common root for the TFS code and yours (in my case, I used
RangersCode) and then create subdirectories for both platform and your code (so I had My Production and MS Production folders under RangersCode). This keeps everything close for easier access later while keeping them separate, so you can identify them quickly.
From Part III: Overview of Adapters
- Power Tip: The
TraceManager puts all its output into the log files, so make sure you never write sensitive information there.
From Part IV: IProvider
- Power Tip: Using Visual Studio 2010’s “Generate from usage” feature makes this stage of development much easier.
From Part V: Items (IMigrationItem & IMigrationItemSerializer)
- Power Tip: VC stands for Version Control, which refers to an adapter working with the source control aspects of the system. WI (work items) and WIT (work item tracking) are the same thing. File attachments in WI are not considered VC and must be handled by your WI adapter.
- Power Tip: When you’re downloading files via
IMigrationItem, you’re also responsible for creating the correct path. Ensure you’re creating the necessary directories—and checking whether they exist.
From Part VIII: IMigrationProvider
- Power Tip: In my implementation, I used
.NET’s Path.GetTempFileName() to get a temp location for the file. However, this creates an empty temp file by default, which the platform doesn’t like—so I deleted it first, then called Download. - Power Tip: For folder creation or file/folder deletion, you can use the
Path property of the action to retrieve the folder name.
From Part IX: IServerPathTranslationService
- Power Tip: The neutral path (or canonical path, as it’s properly called) is a Unix-style path (e.g.,
/src/project/). However, these don’t follow all Unix path rules—for example, : is a valid character in the path.
Note: This post is part of a series and you can find the rest of the parts in the series index.
This post is not as technically heavy as most of the series—it’s more of a reflection on what I learned about integrating with SharePoint. This information holds true for any type of work with SharePoint, not just if you’re creating adapters.
What I used
For the WIT adapter, I used the lists.asmx web service, which allows you to work with list items. With the VC adapter, I used both the lists.asmx and copy.asmx web service—and even ended up using some WebDAV methods too.
You may be asking: Why did I use lists.asmx with VC? Because of SharePoint Rule #1—"Everything is a list"—even a document library. The copy web service allows for files to be uploaded to SharePoint.
My goal was to use only web services, one of the three ways you can interact with SharePoint (the others being WebDAV and the API). The API is better than web services in every way—faster and more feature-complete—but has a serious limitation: you must run the application using the API on the same server where SharePoint is installed. This makes it useful mainly for tools used by SharePoint admins or web components, like web parts. WebDAV is a standard for talking to web services but is generally regarded as a poorer implementation compared to the web services because it does less.
In the end, I hit a bug with file deletion in the VC adapter when using the web services. After much troublehooting, I gave up and used WebDAV for that function instead.
What I learnt
If I rewrote these adapters, I’d use mostly WebDAV and rely on the lists.asmx web service only for metadata tasks—not for manipulation. That’s because, while WebDAV does less than the web services, it handles all the fundamentals (create, update, delete) faster and more reliably. The lists.asmx web service would still be useful for tasks like:
- Getting item IDs
- Listing items, files, and folders
- Renaming (since WebDAV can’t rename)
This approach would let me drop the copy web service entirely, resulting in faster adapters and cleaner code in less time.
Note: This post is part of a series and you can find the rest of the parts in the series index.
IServerPathTranslationService takes the path to your source control item and translates it into a platform-neutral path—and vice versa. An example: if you move files between Windows and Linux, the Windows path might be c:\RangersCode\My Production\, while the equivalent on Linux would need to become /src/RangersCode/My Production/ to handle the differences. You need to first change it to a neutral path.
The amount of sleep I lost over path translation is embarrassing because, while the concept is dead simple, applying it correctly is ridiculously hard. The de facto guide on how this should work is Willy-Peter Schaub’s blog post, though there is also an update—based on my many questions—which you may want to read.
This is needed only for VC adapters; if you’re creating a WI adapter, you can skip this section.
Power Tip: The neutral path—or canonical path, as it’s correctly named—is “Unix-like” (i.e., /src/project/). However, these don’t follow all the same rules as true Unix paths. For example, a colon (:) is a valid character in the path.
The two methods you must implement are:
TranslateToCanonicalPathCaseSensitive
This method requires you to provide a neutral path for one of your paths. In my case, it’s simply adding a leading slash to the item’s URL:
public string TranslateToCanonicalPathCaseSensitive(string serverPath)
{
    TraceManager.TraceInformation("WSSVC:TranslationToCanonical - {0}", serverPath);
    string localPath = string.Format(CultureInfo.CurrentCulture, "/{0}", serverPath);

    TraceManager.TraceInformation("WSSVC:New:{0} -> {1}", serverPath, localPath);
    return localPath;
}
TranslateFromCanonicalPath
This method reverses TranslateToCanonicalPathCaseSensitive: it takes a neutral path and provides one that applies to your adapter. In my case, it means dropping the first character and ensuring an absolute URI:
public string TranslateFromCanonicalPath(string canonicalPath, string canonicalFilterPath)
{
    TraceManager.TraceInformation("WSSVC:TranslationFromCanonical - {0} - {1}", canonicalPath, canonicalFilterPath);
    string result = new Uri(canonicalPath.Substring(1)).AbsoluteUri;

    TraceManager.TraceInformation("WSSVC:TranslationFromCanonical:Result {0}", result);
    return result;
}
First in the Platform’s Eyes
Here’s something interesting about server path translation: the platform creates this class first—before anything else, like the configuration service. It must rely on minimal (or ideally none) external information. During creation, it also takes the root path from the filter items in your configuration and passes it to TranslateToCanonicalPathCaseSensitive to get the root neutral path. It needs this because it will strip this information out when passing paths to other adapters and re-add it when they send paths back to you.
Note: This post is part of a series and you can find the rest of the parts in the series index.
The IMigrationProvider interface is the sister to IAnalysisProvider and handles writing to your system. As with IAnalysisProvider, it includes some methods you can ignore.
InitializeServices
As with IAnalysisProvider, the InitializeServices method is what is called first and is used for all setup. In my implementation, I do a lot of setup for SharePoint, which may not apply to other implementations. One thing you must do, however, is register your item serializer with the platform as follows:
changeGroupService.RegisterDefaultSourceSerializer(new SharePointVCMigrationItemSerializer());
ProcessChangeGroup
The ProcessChangeGroup method is the most important method of IMigrationProvider, as it is called to perform the write operation. You are provided a ChangeGroup, and the Actions property of that ChangeGroup contains each file, folder, or item you need to write, update, or delete in your system. The ProcessChangeGroup method needs to return a log of what has happened so that the platform knows all actions were performed and can correctly tie up item unique IDs in your system with those in the other system. The log is done using a ConversionResult:
ConversionResult conversionResult = new ConversionResult(configurationService.MigrationPeer, configurationService.SourceId);
Each action has an Action, which tells you what to do with the item—whether to update, add, or delete it. Each action also has an ItemTypeReferenceName, which specifies its type. For WIT (work items), this isn’t critical, but for VC (version control), it’s very important, as it could be a concrete file, folder, or a theoretical item like a branch or merge instruction.
You need to loop over all actions and perform the correct operation based on the action and type:
foreach (MigrationAction action in changeGroup.Actions)
{
    if (action.Action == WellKnownChangeActionId.Add || action.Action == WellKnownChangeActionId.Edit)
    {
        if (action.ItemTypeReferenceName == WellKnownContentType.VersionControlledFile.ReferenceName)
        {
After completing your action, you must add the details to the conversion result log. My two adapters handle this differently, but the key part is ensuring the platform knows how to link your item in the future (e.g., for deletes or updates). Here’s how I did it:
conversionResult.ItemConversionHistory.Add(new ItemConversionHistory(sourceSystemId, string.Empty, newSharePointId.ToString(), string.Empty));
Items and VC
With the VC adapter, you request the actual file by using the Download method on the source item and providing a path.
Power Tip: In my implementation, I used Path.GetTempFileName() from the .NET framework to create a temporary file, but this automatically creates an empty file—which the platform doesn’t like. I had to delete it first and then call Download.
Power Tip: For folder creation or deletes, use the Path property of the action to get the folder name.
Items and WIT
Work item tracking (WIT) is simpler when it comes to writing, as you don’t need to worry about paths or files—just XML parsing. All item information is provided in the MigrationActionDescription property of the action, and you’ll need to parse it into an item. Since the platform handles field name mapping, this is straightforward. Here’s the small method I used to build a field list:
private static Dictionary<string, object> BuildFieldList(IMigrationAction action)
{
    Dictionary<string, object> fields = new Dictionary<string, object>();

    XmlNodeList columns = action.MigrationActionDescription.SelectNodes("/WorkItemChanges/Columns/Column");

    foreach (XmlNode columnData in columns)
    {
        string fieldValue = columnData.FirstChild.InnerText;
        string fieldName = columnData.Attributes["ReferenceName"].Value;

        if (!string.IsNullOrEmpty(fieldName))
        {
            fields.Add(fieldName, fieldValue);
        }
    }

    return fields;
}
Item ID
The platform also handles item ID mapping, so if you need to know what item to update or delete, check the MigrationActionDescription. This method works regardless of your system:
private string GetSharePointID(IMigrationAction action)
{
    TraceManager.TraceInformation("WSSWIT:MP:GetSharePointID");
    XmlNode workItemChangesNode = action.MigrationActionDescription.SelectSingleNode("/WorkItemChanges");
    string value = string.Empty;

    if (workItemChangesNode.Attributes["TargetWorkItemID"] == null)
    {
        TraceManager.TraceInformation("WSSWIT:MP:GetSharePointID: Cannot find work item ID. XML is: {0}", workItemChangesNode.OuterXml);
    }
    else
    {
        value = workItemChangesNode.Attributes["TargetWorkItemID"].Value;
        TraceManager.TraceInformation("WSSWIT:MP:GetSharePointID: Value {0}", value);
    }

    return value;
}
Note: This post is part of a series and you can find the rest of the parts in the series index.
The WIT adapter needs a custom conflict type and a custom conflict handler—really, for no reason other than the platform expects it.
Conflict Handler
If you have no reason for a custom conflict handler, a simple implementation that allows for manual resolution can be created, which is what I’ve done below.
public class SharePointWITGeneralConflictHandler : IConflictHandler
{
    public bool CanResolve(MigrationConflict conflict, ConflictResolutionRule rule)
    {
        return ConflictTypeHandled.ScopeInterpreter.IsInScope(conflict.ScopeHint, rule.ApplicabilityScope);
    }

    public ConflictResolutionResult Resolve(MigrationConflict conflict, ConflictResolutionRule rule, out List<MigrationAction> actions)
    {
        actions = null;

        if (rule.ActionRefNameGuid.Equals(new ManualConflictResolutionAction().ReferenceName))
        {
            return ManualResolve(out actions);
        }

        return new ConflictResolutionResult(false, ConflictResolutionType.Other);
    }

    public ConflictType ConflictTypeHandled
    {
        get;
        set;
    }

    private static ConflictResolutionResult ManualResolve(out List<MigrationAction> actions)
    {
        actions = null;
        return new ConflictResolutionResult(true, ConflictResolutionType.Other);
    }
}
Conflict Type
If you have no reason for a custom conflict type, you can do what I did—which is to re-implement the generic one with even fewer features, namely only supporting ManualConflictResolution and a very simple scope hint.
public class SharePointWITGeneralConflictType : ConflictType
{
    public static MigrationConflict CreateConflict(Exception exception)
    {
        return new MigrationConflict(
            new SharePointWITGeneralConflictType(),
            MigrationConflict.Status.Unresolved,
            exception.ToString(),
            CreateScopeHint(Guid.NewGuid().ToString()));
    }

    public static MigrationConflict CreateConflict(Exception exception, IMigrationAction conflictedAction)
    {
        return new SharePointWITGeneralConflictType().CreateConflict(
            exception.ToString(),
            CreateScopeHint(Guid.NewGuid().ToString()),
            conflictedAction);
    }

    public override Guid ReferenceName
    {
        get
        {
            return s_conflictTypeReferenceName;
        }
    }

    public override string FriendlyName
    {
        get
        {
            return s_conflictTypeFriendlyName;
        }
    }

    public override string Description
    {
        get
        {
            return s_conflictTypeDescription;
        }
    }

    public SharePointWITGeneralConflictType()
        : base(new SharePointWITGeneralConflictHandler())
    { }

    public static string CreateScopeHint(string sourceItemId)
    {
        return string.Format(CultureInfo.CurrentCulture, "/{0}/{1}", sourceItemId, Guid.NewGuid().ToString());
    }

    protected override void RegisterDefaultSupportedResolutionActions()
    {
        AddSupportedResolutionAction(new ManualConflictResolutionAction());
    }

    private static readonly Guid s_conflictTypeReferenceName = new Guid("{606531DF-231A-496B-9996-50F239481988}");
    private const string s_conflictTypeFriendlyName = "TFS WIT general conflict type";
    private const string s_conflictTypeDescription =
        "This conflict is detected when an unknown exception is thrown during Work Item data submission.";
}
Note: This post is part of a series and you can find the rest of the parts in the series index.
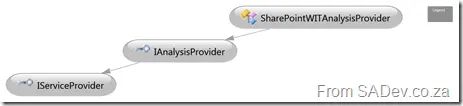
IAnalysisProvider, has a name that is a bit misleading—or was misleading to me—because for a long time I thought it did some analysis of the environment as a pre-step and then the real work happened elsewhere. The reality is, the _IAnalysisProvider_ is the reader part of your adapter: its goal is to get data from your system and into a format and/or location that the platform can work with.
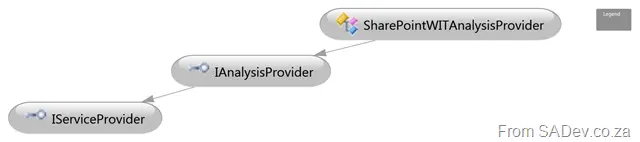
IServiceProvider
IAnalysisProvider inherits from IServiceProvider, which means you need to implement a method for that: _GetService, which just returns this object.
object IServiceProvider.GetService(Type serviceType)
{
    return (IServiceProvider)this;
}
Misc Methods
I am not covering every method you need to implement from IAnalysisProvider, because you seldom need to implement them all. For example, in my implementation of _DetectConflicts_, it just does some logging:
void IAnalysisProvider.DetectConflicts(ChangeGroup changeGroup)
{
    TraceManager.TraceInformation("WSSVC:AP:DetectConflicts");
}
InitializeServices
The first method you must care about is _InitializeServices_, this is the first method called by the platform and does five key things in my scenario:
void IAnalysisProvider.InitializeServices(IServiceContainer serviceContainer)
{
    TraceManager.TraceInformation("WSSVC:AP:Initialize");
    this.analysisServiceContainer = serviceContainer;

    supportedContentTypes = new Collection<ContentType>();
    supportedContentTypes.Add(WellKnownContentType.VersionControlledFile);
    supportedContentTypes.Add(WellKnownContentType.VersionControlledFolder);

    SharePointVCChangeActionHandler handler = new SharePointVCChangeActionHandler(this);
    supportedChangeActions = new Dictionary<Guid, ChangeActionHandler>();
    supportedChangeActions.Add(WellKnownChangeActionId.Add, handler.BasicActionHandler);
    supportedChangeActions.Add(WellKnownChangeActionId.Delete, handler.BasicActionHandler);
    supportedChangeActions.Add(WellKnownChangeActionId.Edit, handler.BasicActionHandler);

    configurationService = (ConfigurationService)analysisServiceContainer.GetService(typeof(ConfigurationService));

    highWaterMarkDelta = new HighWaterMark<DateTime>(Constants.HwmDelta);
    highWaterMarkChangeset = new HighWaterMark<int>("LastChangeSet");
    configurationService.RegisterHighWaterMarkWithSession(highWaterMarkDelta);
    configurationService.RegisterHighWaterMarkWithSession(highWaterMarkChangeset);
    changeGroupService = (ChangeGroupService)analysisServiceContainer.GetService(typeof(ChangeGroupService));
    changeGroupService.RegisterDefaultSourceSerializer(new SharePointVCMigrationItemSerializer());
}
- The first part is setting up what types of content we support (lines 6 to 8). You can see above I only care about files and folders.
- The second part is setting up what actions we support for reading (lines 10 to 14), which in this case is Add, Delete, and Edit. Delete is a bit of a lie—we do not actually support it, but we claim we do.
- The third part is getting the configuration service, which is important since we will use it later (line 16).
- The fourth part is getting the HWM—or high watermark information—(lines 18 to 21), which I will explain soon.
- Lastly, we register the default item serializer (line 23) so that the platform knows how to convert the items.
Registration
We set up the content types and actions we support and then need to register those. The way to do that is with _RegisterSupportedChangeActions. What I did was loop over the actions, then loop over the types, and finally call _RegisterChangeAction. You could do this differently—for example, if you only supported some actions on some types:
void IAnalysisProvider.RegisterSupportedChangeActions(ChangeActionRegistrationService contentActionRegistrationService)
{
    TraceManager.TraceInformation("WSSVC:AP:RegisterSupportedChangeActions");
    this.changeActionRegistrationService = contentActionRegistrationService;
    foreach (KeyValuePair<Guid, ChangeActionHandler> supportedChangeAction in supportedChangeActions)
    {
        foreach (ContentType contentType in ((IAnalysisProvider)this).SupportedContentTypes)
        {
            changeActionRegistrationService.RegisterChangeAction(supportedChangeAction.Key, contentType.ReferenceName, supportedChangeAction.Value);
        }
    }
}
ChangeActionHandler
The _ChangeActionHandler_ class is a separate class used in the _IAnalysisProvider_ during registration, providing the minimal functionality for figuring out how to register a new action (i.e., add a file, update a work item, etc.).
public abstract class ChangeActionHandlers
{
    protected ChangeActionHandlers(IAnalysisProvider analysisProvider)
    {
    }

    public virtual void BasicActionHandler(MigrationAction action, ChangeGroup group)
    {
        if (action == null)
        {
            throw new ArgumentNullException("action");
        }

        if (group == null)
        {
            throw new ArgumentNullException("group");
        }

        group.CreateAction(action.Action,
            action.SourceItem,
            action.FromPath,
            action.Path,
            action.Version,
            action.MergeVersionTo,
            action.ItemTypeReferenceName,
            action.MigrationActionDescription);
    }
}
High Watermark
High watermarks are a very interesting feature of the platform, and they let you store a value in the database for the usage of identifying change groups. One aspect I liked about its construction is its use of generics, meaning you can work with the types that make the most sense. So I have int and DateTime, and you associate a name with it.
To get the value from the database, you call the _Reload_ method. To set the value and save, call _Update_.
highWaterMarkDelta.Reload();
highWaterMarkDelta.Update(deltaTableStartTime);
Conflict Types
I mentioned conflict types briefly before and said that my VC adapter does not have a conflict type—which is not 100% true. It does have one, the _GenericConflictType_, which is based on the platform. Below is the code snippet from the WIT adapter, which does have a custom conflict type. The only difference with the VC adapter is that the last line does not exist.
public void RegisterConflictTypes(ConflictManager conflictManager)
{
    TraceManager.TraceInformation("WSSWIT:AP:RegisterConflictTypes");
    this.conflictManagerService = (ConflictManager)analysisServiceContainer.GetService(typeof(ConflictManager));
    this.conflictManagerService.RegisterConflictType(new GenericConflictType());
    this.conflictManagerService.RegisterConflictType(new SharePointWITGeneralConflictType(), SyncOrchestrator.ConflictsSyncOrchOptions.Continue);
}
GenerateDeltaTable
The next method to cover—and the second most important—is _GenerateDeltaTable, which is responsible for actually getting the values from the source system. This is done below in two steps: first _GetSharePointUpdates and second _PromoteDeltaToPending_.
void IAnalysisProvider.GenerateDeltaTable()
{
    TraceManager.TraceInformation("WSSVC:AP:GenerateDeltaTable");
    highWaterMarkDelta.Reload();
    TraceManager.TraceInformation("\tWSSVC:AP:Initial HighWaterMark {0} ", highWaterMarkDelta.Value);
    deltaTableStartTime = DateTime.Now;
    TraceManager.TraceInformation("\tWSSVC:AP:CutOff {0} ", deltaTableStartTime);
    GetSharePointUpdates();
    highWaterMarkDelta.Update(deltaTableStartTime);
    TraceManager.TraceInformation("\tWSSVC:AP:Updated HighWaterMark {0} ", highWaterMarkDelta.Value);
    changeGroupService.PromoteDeltaToPending();
}
GetSharePointUpdates
This is a huge method and does the heavy lifting. I will skip covering all the boring details of talking to SharePoint and focus on what you need to do. First, you need to identify what is new, which is done using the HWM and comparing the modified date.
if (item.Modified.CompareTo(highWaterMarkDelta.Value) > 0 && item.Modified.CompareTo(deltaTableStartTime) < 0)
You also need to figure out if the file is new or an update. In my VC adapter, I created a special system called the _ProcessLog_, which was to cater to a situation caused by SharePoint and won’t apply to other systems. Once you’ve done all of that, you can tell the platform about it by creating an action and saving the action. The following code is for VC:
TraceManager.TraceInformation("\tChangeSet:{0} - {1} ({2})", highWaterMarkChangeset.Value, item.Filename, item.AbsoluteURL);
string itemType = item.ItemType.ToWellKnownContentType().ReferenceName;
ChangeGroup cg = CreateChangeGroup(highWaterMarkChangeset.Value, 0);
cg.CreateAction(actionGuid, item, null, item.AbsoluteURL, item.Version, null, itemType, null);
cg.Save();
highWaterMarkChangeset.Update(highWaterMarkChangeset.Value + 1);
And this is the same logic for WIT:
ChangeGroup changeGroup = CreateChangeGroup(highWaterMarkChangeSet.Value, 0);
changeGroup.CreateAction(actionGuid, task, string.Empty, listName, string.Empty, string.Empty,
    WellKnownContentType.WorkItem.ReferenceName, CreateFieldRevisionDescriptionDoc(task));
changeGroup.Save();
highWaterMarkChangeSet.Update(highWaterMarkChangeSet.Value + 1);
Revision Description Doc
While the VC adapter is fairly easy—the downloading is done in the _SharePointItem—the WIT adapter doesn’t download anything. What it needs is a special XML file called a revision description document. You are responsible for generating this document as part of the creation of the action (you may have noticed this in the sample above).
This is what makes field mapping possible. If you don’t understand field mapping, you must read Willy-Peter’s post on it. You can see below how I create my document, which is created per SharePoint list item and how I support all the columns, including custom ones:
private static XmlDocument CreateFieldRevisionDescriptionDoc(SharePointListItem task)
{
    XElement columns = new XElement("Columns",
            new XElement("Column",
                new XAttribute("DisplayName", "Author"),
                new XAttribute("ReferenceName", "Author"),
                new XAttribute("Type", "String"),
                new XElement("Value", task.AuthorId)),
            new XElement("Column",
                new XAttribute("DisplayName", "DisplayName"),
                new XAttribute("ReferenceName", "DisplayName"),
                new XAttribute("Type", "String"),
                new XElement("Value", task.DisplayName)),
            new XElement("Column",
                new XAttribute("DisplayName", "Id"),
                new XAttribute("ReferenceName", "Id"),
                new XAttribute("Type", "String"),
                new XElement("Value", task.Id.ToString())));

    foreach (KeyValuePair<string, object> column in task.Columns)
    {
        columns.Add(new XElement("Column",
            new XAttribute("DisplayName", column.Key),
            new XAttribute("ReferenceName", column.Key),
            new XAttribute("Type", "String"),
            new XElement("Value", column.Value)));
    }

    XElement descriptionDoc = new XElement("WorkItemChanges",
        new XAttribute("Revision", "0"),
        new XAttribute("WorkItemType", "SharePointItem"),
        new XAttribute("Author", task.AuthorId),
        new XAttribute("ChangeDate", task.ModifiedOn.ToString(CultureInfo.CurrentCulture)),
        new XAttribute("WorkItemID", task.Id.ToString()),
        columns);

    XmlDocument doc = new XmlDocument();
    doc.LoadXml(descriptionDoc.ToString());
    return doc;
}
Note: This post is part of a series and you can find the rest of the parts in the series index.
An important class in your implementation is your item implementation, which is used to identify what an item (be it a file, directory, list item, bug, etc.) is. This class must implement IMigrationItem. This class is more important for VC than WIT, but in both cases, you need to include all the properties you need to know about. You must also ensure that all properties are serializable by the default XML serializer in .NET.
Power Tip: VC stands for Version Control—this refers to an adapter that works with the source control aspects of the system. WI (work items) and WIT (work item tracking) are the same thing. File attachments in WIs are not regarded as VC and must be handled by your WI adapter.
IMigrationItem
WIT
The WIT adapter is slightly smaller than the VC one since it is just a set of properties. I do not prioritize the inherited DisplayName property here, and the Download method is just logging. The only interesting part is the SimpleDictionary<T, V> I use. SimpleDictionary<T, V> is simply to store key/value pairs of column information from SharePoint (because you may have customized the columns in SharePoint, and I cannot hard-code them). The reason I use this instead of the Dictionary<T, V> provided by .NET is that the latter cannot be serialized using the default XML serializer. I will cover SimpleDictionary<T, V> in a later post.
public class SharePointListItem : IMigrationItem
{
    public SharePointListItem()
    {
        this.Columns = new SimpleDictionary<string, object>();
    }

    public string Id { get; set; }
    public DateTime ModifiedOn { get; set; }
    public string AuthorId { get; set; }
    public SimpleDictionary<string, object> Columns { get; set; }
    public string DisplayName { get; set; }

    public void Download(string localPath)
    {
        TraceManager.TraceInformation("WSSWIT:MI:Download - {0}", localPath);
    }
}
VC
The VC adapter is a bit more complex, with more properties, but the key difference is the DisplayName property, which returns the filename. Even more critical is the Download method, which retrieves the actual file or folder to a specified location (provided by the localPath parameter) on disk for the platform to use.
Power Tip: When downloading files in IMigrationItem, you are responsible for creating the path. Make sure you create directories and check if they exist.
string IMigrationItem.DisplayName
{
get { return Filename; }
}
void IMigrationItem.Download(string localPath)
{
TraceManager.TraceInformation("WSSVC:Item:Download:From {0} to {1}", this.AbsoluteURL, localPath);
if (this.ItemType == SharePointItemType.File)
{
TraceManager.TraceInformation("\tType is file");
string targetDir = Path.GetDirectoryName(localPath);
if (!Directory.Exists(targetDir))
{
TraceManager.TraceInformation("\tCreating directory for file - {0}", targetDir);
Directory.CreateDirectory(targetDir);
}
HttpWebRequest webRequest = (HttpWebRequest)WebRequest.Create(this.AbsoluteURL);
webRequest.Credentials = this.Credentials;
using (Stream responseStream = webRequest.GetResponse().GetResponseStream())
{
using (FileStream fileStream = new FileStream(localPath, FileMode.CreateNew, FileAccess.ReadWrite))
{
byte[] buffer = new byte[1024];
int bytesRead;
do
{
bytesRead = responseStream.Read(buffer, 0, buffer.Length);
fileStream.Write(buffer, 0, bytesRead);
} while (bytesRead > 0);
}
}
TraceManager.TraceInformation("\tFile downloaded successfully");
}
if (this.ItemType == SharePointItemType.Directory)
{
TraceManager.TraceInformation("\tType is directory");
if (!Directory.Exists(localPath))
{
TraceManager.TraceInformation("\tCreating directory - {0}", localPath);
Directory.CreateDirectory(localPath);
}
}
}
IMigrationItemSerializer
The migration item serializer is simply a way to convert your item to XML using .NET serialization. My implementation of this is identical for both VC and WIT.
public class SharePointWITMigrationItemSerializer : IMigrationItemSerializer
{
    public IMigrationItem LoadItem(string itemBlob, ChangeGroupManager manager)
    {
        TraceManager.TraceInformation("WSSWIT:S:LoadItem");
        if (manager == null)
        {
            throw new ArgumentNullException(nameof(manager));
        }

        if (string.IsNullOrEmpty(itemBlob))
        {
            throw new ArgumentNullException(nameof(itemBlob));
        }

        XmlSerializer serializer = new XmlSerializer(typeof(SharePointListItem));

        using (StringReader itemBlobStringReader = new StringReader(itemBlob))
        {
            using (XmlReader itemBlobXmlReader = XmlReader.Create(itemBlobStringReader))
            {
                return (SharePointListItem)serializer.Deserialize(itemBlobXmlReader);
            }
        }
    }

    public string SerializeItem(IMigrationItem item)
    {
        if (item == null)
        {
            throw new ArgumentNullException(nameof(item));
        }

        TraceManager.TraceInformation("WSSWIT:S:SerializeItem - {0}", item.DisplayName);

        XmlSerializer sharePointTaskSerializer = new XmlSerializer(item.GetType());

        using (MemoryStream memoryStream = new MemoryStream())
        {
            sharePointTaskSerializer.Serialize(memoryStream, item);
            memoryStream.Seek(0, SeekOrigin.Begin);
            using (StreamReader streamReader = new StreamReader(memoryStream))
            {
                return streamReader.ReadToEnd();
            }
        }
    }
}