Tech·Ed is around the corner, and if you’ve seen the session catalogue, you’ll see there are 267 sessions available for you to attend! How are you supposed to know which sessions are quality and worth your time?
Disclaimer: Rights Management Server is a great product for certain situations, and I’m picking on it in this post as an example more than anything else.
Know Yourself
The first thing to get right is to know yourself—if you’ve just started writing C# code, attending an advanced session on the internal workings of LINQ may be a waste of time, as you may struggle to keep up.
Knowing yourself isn’t just about skill level but also about what matters to you. If you have no plans to use Rights Management Server (RMS), don’t attend those sessions—you’ll miss out on other valuable ones. However, don’t limit yourself only to familiar topics.
Identify Trends
One of the benefits of attending Tech·Ed is exposure to new ideas you might not encounter in your daily routine. You might be tempted to attend an RMS session simply because it’s unfamiliar—but my advice is this: when exploring unknown topics, focus on hot trends (not RMS). A great way to spot these is by checking what community and knowledge-sharing sites, like Channel 9, are discussing.
I suggest prioritizing new trends because they’re where cutting-edge technology and learning take place. There’s often little existing content on these topics, unlike well-documented areas like RMS, where training is widely available.
Decoding Sessions
Every session at Tech·Ed has a code, and this code contains key details to help you find the right ones. For example, my session is APS309, but what does that mean?
APS – This is the track, or high-level concept, the session belongs to. In this case, APS stands for Application Server. Microsoft has a guide to all these TLA (three-letter acronyms) on the technical track page. The only missing one is WTB, which stands for Whiteboard (covered next).
3 – This digit indicates the session’s difficulty level, ranging from 1 to 4:
1: Introductory session (assumes no prior knowledge).
3: Technical session (assumes working experience with the topic).
4: Advanced session (for experts only).
09 – A unique identifier for the session.
Next, read the abstract—this outlines the session’s plan. For example, my session is titled: Intro to Workflow Services and Windows Server AppFabric
But the abstract reveals more:
Focus on Workflow Foundation (WF) for developers.
Integration of WF and WCF in .NET 4.
Hosting details for AppFabric.
The abstract clarifies my approach—starting with WF, moving to WCF, and ending with AppFabric—something the title alone doesn’t convey. Always read abstracts carefully.
Session Types
Tech·Ed offers two session types:
Breakouts: Formal presentations with demos.
Whiteboards: Less structured, often interactive discussions where topics evolve based on audience questions.
For learning a new technology, breakout sessions are ideal. If you’re familiar with a topic, whiteboards provide deeper insights for senior developers.
Networking
Tech·Ed brings together thousands of passionate professionals—perfect for networking. Most presenters welcome questions during or after sessions.
For structured networking opportunities:
Community Lounge: A space to connect with community leaders.
Ask the Experts: A dedicated event where experts offer one-on-one guidance.
Get Started Now
Don’t wait until arrival to plan sessions. Research trends, speakers, and trends now.
A helpful tip for companies: Host a pre-event gathering (like we do at BBD for our attendees). Returning attendees share insights, while newcomers get recommendations—helping everyone find great sessions.
I posted yesterday about some pain I felt when working with SharePoint and the OData API. To balance the story, this post covers some of the pleasure of working with it—that being uploading a file to a document library using OData!
This is really easy to do once you know how—but it’s the learning curve of Everest here that makes this so hard to get right, as you have both OData specializations and SharePoint quirks to contend with. Before we start, the requirements are that we need a file (as a stream), we need to know its filename, we need its content type, and we need to know where it will go.
For this post, I am posting to a document library called Demo (which is why OData generated the name DemoItem), and the item is a text file called Lorem ipsum.txt. I know it is a text file, which means I also know its content type is plain/text.
The code below is really simple, and here’s what’s going on:
Line 1: I am opening the file using the System.IO.File class, which gives me the stream I need.
Line 3: To communicate with the OData service, I use the DataContext class, which was generated when I added the service reference to the OData service and passed in the URI to the service.
Line 8: Here, I create a DemoItem—remember, in SharePoint, everything is a list or a list item, even a document, which means I need to create the item first. I set the properties of the item over the next few lines. It is vital you set these and set them correctly, or it will fail.
Line 16: I add the item to the context, meaning it is being tracked locally—it is not in SharePoint yet. It is vital that this be done prior to associating the stream.
Line 18: I associate the stream of the file with the item. Once again, this is still happening locally—SharePoint has not been touched yet.
Line 20:SaveChanges handles the actual writing to SharePoint.
The Path property, which is set on the item (Line 12) and when associating the stream (Line 18, final parameter), is vital. This must be the path to where the file will exist on the server. This is the relative path to the file, regardless of the SharePoint site you are in. For example:
Path:/Documents/demo.txt
Server: http://sharepoint1
Site: /
Document Library: Documents
Filename: demo.txt
Path:/hrDept/CVs/abc.docx
Server: http://sharepoint1
Site: /hrDept
Document Library: CVs
Filename: abc.docx
Wrap-up
I still think you need to consider WebDAV as a viable way to handle documents that do not have metadata requirements. But if you have metadata requirements, this is a great alternative to the standard web services.
SharePoint 2010 has a number of APIs (an API is a way we communicate with SharePoint), some we have had for a while, like the web services, but one is new—OData. What is OData?
The Open Data Protocol (OData) is a Web protocol for querying and updating data that provides a way to unlock your data and free it from silos that exist in applications today. OData does this by applying and building upon Web technologies such as HTTP, Atom Publishing Protocol (AtomPub), and JSON to provide access to information from a variety of applications, services, and stores.
The main reason I like OData over web services is that it is lightweight, works well in Visual Studio, and works easily across platforms, thanks to all the SDKs.
SharePoint 2010 exposes these on the following URL: _http(s)://<site>/_vti_bin/listdata.svc_. You can add this to Visual Studio to consume it, using the exact same process as a web service: right-click the project and select Add Service Reference.
Once loaded, each list is a contract and listed on the left. To add it to code, you just hit OK and start using it.
Add Service Reference Failed
The procedure above works well—until it doesn’t. Oddly enough, my current work encountered a situation where the Add Reference dialog failed. The experience isn’t great when it fails: the dialog closes and pops back up blank. Try it again, and it disappears—but stays gone.
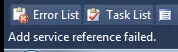
If you check the status bar in Visual Studio, you’ll see the error message indicating it failed—but by then, you may notice the service reference is listed, but no code works, because the add failed.
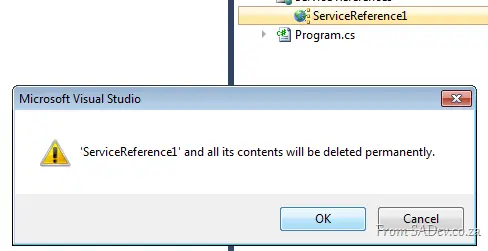
If you right-click and try to delete it, Visual Studio will refuse, because the add failed. The only way to remove it is to close Visual Studio, navigate to the Service References folder (<Solution Folder>\<Project Folder>\Service References\), and delete the folder matching your service name. You’ll then be able to reopen Visual Studio and delete the service reference successfully.
What Went Wrong?
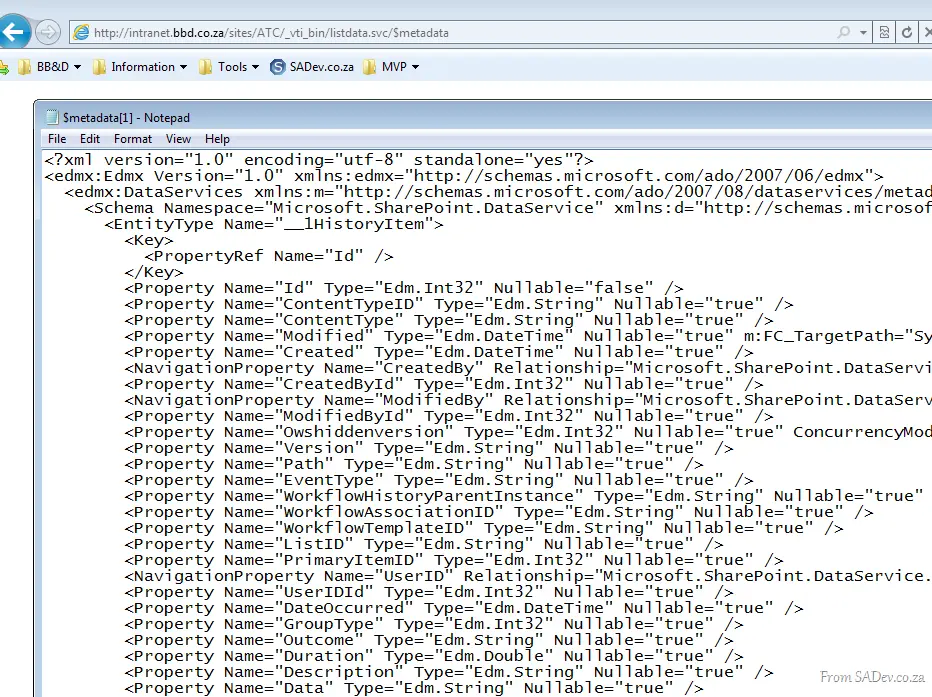
Since we have no way to know what caused the failure, we need to dig deeper. Start by launching a web browser and navigating to the metadata URL for the service: _http(s)://<site>/_vti_bin/listdata.svc/$metadata_.
In Internet Explorer 9, this just gives a useless blank page 🙁, but if you use the right-click menu option in IE 9 (View Source), it will show you the XML in Notepad. This XML is what Visual Studio attempts to parse and fails on. To diagnose the issue, save it to your machine with a .csdl file extension—this special extension is required for the next tool, which refuses to work with files lacking it.
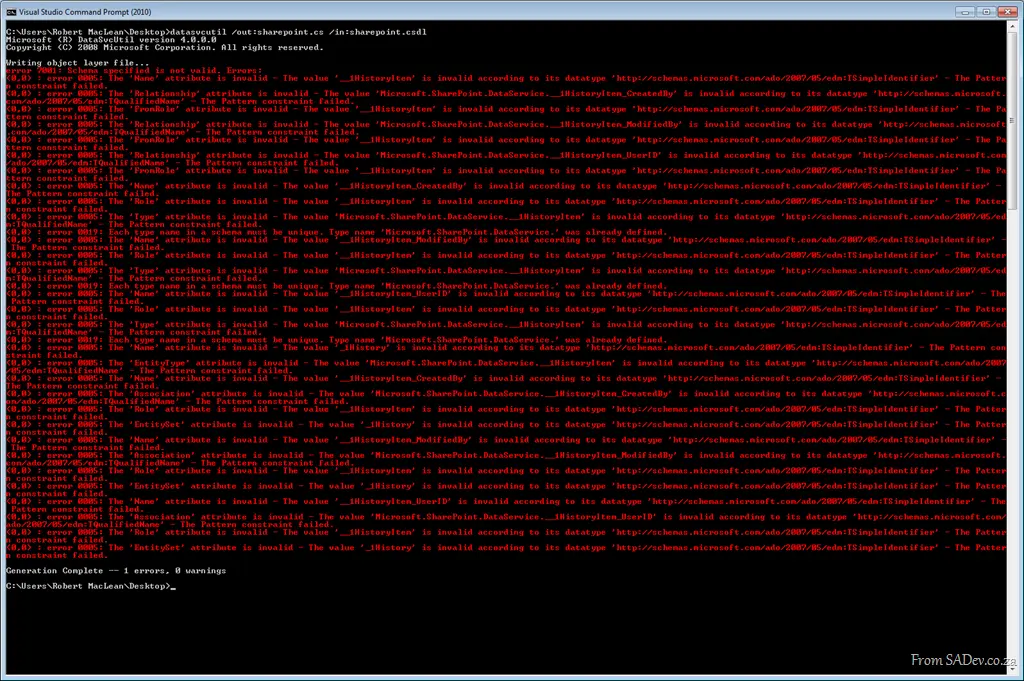
Next, open the Visual Studio Command Prompt and navigate to where you saved the CSDL file. Use the command-line tool DataSvcUtil.exe. If you’ve worked with WCF, you may recognize SvcUtil.exe—this is similar, but specifically for OData services. It takes the CSDL file and generates a code contract using this syntax: datasvcutil.exe /out:<file.cs> /in:<file.csdl>
Immediately, you’ll see a mass of red errors, indicating failure. In my case, the issue was a list named 1 History, which the OData service refers to as __1History. This problematic entry was blocking code generation, as revealed by the errors.
Solving the Problem!
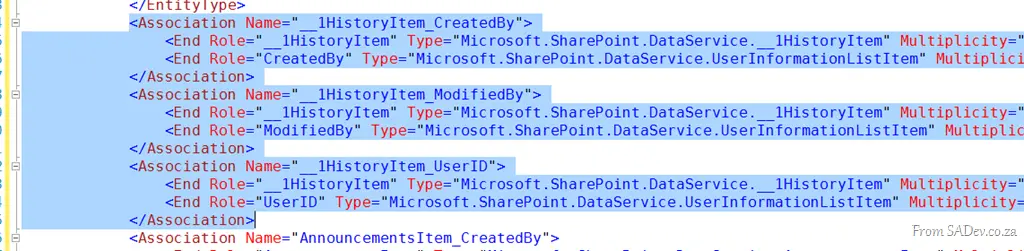
Since I didn’t need 1 History, I cleaned up the CSDL file by removing all references to __1History. In Visual Studio, I opened the CSDL file and began deleting references to the troublemaker. I also needed to remove the item contract for the list, which was __1HistoryItem. First, I removed the EntityType for the item contract, highlighted in the image.
The next cleanup step was removing all associations to __1HistoryItem.
Finally, I removed the EntitySet for the list.
PHEW! Now the hard work is done. I jumped back to the command prompt, reran DataSvcUtil, and it worked:
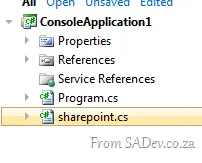
This produced a file (in my case, s_harepoint.cs), which I added to my project just like any other class file. Now I could use OData in my solution as intended!
Note: This is part of a series; you can find the rest of the parts in the series index.
Pull started as a learning exercise, so I didn’t feel bad about using a new technology for a component that may not be the best choice. IMPF was one such area where I decided to use a new technology, though it hasn’t been smooth sailing – but I persisted, as it was important for me to learn.
I was working on some enhancements and bug fixes recently and ended up having to put yet another hack into IMPF to handle the technology behind the scenes. In this case, a Thread.Sleep delay was needed between when things are written and when they are read. This was a wake-up call for me, as it felt dirty and stupid. So what did I do? I decided the best course of action was to step back and think about the best way to do this—and so I ripped all the MemoryMappedFile out and the Win32 API stuff (about 200 lines of code) and replaced it with a WCF service/client implementation.
To do that, I needed the contract, which is about as simple as it can get:
You may note some command parameter items above—this is for new features I am working on.
Finally, I needed a way to create the WCF service (the server) and a client to talk to it. I am using .NET 4, which means I get access to the great AddDefaultEndpoints method, making this really simple. It figures out everything it needs for a default configuration from the URI that is passed. In my case, I pass in a net.pipe URI, so it sets up a named pipe for me.
publicIPMF(string instance)
{
host = new ServiceHost(typeof(DataService), new Uri(InstanceURL(instance)));
host.AddDefaultEndpoints();
host.Open();
}
Lastly, sending a message to the named pipe is also very simple. You’ll note that I’m using a ChannelFactory here and not an actual implementation. This is because I did not add a service reference—since the application has all the information it needs internally, there’s no need for additional code to be written.
This is the correct way to do this—and it is what you should use in real systems. Not only is it so much less code, but it also works perfectly—no need for insane hacks.
My learning with IMPF wasn’t only about the exceptionally powerful MemoryMappedFile in .NET 4, but also about when it should and shouldn’t be used.
Saturday was Microsoft’s Dev4Dev event, where each presenter gets 20 minutes to cover one topic. It’s fantastic fun and a great way to learn.
For the event, I decided to tackle CodedUI, which is just a great testing technology. In 20 minutes, I showed off a number of its features. Below are the slides—though they’re not valuable unless you jump to the hidden content, where you’ll find my demo script and some extra information!
If you want to play with the demos, you’ll also need my pre-constructed demo bits:
The XML file with the values for the data-driven test: Below
For those who attended and saw my second demo not go according to plan, I apologize again 😭. I’ve since run it again, and it works every time—I guess the massive audience scared CodedUI into breaking! 😉
Note: This is part of a series—you can find the rest of the parts in the series index.
I’ve mentioned that a podcatcher is really just two things put together: a download manager and a feed parser. Feed parsing is not the easiest item to build—just look at my attempt many years ago to build a Delphi RSS parser called SimpleRSS. It works well, but there are many edge cases that can break it.
The key things that trip you up when writing a parser are:
RSS and ATOM – There are two major formats for feeds, RSS and ATOM, which are very different.
Versioning – RSS and ATOM both have a number of versions, each requiring completely different parsing logic.
Errors – It’s easy to produce them; since feeds are just XML, there’s a lot of invalid feeds out there.
With that in mind, I’m really happy that the .NET Framework (since 3.5) includes its own parser for feeds: SyndicationFeed.
SyndicationFeed
System.ServiceModel.SyndicationFeed supports both ATOM (version 1.0) and RSS (version 2.0). To use it, add a reference to System.ServiceModel.dll. It only handles parsing (and feed creation, though I don’t need that functionality in Pull). To parse a feed, pass an XmlReader to the Load method, and it takes care of the rest.
using (XmlReader reader = XmlReader.Create(podcastUrl))
{
    return SyndicationFeed.Load(reader);
}
Note: This is part of a series, you can find the rest of the parts in the series index.
Pull for me is as much about learning as it is about writing a useful tool that others will enjoy—and often I head down a path only to learn it was wrong. Sometimes I realize before a commit and no one ever knows; other times, it is committed, and reading the source history is like an example of how bad things can get. Sometimes I even ship bad ideas. IMPF is one such area where I shipped a huge mistake that caused Pull to easily consume an entire core of CPU for doing zero work.
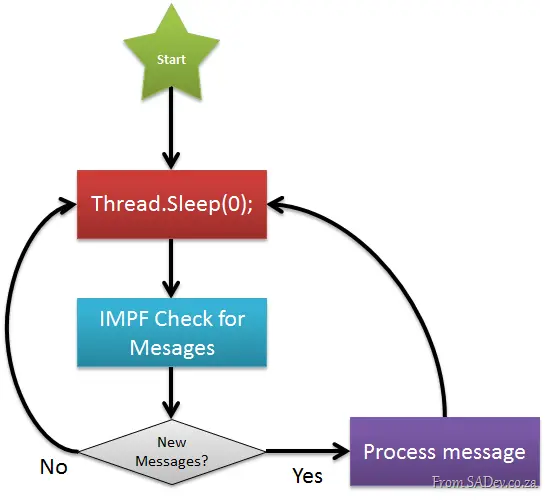
IMPF would check for messages using the following process:
The _Thread.Sleep(0) is there to ensure application messages get processed, but it is zero, so that as soon as a message arrives, it is processed. This meant the check—which did a lot of work—was running almost constantly. This meant that Pull ended up eating 100% of a core’s power 🙁
The Solution
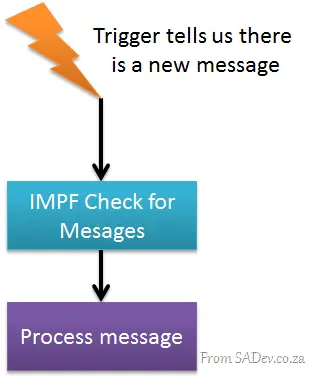
The solution was to change the process from constantly checking to getting notified when there is a new message.
This is also much simpler to draw than the other way—maybe that should be a design check: the harder to draw, the less chance it works! 😉
The only issue is how to cause that trigger to fire from another application when it writes a message IMPF should read?
Windows Messaging
Windows has an internal message system that you can use to send messages to various components in Windows—for example, to turn the screen saver on or off, or to send messages to applications. I have used this previously in Pull to tell Windows to add the shield icon (see Part IX) if needed to the protocol handler buttons.
I can also use it to ping an application with a custom message that the application can act on. For Pull, when I get that ping, I know there is a new IMPF message.
The first step is finding the window handle of the primary instance that I want to ping. I do this by consulting the processes running on the machine and using a dash of LINQ to filter it to the primary instance:
privatestatic IntPtr GetWindowHandleForPreviousInstances()
{
Process currentProcess = Process.GetCurrentProcess();
string processName = currentProcess.ProcessName;
List<Process> processes = new List<Process>(Process.GetProcessesByName(processName));
IEnumerable<Process> matchedProcesses = from p in processes
where (p.Id != currentProcess.Id) &&
(p.ProcessName == processName)
select p;
if (matchedProcesses.Any())
{
return matchedProcesses.First().MainWindowHandle;
}
return IntPtr.Zero;
}
Now that I know whom to ping, I just need to send the ping. This is done by calling the Win32 API _SendNotifyMessage:
That takes care of sending, but how do I receive the ping? I need to override the _WndProc method on my main form to check for the message and, if I get the right ID (see line 1—the _NotifyMessageID), I then act on it. In my case, I use the bus to tell IMPF that there is a new message:
This change enabled IMPF to act only when needed, removed a thread (since it no longer needs its own), simplified the IMPF code, and made Pull a better citizen on your machine. 😊
6 July 2026 - this is version 2.1, version 2.2, 2.3 and 2.4 were lost when the host had a problem. There is a bug in multiple checks in this version and some issues with checking leap years.
A long time ago, I built a simple Excel spreadsheet that worked out if an ID number was valid or not. Since I released it, I have received a lot of feedback about the spreadsheet. Most of the feedback was about how it worked, but a week ago, Riaan contacted me and pointed out a bug in it, so I took this as an opportunity to rebuild it.
Not only does the new version check the validity of the ID number, but it also tells you where the person was born, their gender, and birth date.
Something else I wanted to do was clean up the calculations. So now they have been moved to their own (hidden) tab and are documented.
For those who need to do bulk checking, the second sheet of the Excel spreadsheet contains the ability to check multiple ID numbers.
I want to extend a massive thanks to Riaan Pretorius—not only for pointing out the bug but also for running the new version through its paces and finding some issues in it. The fact that this one is much better is owed to him. I just typed the code 😊
Note: This is part of a series. You can find the rest of the parts in the series index.
Microsoft has offered a great tool called fxCop for a number of years now. This free tool takes your compiled .NET code and runs it against a number of rules to check things like security, compatibility, globalization, and so on.
Some of the higher SKUs of Visual Studio have included fxCop directly in the IDE via the Code Analysis option. In previous versions of Visual Studio, this just ran the fxCop command line and returned the results. There was not much else happening except a shortcut to having to run a separate tool.
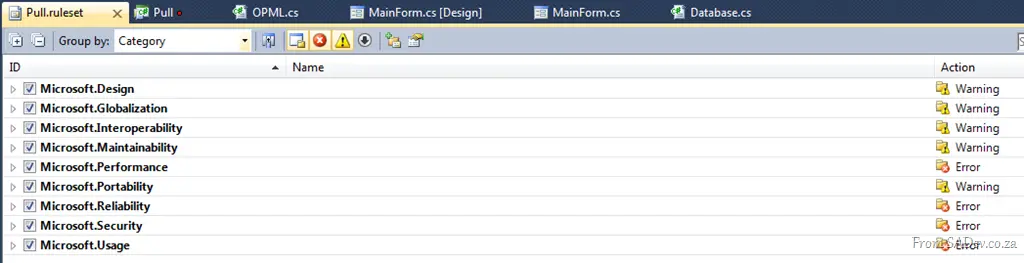
In Visual Studio 2010, the fxCop integration had a major improvement: the addition of a dedicated interface for managing which rules to run and the ability to create a bespoke collection of the rules you care about by ignoring the ones you don’t. The other great feature is that you can set whether a rule throws a warning or an error in Visual Studio—very useful for enforcing rules!
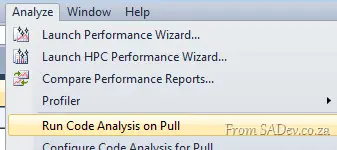
For Pull, I took the opportunity to create a dedicated rule set.
Step One – Theft
The first thing I did was to take the Microsoft All Rules rule set and copy it to my project, renaming it to pull.ruleset. You can find the Microsoft All Rules rule set file at: C:\Program Files (x86)\Microsoft Visual Studio 10.0\Team Tools\Static Analysis Tools\Rule Sets\AllRules.ruleset.
Step Two – Minor Tweak
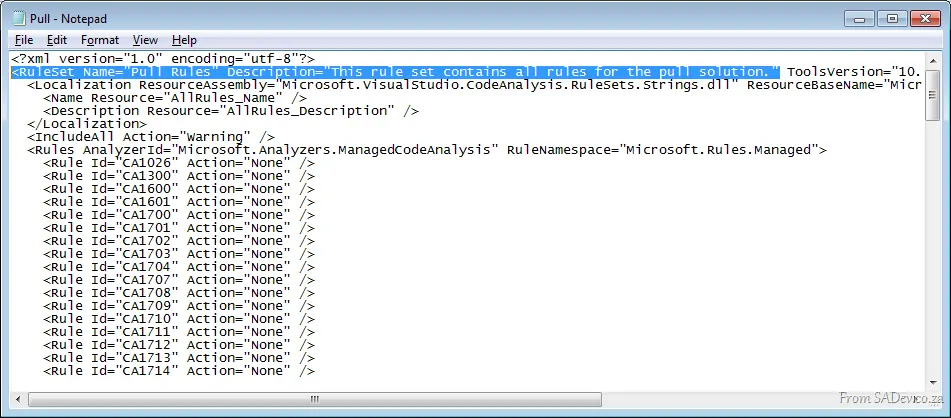
Next, I opened the pull.ruleset file in a text editor (it is just XML) and changed the rule set name and description.
Step Three – Associate
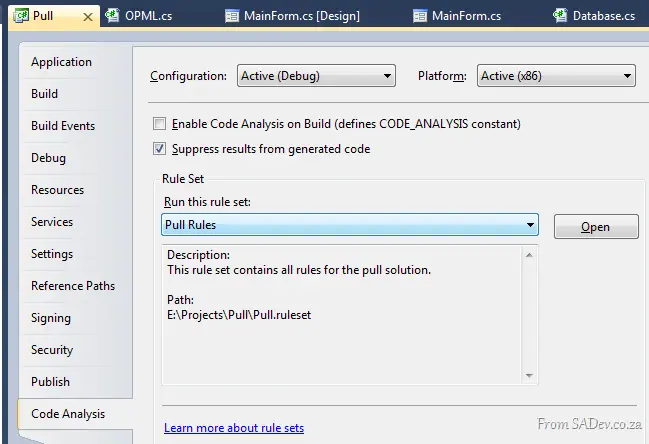
Next, I used the Browse option in the rule set selector to select my pull.ruleset file.
Step Four – Adjust Rules
Now, I could use the Visual Studio rules editor (by clicking Open) to adjust what rules I wanted to keep and what severity level to assign them. Since I started with the Microsoft All Rules, I had all the rules listed initially, so this took a little bit of time to adjust.
Step Five – Source Control
Make sure you check in your custom rule set file so that everyone on the team can enjoy its powerful magic. If I were using a fully featured ALM tool (like TFS) and not just a source control tool, I could also include the rules in my check-in policies to ensure that code checked in complies—and in my build server.
Note: This is part of a series, you can find the rest of the parts in the series index.
Windows Vista introduced a feature called User Account Control (UAC), which added the following to Windows (along with a lot of hair-pulling by some users). Visually, it brought a small shield overlay icon to indicate to the user that when you click that icon or button, you’ll be prompted to confirm your action—and possibly to enter an administrator username and password. This was introduced to stop people from shooting themselves in the foot by making certain actions, which could break Windows, require special privileges (called administrator privileges, though I find this confusing alongside administrator users and groups; I call it root privileges).
I’ve been a fan of this idea since its launch, and as a developer, I’ve kept it turned on—mainly because my customers may not have it turned off. Imagine the scenario where I have it off, and something works, but on a customer’s machine, it fails because UAC is on. A Works on my machine scenario, indeed! 🙁
Pull has a component that directly interacts with UAC—registering protocol handlers. I don’t want the entire Pull application to need root privileges when running; I only want the small part where you can register or unregister a protocol handler to require root privileges.
Multiple Processes
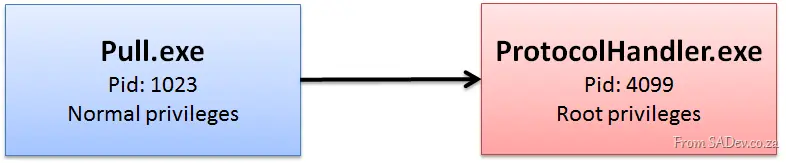
The first issue is that root privileges are assigned to an entire process, not to a thread, method, or subpart. To solve this for Pull, I created a second executable file, ProtocolHandler.exe, which handles the registering and unregistering of protocol handlers via command-line parameters.
This enables Pull to launch this secondary executable with the required root privileges and offload the heavy lifting without Pull itself needing any elevated permissions.
Running with Root Privileges
Launching another process in C# is straightforward thanks to the Process class, which handles execution via the Start() method. The Process class knows which process to run because of the ProcessStartInfo class, configured beforehand and passed to the StartInfo property.
To enable root privileges in the new process, simply set the Verb property of ProcessStartInfo to "runas" (line 6 below). Pull also waits for the process to finish running so the user isn’t left confused by an immediate return with no visible action. This is achieved using the WaitForExit() method on the Process instance (line 12 below).
privatestaticvoidRunProtocolHandler(string arguments)
{
ProcessStartInfo processStartInfo = new ProcessStartInfo();
processStartInfo.FileName = Path.Combine(Directory.GetCurrentDirectory(), "ProtocolHandler.exe");
processStartInfo.Arguments = arguments;
processStartInfo.Verb = "runas";
using (Process process = new Process())
{
process.StartInfo = processStartInfo;
process.Start();
process.WaitForExit();
}
}
The Shield
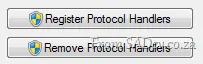
The final component was to follow UI guidelines by placing a shield icon on buttons that launch the secondary application, alerting users that root privileges are required. While you could manually place a shield image on such buttons, this is not recommended because:
What if the logo changes in future Windows versions? (You’d be out of date!) 🙁
What if the shield isn’t needed because the user already has root privileges?
To handle this, I created a small class called UACShield with two methods:
IsAdmin(): Returns true if the user has root privileges, false otherwise (using .NET’s built-in check for the Administrator role).
AddShieldToButton(): Takes a button and, if the user isn’t an admin, adds the shield icon by calling the Win32 API’s SendMessage to update the button. A caveat here: the button’s FlatStyle must match the system’s style, or custom UI tweaks may break.


 Tech·Ed is around the corner, and if you’ve seen the session catalogue, you’ll see there are 267 sessions available for you to attend! How are you supposed to know which sessions are quality and worth your time?
 One of the benefits of attending Tech·Ed is exposure to new ideas you might not encounter in your daily routine. You might be tempted to attend an RMS session simply because it’s unfamiliar—but my advice is this: when exploring unknown topics, focus on hot trends (not RMS). A great way to spot these is by checking what community and knowledge-sharing sites, like Channel 9, are discussing.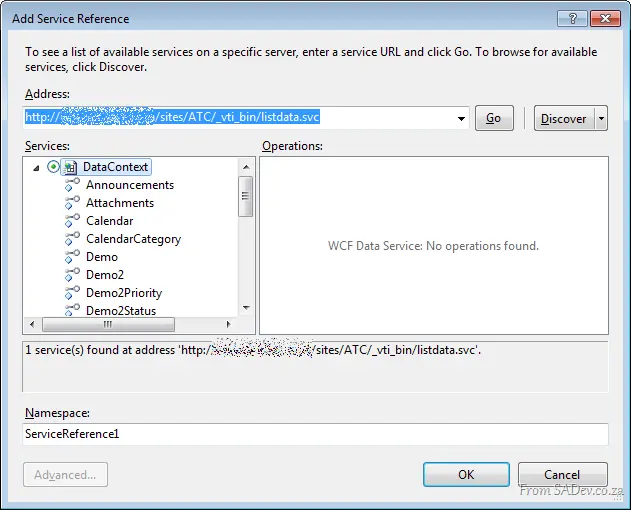


 ]
]
 to indicate to the user that when you click that icon or button, you’ll be prompted to confirm your action—and possibly to enter an administrator username and password. This was introduced to stop people from shooting themselves in the foot by making certain actions, which could break Windows, require special privileges (called administrator privileges, though I find this confusing alongside administrator users and groups; I call it root privileges).