Want to learn about other C# 6 features? Check out the full list of articles & source code on GitHub
Expression bodied members are a new feature in C# 6 and are a very interesting feature that aims to reduce the number of lines of code in your app for simple tasks. What do I mean by "simple tasks"? Anything that consists of a single statement.
I use the word statement and not line because you can break a statement across multiple lines and it will still work. Think of a statement as complete when you hit the first semicolon (;).
Here are some examples of one-statement code blocks:
// a method with one statement in itprivatedoubleTax()
{
return1.14;
}
// a read-only property with one statementpublicdouble Price
{
get
{
return CostPrice * Tax();
}
}
// a method calling an event, in this case using the [null-propagation operator](/content/null-propagation-operator-nullet-c-6)privatevoidRaisePain(string propertyName)
{
PropertyChanged?.Invoke(this, new PropertyChangedEventArgs(propertyName));
}
All examples contain a single statement but span multiple lines. The first and last examples are 4 lines of code (4:1 ratio), and the second example is 7 lines of code (7:1 ratio). Expression bodied members aim to reduce this to a 1:1 ratio! 😊
Expression Bodied Members
The name of this feature hints at everything you need to know: it applies to members (properties, methods, etc.), it’s an expression, and we use the => operator followed by the body of that expression. Applying this logic to the first example, we can rewrite them as follows:
// still a method, but now one lineprivatedoubleTax() => 1.14;
// still a read-only propertypublicdouble Price => CostPrice * Tax();
// still a methodprivatevoidRaisePain(string propertyName) => PropertyChanged?.Invoke(this, new PropertyChangedEventArgs(propertyName));
This dramatically cuts the code-to-statement ratio and lets you express simple tasks without much ceremony.
While it uses the => operator, I’ve intentionally avoided calling these lambdas because they don’t support all lambda functionality.
Supported and Unsupported Scenarios
As we’ve seen, both methods (with or without parameters) and read-only properties (those without a setter) are supported. Operators are also supported:
publicstatic Complex operator +(Complex a, Complex b) => a.Add(b);
Converters (implicit or explicit) are also supported:
Want to learn about other C# 6 features? Check out the full list of articles & source code on GitHub.
nameof is a fantastic piece of syntactic sugar in C# 6, which aims to solve a major pain: magic strings. A magic string is a type of string in your application that isn’t input/output-related but rather a marker or used for comparison. For example, you might do role checking with something like this:
if (role == "admin")
{
}
The issue with this string "admin" is that there is no compiler checking for it. That means if you mistype the content, you won’t know it’s wrong until the app fails. The second issue is that refactoring tools don’t work with them—so if you change "admin" to "administrator" in one place, there’s no way tools can find and update all instances throughout your app, and it breaks again when you run it.
A lot of the time, you can clean this up with enums or objects. For example, we can improve our role scenario by checking against an enum:
if (role == Roles.Admin.ToString())
{
}
This no longer suffers from the two issues listed above 😊.
Members & Magic Strings
The problem remains with magic strings that refer to members (fields, properties, methods, types, etc.). In the first example, we have a magic string pointing to the Age property:
publicint Age
{
get { return age; }
set
{
age = value;
RaisePropertyChanged("Age");
}
}
For the second example, we have a magic string pointing to a class Track:
var type = Type.GetType("Track");
And finally, our third example involves checking a field for null and raising an exception with the correct field name:
privatevoidRaisePropertyChanged(string propertyChanged)
{
if (propertyChanged == null)
{
thrownew ArgumentNullException("propertyChanged");
}
// do stuff
}
All of these examples suffer from the same two problems—no compile-time checks and no refactoring support—but until now, there hasn’t been an effective way to clean them up.
nameof
The goal of the new nameof keyword is to solve this specific type of magic string—those that refer to members in code. By using nameof, we can rewrite the above examples like this:
// example 1publicint Age
{
get { return age; }
set
{
age = value;
RaisePropertyChanged(nameof(Age));
}
}
// example 2var type = Type.GetType(nameof(Track));
// example 3privatevoidRaisePropertyChanged(string propertyChanged)
{
if (propertyChanged == null)
{
thrownew ArgumentNullException(nameof(propertyChanged));
}
// do stuff
}
Notice we’ve eliminated the strings entirely! This means if you mistype a member name at compile time, you’ll get an error.
We also get full refactoring support, since Visual Studio and other refactoring tools can now identify that it’s a member and replace/rename as needed.
More Sugar
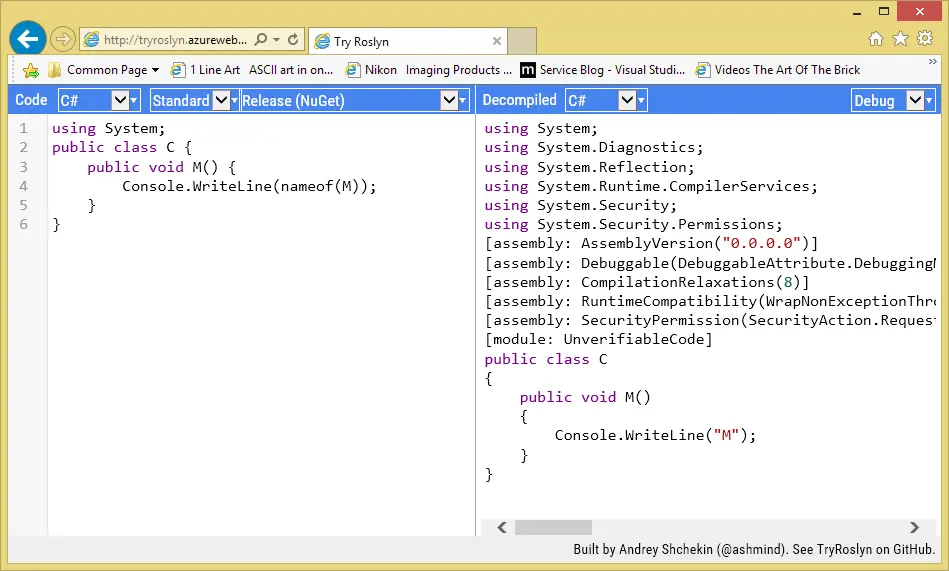
As mentioned earlier, this is just syntactic sugar—the compiler does clever tricks for us. All nameof does is instruct the compiler to convert a member to a string, so the output is the same as before—just safer.
I recommend the TryRoslyn website, which is fantastic for experimenting with C# 6. It also shows decompiled code side by side, demonstrating how the syntactic sugar works:
What Does It Output?
In the first set of examples, we looked at simple members, but what if we have something more complex—like a namespace or a class & property? In those cases, it outputs the last part each time:
nameof(Track.Band); // Class.Property → outputs: Property, in this case 'Band'nameof(System.Configuration); // Namespace → outputs: Last namespace, in this case 'Configuration'nameof(List); // List + Generics → outputs: The type of the object, in this case 'List'nameof(this.field); // `this` keyword + field → outputs the field name 'field'
What Isn’t Supported
nameof isn’t a solution for everything in .NET, and there’s a lot it won’t handle. Here are some examples:
nameof(f()); // where `f` is a method → you could use `nameof(f)` insteadnameof(c._Age); // where `c` is a different class and `_Age` is private → nameof can't break accessor rulesnameof(List<>); // List<> isn't valid C# anywaynameof(default(List<int>)); // default returns an instance, not a membernameof(int); // `int` is a keyword, not a member → you could do `nameof(Int32)`nameof(x[2]); // returns an instance using an indexer, so not a membernameof("hello"); // a string isn't a membernameof(1+2); // an `int` isn't a member
Is This a Replacement for CallerMemberName?
I’ve written about a fantastic .NET 4.5 feature called CallerMemberName. To recap: it’s a way to attribute a method parameter and have the runtime set its value to the name of the calling member.
In the following example, the output will be Main, matching the name of the calling method:
This seems similar to nameof, but there are fundamental differences. Most importantly:
nameof works at compile time.
CallerMemberName works at runtime.
This means one method in the example can work with multiple callers—i.e., if you call it from a different member, it will output the correct name. There’s no way to do that with nameof, since it produces hardcoded values.
While there’s some overlap, in cases like XAML + RaisePropertyChanged, you could choose either based on preference—but these two features have their differences. There are times where CallerMemberName is the only viable option.
Want to learn about other C# 6 features? Check out the full list of articles & source code on GitHub
NULLs—you either hate them or loathe them. They are the source of so many issues in the apps we write, especially the dreaded NullReferenceException. The current fix is to be very defensive in your programming, for example:
publicstaticvoidException(Track track)
{
// this may cause an exception if the track object, band property or the frontman property is null
Console.WriteLine("HI! " + track.Band.FrontMan.Name);
// defensive programming to avoid null exceptionsif (track != null && track.Band != null && track.Band.FrontMan != null)
{
Console.WriteLine("HI! " + track.Band.FrontMan.Name);
}
}
Constant null-checking also makes working with events particularly ugly, because you need to check for nulls before you call an event:
With C# 6, a new operator has been added: the null propagation operator (?). Some people have taken to calling it the Elvis operator (since it resembles two eyes and a splash of hair), though I think the hair resembles more of a mullet—so I’ve adopted the term "NULLET operator".
The nullet operator allows you to check for nulls, so we can rewrite the first example as follows—which will not raise a null exception:
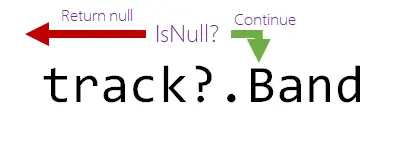
Here’s how the nullet works: it tells .NET to check if the preceding item is null before moving to the next. If an item is null, evaluation stops there, returning null. For example, with track:
Both examples execute without null issues because the ? prevents cascading exceptions.
Not the End of Null Pain
Nullet is a shortcut that prevents NullReferenceException, but null-related exceptions can still occur. For example, Enum.Parse throws a NullArgumentException if given null:
Want to learn about other C# 6 features? Check out the full list of articles & source code on GitHub
Many of the other C# 6 features I’ve covered are implemented using syntactic sugar—exception filters aren’t. This has been in the deep parts of .NET for some time, and in C# 6 it is finally being surfaced. This is a very basic introduction to exception filtering, and I have another post with advanced topics that I’d love for you to read.
Catching Exceptions
Catching exceptions today uses the exception type as the condition for the catch block.
try
{
    // code which could throw exception
}
catch (HttpException ex)
{
    // catching only HttpExceptions
}
In the above code, any HttpException will be caught, but any exception of any other type won’t.
try
{
    // code which could throw exception
}
catch (HttpException ex)
{
    // catching only HttpExceptions
}
catch (Exception ex)
{
    // catching everything except HttpExceptions
}
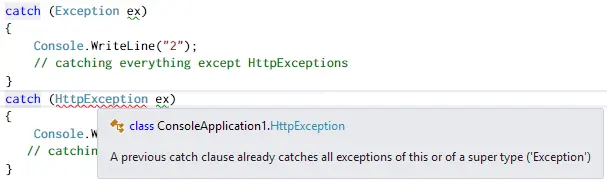
We can catch everything by catching the base Exception class. Order matters here, but the compiler will help prevent you from shooting yourself in the foot:
Today, if you want more fine-grained control over what a catch block responds to, you need to do it inside the catch block itself. For example, handling an exception differently based on values in the exception:
try
{
    // some code
}
catch (HttpException ex)
{
    if (ex.HttpCode == 401)
    {
        // need to do an authenticate
    }
    else
    {
        // some other HTTP error we need to handle
    }
}
Another good example is logging, based on a setting you might want to log or not log exceptions:
try
{
    // some code
}
catch (HttpException ex)
{
    if (loggingTurnedOn)
    {
        // log it
    }

    throw;
}
Exception Filters
Exception Filters add a way to impose additional requirements on a catch block in the form of a boolean expression, which we append with the when keyword. We can now rewrite the two examples as follows:
// example 1try
{
// some code
}
catch (HttpException ex) when (ex.HttpCode == 401)
{
// need to do an authenticate
}
catch (HttpException ex)
{
// some other HTTP error we need to handle
}
// example 2var loggingTurnedOn = false;
try
{
// some code
}
catch (HttpException ex) when (loggingTurnedOn)
{
// log itthrow;
}
The when clause can evaluate any boolean expression. You can chain conditions with && or ||:
when (loggingTurnedOn && ex.HttpCode != 401)
You can also pass methods into the when condition:
publicstaticboolThrowException()
{
// elided
}
publicstaticvoidOldPain2()
{
try
{
// some code
}
catch (HttpException ex) when (ThrowException())
{
// do something
}
}
When Isn’t If
Lastly, the language choice for this feature is important: it’s not an if statement, because it isn’t conditional branching—it is a filter condition. One of the key distinctions is that an if statement supports else, whereas when does not.
Want to learn about other C# 6 features? Check out the full list of articles & source code on GitHub
Static using statements are a new feature of C# 6 designed to improve the readability of code. Before we begin: a word of warning about this feature. In my honest opinion (IMHO), this feature is not meant to be used everywhere in your code. Like salt, a little enhances the flavor—but too much can cause issues.
With that warning out of the way, let’s see what static using does. There are times when the class name breaks the flow of code, lowering readability. Here’s some example code we’ll work with:
The repeated use of the [Math](https://msdn.microsoft.com/en-us/library/system.math%28v=vs.110%29.aspx) class makes this a bit harder to read. We can use the new static using statement feature to remove that redundancy:
Notice that while we’ve removed Math. from line 8, we’ve added a new static using statement on line 2. This line tells the compiler where to look if it can’t find the method or property in the current scope. Again, this is just syntactic sugar—the resulting code is functionally identical to the first example.
The only requirement is that the class be static. This means it works with Math, Console, Convert, and any of your own static classes as well.
What happens if I have a member with the same name already in scope?
If there’s already a member in scope with the same name—for example, if we define a Cos method—this is what happens:
In this scenario, the locally defined member (Cos) takes precedence, as it’s the first one the compiler finds. This is an example of where overusing this feature could lead to subtle, hard-to-debug naming conflicts.
What about Extension Methods?
C# 3.0 introduced extension methods, which let you write methods that appear to be part of a class but are actually separate. Here’s an example where we add Example() to the string class:
Adding a static using statement still lets you call extension methods as usual, but you cannot call them directly without qualifying them. For direct calls, you must include the class (and possibly the namespace):
using System;
usingstatic ExtensionMethods.Extensions;
internalclassStaticUsing
{
publicstaticvoidBrokenFlow()
{
Console.WriteLine(ExtensionMethods.Extensions.Example("Leslie")); // Works
Console.WriteLine(Example("Robert")); // Does NOT work
Console.WriteLine("Robert".Example()); // Works
}
}
Want to learn about other C# 6 features? Check out the full list of articles & source code on GitHub
Continuing from the previous post on auto-property initializers, the second enhancement to auto-properties in C# 6 is proper support for read-only properties.
Before we get to the C# 6 solution, let’s look at C# 1 and how we handled this in the past. In C# 1, we could remove the setter of a property to create a read-only property:
private int csharpOne = 42;

public int CSharpOne
{
    get { return csharpOne; }
}
With C# 2 auto-properties, we didn’t receive support for a read-only version. The closest we could get was limiting the accessibility of the setter, for example:
public int CSharpTwo { get; private set; }
Finally, with C# 6, we get true read-only support in auto-properties, allowing us to assign the value using either the new auto-property initializer syntax or in the constructor. For example:
publicint CSharpSix { get; } = 42;
The changes to auto-properties will bring many benefits for cleaner code. What do you think?
Want to learn about other C# 6 features? Check out the full list of articles & source code on GitHub
A big design trend in C# 6 is the removal of ceremony from code. Ceremony is the amount of code you need to write to write the code that actually matters. It is the fluff that is there because it is needed by C# and not to solve your problem. Auto-properties are a great example of removal of ceremony—and in C# 6, they have been improved further.
In C# 1, we would type out the full property with the getter & setter and a field. One nice feature was that you could initialize the value of the field, thus giving the property a default value. For example, like this:
privateint csharpOne = 42;
publicint CSharpOne
{
get { return csharpOne; }
set { csharpOne = value; }
}
In C# 2, we got the (syntactic sugar) feature for one-line properties. The compiler would generate the field, the getter, and the setter automatically in the compiled code. However, the loss of the field meant the only way to assign a default value was in the constructor, as in the following example:
On one hand, the single-line property is great and is an example of less ceremony, adding readability. But when we need to assign a default value, we add more ceremony—and ultimately increase complexity and the potential for errors because there is no obvious way to see the constructor is assigning a value unless you go and check it.
C# 6 simplifies this with a new syntax to assign a default value:
Want to learn about other C# 6 features? Check out the full list of articles & source code on GitHub
Exceptions, the bit of code that makes everything break! Here are some interesting thoughts around how exceptions work, which were brought up during a recent presentation I gave on C# 6.
Note: Based on VS 2015 CTP 6, this may change by RTM.
Exceptions in a catch block
Starting off, let us look at what happens if you raise an exception in the catch block of a try…catch. This isn’t anything new to C# 6, but it is worth a recap.
In this scenario, the first exception (MyException) is caught, and then the second exception is raised. Since there is no try…catch for the second exception, it runs normally and bubbles up until it is either caught higher up or the app crashes. In this example, that means an exception of type Exception will be raised.
What if we add a catch all?
As a slight variation, what happens if you add another catch below the first one? Does the second catch catch the exception raised in the first catch block? For example:
Nope, not at all. It exits the entire try…catch scope, so that second catch does nothing for what we are testing. In the example above, that means an exception of type Exception will be raised—same as with the first scenario.
Exceptions in when
C# 6 adds the when keyword, allowing us to add a filter to our catch blocks. This feature is called Exception Filters, and you may find articles using if as the keyword, but that has changed to when. Prior to C# 6, the condition to run a catch block was just the exception type. Now, with C# 6, it is the exception type—and, optionally, the result of the when expression. So what happens if the when expression raises an exception? For example:
I assumed it would work in a similar way to the exceptions inside the catch block we looked at above. I was wrong. Any exception in the when condition is swallowed up! In this example, the MyException will be raised since there is no catch block that can handle it—the when has failed due to the exception being raised in Test().
What if we add a catch all?
As with the first example, does adding a second catch block here change the behavior?
publicstaticboolTest()
{
thrownew ApplicationException("WHAT!");
}
publicstaticvoidOldPain()
{
try
{
thrownew MyException { Id = 200 };
}
catch (MyException ex) when (Test())
{
}
catch (ApplicationException ex)
{
// will this be run?
}
}
No, this scenario runs the same as before—a MyException is raised.
Constant whens
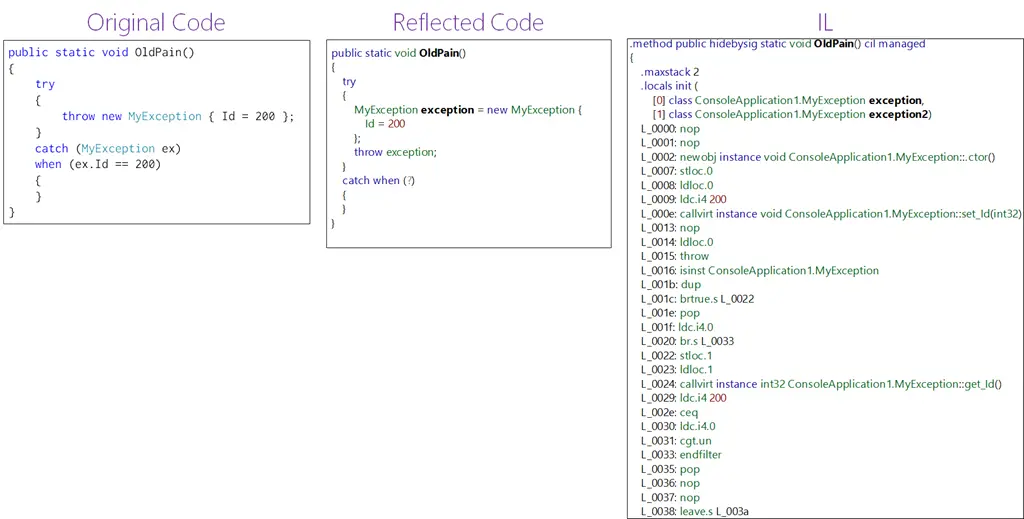
What happens if the when expression is a constant? Is the compiler smart enough to optimize the code? To work this out, I used the AMAZING .NET Reflector, which means I can compare the original code, the IL, and the code reflected back from the IL.
Starting off with the standard filter, here’s what it looks like across all places. I suspect the reflected code shows ? since the current version of Reflector doesn’t support this.
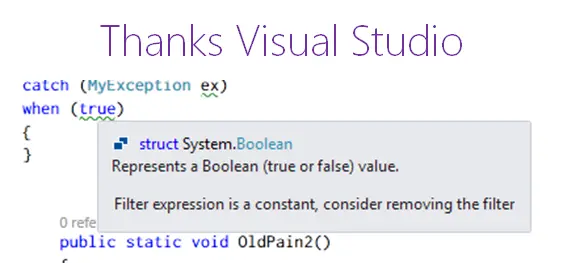
Let’s change the condition to be always true. Thankfully, Visual Studio detects this and warns you:
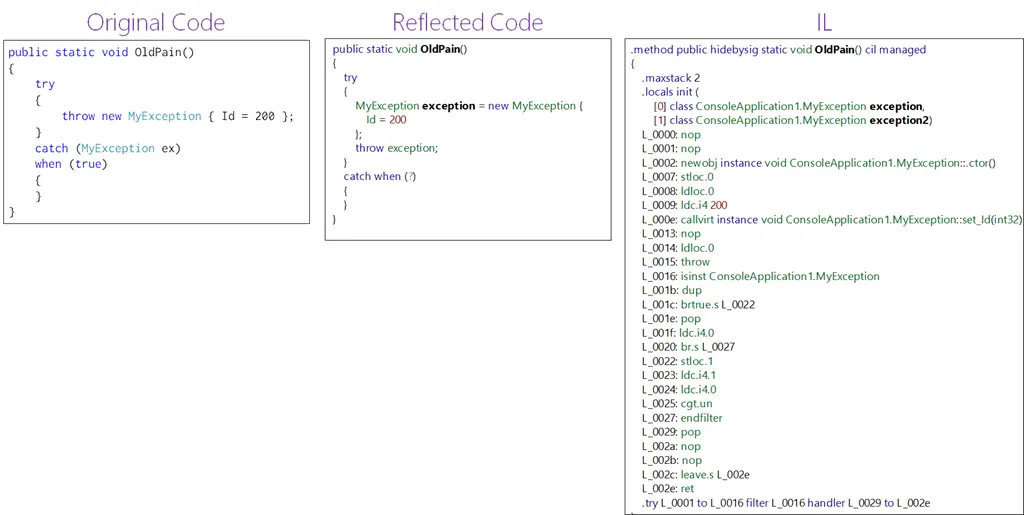
But what is the result of the compiler?
It’s pretty much the same—with the filter still existing in the IL. Checking with false (and also release builds) shows no difference in any scenario.
Duplicate whens
The last set of scenarios are around duplicate when clauses. For example, below we have two catch blocks that are the same, and I know from running this that only the first one is executed.
And from checking the generated IL, both catches are included too—so no optimization around this.
As a final mad scientist idea, what if the first catch changes the condition to one the second catch can handle? Will that allow both to run? For example:
publicstaticvoidOldPain()
{
var canCatch = true;
try
{
thrownew MyException { Id = 200 };
}
catch (MyException ex) when (canCatch)
{
canCatch = false;
}
catch (MyException ex) when (!canCatch)
{
}
}
The answer is no. Once one catch handles it, the rest are ignored.
I hope you find this new syntax interesting! If you have any questions, please post them in the comments.
Want to learn about other C# 6 features? Check out the full list of articles & source code on GitHub
C# 6 introduces a new feature called Dictionary Initialisers or Index Initialisers, depending on how they function internally. Even the C# team isn’t consistent—the roadmap page](https://github.com/dotnet/roslyn/wiki/Languages-features-in-C%23-6-and-VB-14) refers to them as "dictionary," while the [feature description document calls them "index." Until the name is settled, what are index initialisers, and how do they work internally?
Note: This is based on VS 2015 CTP 6 and may change.
Adding to Collections in C# 2
In C# 2, the only way to add items to a collection was by using the collection’s built-in methods, typically Add. For example, below we add items to a dictionary and a list using the C# 2 approach.
publicstaticvoidCSharp_Two_Dictionary()
{
var config = new Dictionary<int, string>();
config.Add(1, "hi");
config.Add(2, "how are you");
config.Add(3, "i am fine");
config.Add(4, "good bye");
foreach (var item in config)
{
Console.WriteLine("{0} = {1}", item.Key, item.Value);
}
}
publicstaticvoidCSharp_Two_List()
{
var config = new List<string>();
config.Add("hi");
config.Add("how are you");
config.Add("i am fine");
config.Add("good bye");
foreach (var item in config)
{
Console.WriteLine(item);
}
}
Collection Initialisers in C# 3
C# 3 introduced collection initialisers, allowing items to be added using braces. The constructor parentheses become optional. While this is just syntactic sugar—the compiler rewrites it to use the collection’s Add method—the result is cleaner and less error-prone.
The collection must have an Add method (uniquely in .NET, no interface is required—just the method name and at least one parameter).
publicstaticvoidCSharp_Three_Dictionary()
{
var config = new Dictionary<int, string>
{
{ 1, "hi" },
{ 2, "how are you" },
{ 3, "i am fine" },
{ 4, "good bye" },
};
foreach (var item in config)
{
Console.WriteLine("{0} = {1}", item.Key, item.Value);
}
}
publicstaticvoidCSharp_Three_List()
{
var config = new List<string>
{
"hi",
"how are you",
"i am fine",
"good bye",
};
foreach (var item in config)
{
Console.WriteLine(item);
}
}
Index Initialisers in C# 6
C# 6 introduces a new way to add items to collections, using index initialisers. The syntax differs slightly:
publicstaticvoidCSharp_Six_Dictionary()
{
var config = new Dictionary<int, string>
{
[1] = "hi",
[2] = "how are you",
[3] = "i am fine",
[4] = "good bye",
};
foreach (var item in config)
{
Console.WriteLine("{0} = {1}", item.Key, item.Value);
}
}
publicstaticvoidCSharp_Six_List()
{
// Note: This will throw an errorvar config = new List<string>
{
[1] = "hi",
[2] = "how are you",
[3] = "i am fine",
[4] = "good bye",
};
foreach (var item in config)
{
Console.WriteLine(item);
}
}
Key Difference:
Unlike collection initialisers, index initialisers do not use Add. Instead, they leverage the collection’s indexer and setter. The compiled code resembles this:
publicstaticvoidCSharp_Six_Dictionary_Generated()
{
var config = new Dictionary<int, string>();
config[1] = "hi";
config[2] = "how are you";
config[3] = "i am fine";
config[4] = "good bye";
foreach (var item in config)
{
Console.WriteLine("{0} = {1}", item.Key, item.Value);
}
}
publicstaticvoidCSharp_Six_List_Generated()
{
// Note: This will throw an exceptionvar config = new List<string>();
config[1] = "hi"; // Throws ArgumentOutOfRangeException
config[2] = "how are you";
config[3] = "i am fine";
config[4] = "good bye";
foreach (var item in config)
{
Console.WriteLine(item);
}
}
Requirements:
For index initialisers to work, the class must have an indexer with a setter. Unlike collection initialisers, this does not require the class to implement IEnumerable or have an Add method.
Example: Non-Collection Usage
This feature isn’t limited to collections. Let’s assign roles to a team without using constructors.
C# 2 Approach:
publicstaticvoidCSharp_Two_Set_Members()
{
var team = new Team();
team.ScrumMaster = new Member("Jim");
team.ProjectOwner = new Member("Sam");
team.DevLead = new Member("Phil");
team.Dev = new Member("Scott");
}
// Role enum (unchanged in later examples)enum Role
{
ScrumMaster,
ProjectOwner,
DevLead,
Dev
}
classTeam
{
public Member ScrumMaster { get; set; }
public Member ProjectOwner { get; set; }
public Member DevLead { get; set; }
public Member Dev { get; set; }
}
classMember
{
publicMember(string name)
{
Name = name;
}
publicstring Name { get; }
}
C# 3: Object Initialisers
publicstaticvoidCSharp_Three_Object_Initialiser()
{
var team = new Team
{
ScrumMaster = new Member("Jim"),
ProjectOwner = new Member("Sam"),
DevLead = new Member("Phil"),
Dev = new Member("Scott"),
};
}
C# 6: Index Initialisers
To use index initialisers, we add an indexer to the Team class:
publicstaticvoidCSharp_Six_Index_Initialiser()
{
var team = new Team
{
[Role.ScrumMaster] = new Member("Jim"),
[Role.ProjectOwner] = new Member("Sam"),
[Role.DevLead] = new Member("Phil"),
[Role.Dev] = new Member("Scott"),
};
}
classTeam
{
public Member this[Role role]
{
get
{
switch (role)
{
case Role.ScrumMaster: return ScrumMaster;
case Role.ProjectOwner: return ProjectOwner;
case Role.DevLead: return DevLead;
case Role.Dev: return Dev;
default: thrownew IndexOutOfRangeException();
}
}
set
{
switch (role)
{
case Role.ScrumMaster: ScrumMaster = value; break;
case Role.ProjectOwner: ProjectOwner = value; break;
case Role.DevLead: DevLead = value; break;
case Role.Dev: Dev = value; break;
}
}
}
public Member ScrumMaster { get; privateset; }
public Member ProjectOwner { get; privateset; }
public Member DevLead { get; privateset; }
public Member Dev { get; privateset; }
}
This explains how index initialisers work in C# 6 and showcases their flexibility beyond collections. Got ideas on other uses? Share them in the comments!
First off, let me thank everyone who attended—this was one of the best events I’ve been involved in, and that’s all down to the great audience we had. Not only was it fun and exciting, but I learned so much from all of you—about the various pieces of technology you use and your frustrations with them.
Sharp Sharp with C# 6
This is one of my favorite talks I’ve ever given. I don’t think I’ve ever laughed as much on stage as I did during this talk.
You can find the starting code for this on GitHub.
Putting the “DOT” into .NET – Dev, Ops & Test
For Johannesburg audiences, this will look a lot different. I got so much amazing feedback and ideas that I did a lot of work on polishing and restructuring it, and I’m very proud of the final outcome. It’s still a long talk that covers a lot—maybe too much—but it’s one that I think stimulates a lot of ideas and nudges people onto a very important path.