Note – The code being referenced. This is the 1st post in a multipart series. If you want to read more, see our series index.
So let's start with line one:
package i_introduction._0_Hello_World
In Kotlin, package works just like a package in Java or a namespace in .NET. There is no link between the package name and the filesystem.
Next up are imports:
import util.TODO
import util.doc0
Imports work the same as import in Java or using in C#. Kotlin imports the following packages by default:
kotlin.*kotlin.annotation.*kotlin.collections.*kotlin.comparisons.* (since 1.1)kotlin.io.*kotlin.ranges.*kotlin.sequences.*kotlin.text.*
Next up is our first function definition (not defination):
fun todoTask0(): Nothing = TODO()
We use the fun keyword to state it is a function, followed by the function name todoTask0 and its parameters—in this case, none. The function returns Nothing, though this isn’t strictly required, as the compiler can infer the return type. This is a single-statement function, so it ends with an equal sign (=).
The next function is slightly different:
fun task0(): String {
    return todoTask0()
}
This function returns a String and is not a single-statement function.
So how do we solve this Koan?
fun task0(): String {
    return "OK"
}
I have recently decided to start learning Kotlin, and have started with the Koans. Koans are simple unit tests that help ease you into learning a new language. The first step was setting this up on Windows and VSCode... though for some reason, I hate myself that much. 😤
Requirements
Using
I’m using VSCode as my editor and the command line to run the unit tests.
Parts
Since this will be ongoing, I’ll break it into a number of parts, listed below (this list will be updated over time):
- Hello World
- Java to Kotlin Converter
- Named Arguments
- Default Values
- Lambdas
- String Templates
- Data Classes
- Nullable Types
- Smart Casts
- Extension Functions and Extensions on Collections
- Object Expressions and SAM Conversions
- Kotlin’s Elvis Operator
- Return
when - The Awesome Backtick
/learning-kotlin-awesome-backtick - Collections
- The
it Thing - Operators
- Operators Don’t Need to Mean One Thing
- Destructuring
- For Loop
- Invoke
- Looking at the
in Operator & contains - The
.. Operator - Todo
by Delegate Properties- The Lazy Delegate
- The Observable Delegate (with a slight detour on reference functions)
- The Map Delegate
- The Vetoable Delegate
- The
notnull Delegate and lateinit
When you work with delimited data (CSV, TSV, etc.), it can be a pain to just see the data in a nice way. For example, this data:
> cat people-example.csv.txt
First Name,Last Name,Country,age
"Bob","Smith","United States",24
"Alice","Williams","Canada",23
"Malcolm","Jone","England",22
"Felix","Brown","USA",23
"Alex","Cooper","Poland",23
"Tod","Campbell","United States",22
"Derek","Ward","Switzerland",25
With Unix-like OSes, you can use the column command to format the layout—for example:
> column -t -s',' people-example.csv.txt
First Name Last Name       Country       age
Bob      Smith           United States  24
Alice    Williams        Canada         23
Malcolm  Jone            England        22
Felix    Brown           USA            23
Alex     Cooper          Poland         23
Tod      Campbell        United States  22
Derek    Ward            Switzerland    25
With Windows, you can use Import-CSV and Format-Table in PowerShell:
> Import-Csv .\people-example.csv.txt | Format-Table First Name, Last Name, Country, age
First Name Last Name Country       age
---------- --------- --------     ---
Bob        Smith    United States  24
Alice      Williams Canada         23
Malcolm    Jone     England        22
Felix      Brown    USA            23
Alex       Cooper   Poland         23
Tod        Campbell United States  22
Derek      Ward     Switzerland    25
This post is one in a series of things formally trained programmers know—the rest of the series can be found in the series index. # Binary Search Tree
In the previous post, we covered a Binary Tree, which is about the shape of storing data. The Binary Search Tree (BST) is a further enhancement to that structure.
The first important change is that the data we are storing needs a key; if we have a basic type like a string or number, then the value itself can be the key. If we have a more complex class, then we need to define a key in that structure or build a unique key for each item. The second change is a way to compare those keys, which is crucial for the performance of the data structure. Numbers are easiest since we can easily compare which is larger and smaller.
The third and final change is how we store the items: the left node’s key will always be smaller than the parent node’s key, and the right node’s key will be larger than the parent node’s key. As an example, here is a BST using just numbers as keys:
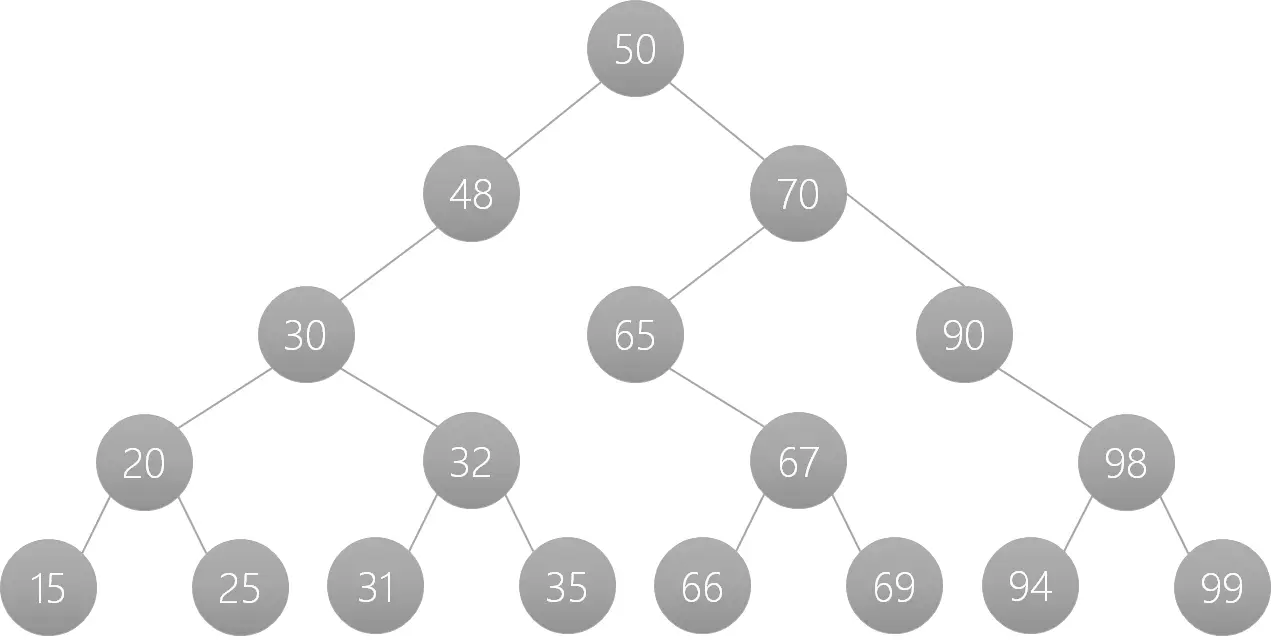
Note that all nodes to the left are smaller than their parent, and all nodes to the right are larger than their parent.
Why?
So, why should we care about a BST? We should care because searching is really performant in it—each time you move a level down, you eliminate approximately 50% of the potential nodes.
For example, if we wanted to find the item in our example with the key 66, we could start at the root (50) and move right. At that point, we have eliminated 8 possible nodes immediately. The next step is to the left from the node with the 70 (total possible nodes removed: 12). Next is to the right of the node with the value of 65, and then to 66 (to the left of 67). So we found the node in 5 steps.
Going to Big O Notation, this means we achieved a performance of close to O(log n). It is possible to have a worst case of O(n), when the tree is not optimal or unbalanced.
Balanced versus Unbalanced
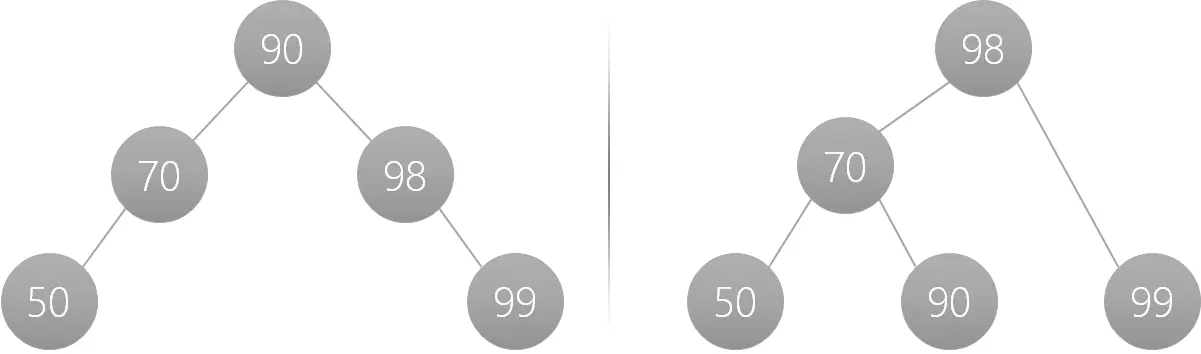
In the above example, we have a binary search tree that is optimal—i.e., it has the lowest depth needed. Below, we can see a totally valid BST: each child node is to the right of the parent because it is bigger than the parent.

This, however, results in a O(n) search performance, which is not ideal. The solution is to rebalance the BST, and for our example above, we can end up with multiple end states (I’ll show two below). The key takeaway is that we go from a depth of 5 to a depth of 3.
Implementations
.NET has a built-in implementation with SortedDictionary. Unfortunately, nothing exists out of the box for this in JavaScript or Java.
This quick tip is about two small features of Git I wish I had known about earlier, as it makes it way easier to search through it.
git-grep
git-grep is a way to search through your tracked files for whatever you provide. For example, if you want all files containing the word "index":
git grep index
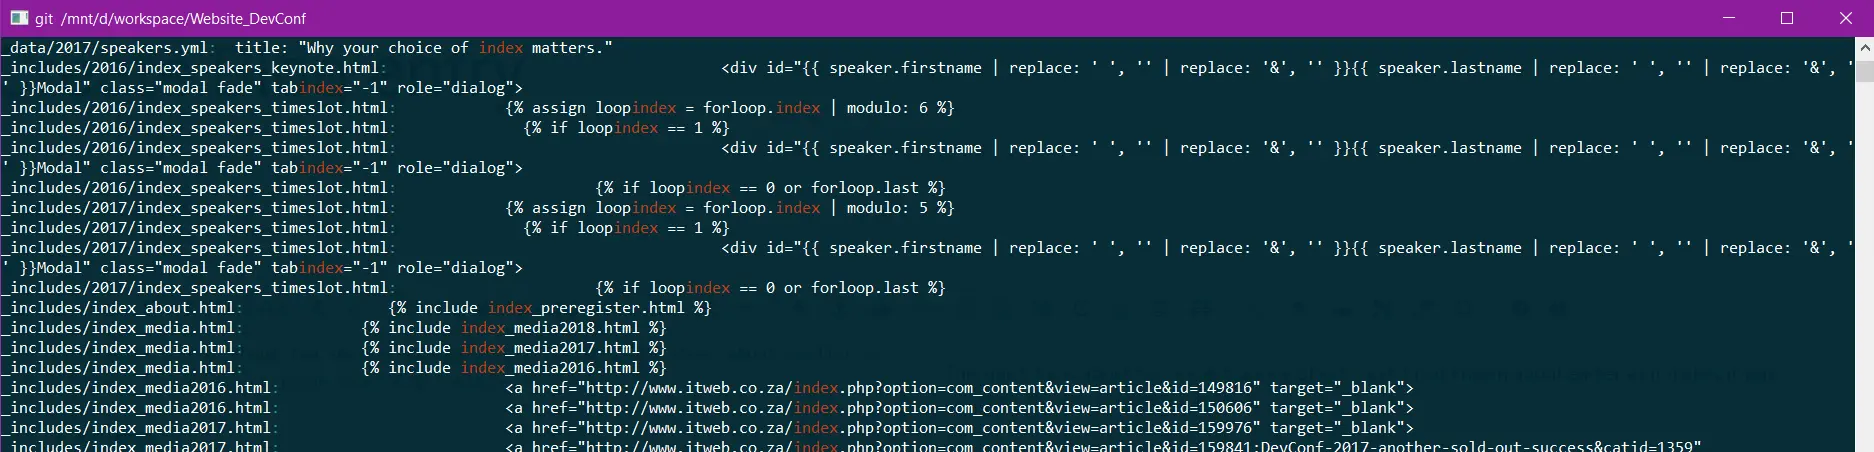
You can limit the search to specific files—for example, if you want to filter the above example to just JSON files:
git grep index -- '*.json'

You can also search for multiple items in a single file—for example, if you want to find all files containing both "index" and "model":
git grep --all-match -e index -e model

git-log grep
git log has a grep function too, which is awesome for finding commit messages with a specific word or words. For example, if you want to find all commits about "Speaker" for DevConf, you could run:
git log --all --grep="Speaker"
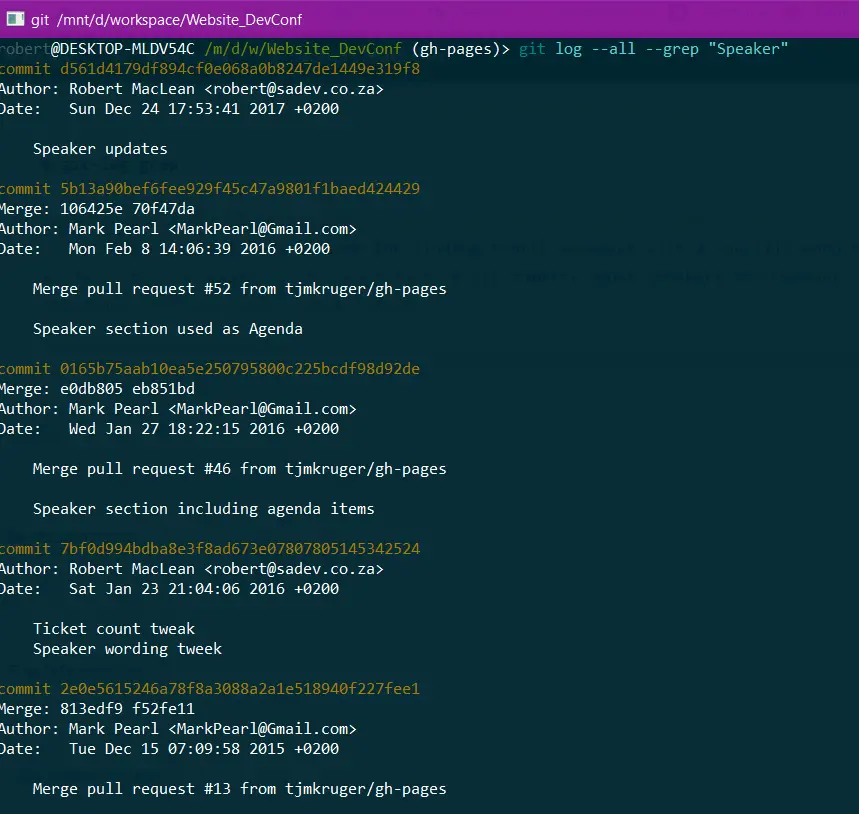
Since redoing this blog, I switched out the syntax highlighting to use the Drupal Geshi Module. For the love of everything, I can't remember the tricks for using it, so here’s a cheatsheet—mostly for myself but maybe you’ll find it valuable too. These are all HTML attributes you can add to your code block:
language: controls the language for rendering.line_numbering: controls whether line numbering is off, on, or fancy, with the values off, normal, and fancy respectively.- With fancy line numbers, you can use the attribute
interval to control how often to show the line numbers. title: adds a title to the code block.special_lines: takes a comma-separated list of numbers and highlights them.linenumbers_start: controls what the first line number is.
(Information worked out from this code.)
[WSL]: Windows Subsystem for Linux — Who needs a GUI to do math when we have options for Unix-like (MacOS, Linux, etc.), Command Prompt, and PowerShell? #Unix-like OSs
Unix-like OSs, including macOS, WSL, and Linux, include an awesome calculator called bc. From the man page:
bc is a language that supports arbitrary-precision numbers with interactive execution of statements. There are some similarities in its syntax to the C programming language. A standard math library is available via a command-line option. If requested, the math library is defined before processing any files.
bc starts by processing code from all the files listed on the command line in the order listed. After all the files have been processed, bc reads from standard input. All code is executed as it is read. The only caveat is the file input: you can't just pass in parameters… but you can use echo to pass in the equation. For example:
echo '1 + 2 + 3 + 4' | bc
10
bc can also work with different number bases, for example:
echo "obase=2; ibase=10; 42" | bc
101010
obase stands for output base, and ibase stands for input base. So in the example, we’re converting 42 (base 10) to binary.
Floating-point division is a weirdness with bc. For example, you would expect the answer to be 0.4 below, but it is 0:
echo "2/5" | bc
0
The solution is to use the math library switch -l:
echo "2/5" | bc -l
.40000000000000000000
And if you want 20 decimal places, you can use scale to control it:
echo "scale=3; 2/5" | bc -l
.400
Windows Command Prompt
Command Prompt has a similar tool using the set /a command:
set /a 3+3
6
set /a (3+3)*3
18
set /a "203>>3"
25
PowerShell
PowerShell natively supports some basic functionality, but if you want to use more advanced functionality, you can use the entire System.Math class for a wide range of operations:
4 + 5
9

6 * 7
42

[Math]::Sin(50)
-0.262374853703929

[Math]::Max([Math]::Tan(40), [Math]::Cos(40))
-0.666938061652262
macOS has a great tool, called say, which just says what you pass it. For example, say "Hello" and next you'll hear your device say "Hello".
Where this is really useful is when you want to do a long-running action and get notified when it's done. For example:
git clone https://github.com/torvalds/linux.git && say "clone complete"
So, what about for Windows? You can do something similar with PowerShell. First, set it up:
Add-Type -AssemblyName System.speech
$say = New-Object System.Speech.Synthesis.SpeechSynthesizer
Once you have that in place, you can use it like this:
git clone https://github.com/torvalds/linux.git
$say.Speak("clone complete")
If you are getting the too many open files error with macOS, it could be VSCode trying to open too many files (or opening more than 10,240 by default). You can confirm that with the following:
lsof | awk '{ print $2 " " $1; }' | sort -rn | uniq -c | sort -rn | head -20
So, what can you do about it? If the files are not important—say, your output folder—then you can use VSCode settings to exclude them. In the example below, I configure VSCode to ignore build folders. I’d encourage this as a workspace setting, so everyone on the team gets it:
"files.exclude": {
"**/build": true
},
"files.watcherExclude": {
"**/build": true
},
"search.exclude": {
"**/build": true
}
After using a MacBook Pro for two years, I thought it was time to share what utilities I found really useful to have. These are obviously weighted toward being a software developer, so your mileage might vary. # Brew It is the missing package manager for macOS, so—as with NPM, Chocolatey, or Composer—you can install what you need via the command line. It may seem weird—like, What’s wrong with just downloading and installing what you need?—but the advantage is that you can write this stuff down. So if you ever need to reinstall it, it’s easier (and also easier to share to help others get up and running). A second advantage is updating: it takes one command to update all the tools I use. More info
VSCode
More than an IDE, this is my go-to tool for anything text—editing configs ✅, taking notes ✅, or anything, really. Install with Brew: brew install homebrew/cask/visual-studio-code An important tweak for VSCode is to make sure it launches from the Terminal. Thankfully, it is really easy. More info
Aerial
The Apple TV has the best screensaver I’ve ever seen, and some smart person ported it to macOS under the name Aerial. A word of warning: these videos are massive and will destroy your bandwidth. One tip to solve that? Under the settings is a Cache section—make sure you have "Cache Aerials As They Play" checked; otherwise, this will destroy your bandwidth. If you’re on an uncapped connection, there’s also a Download Now option, which is a must-use.
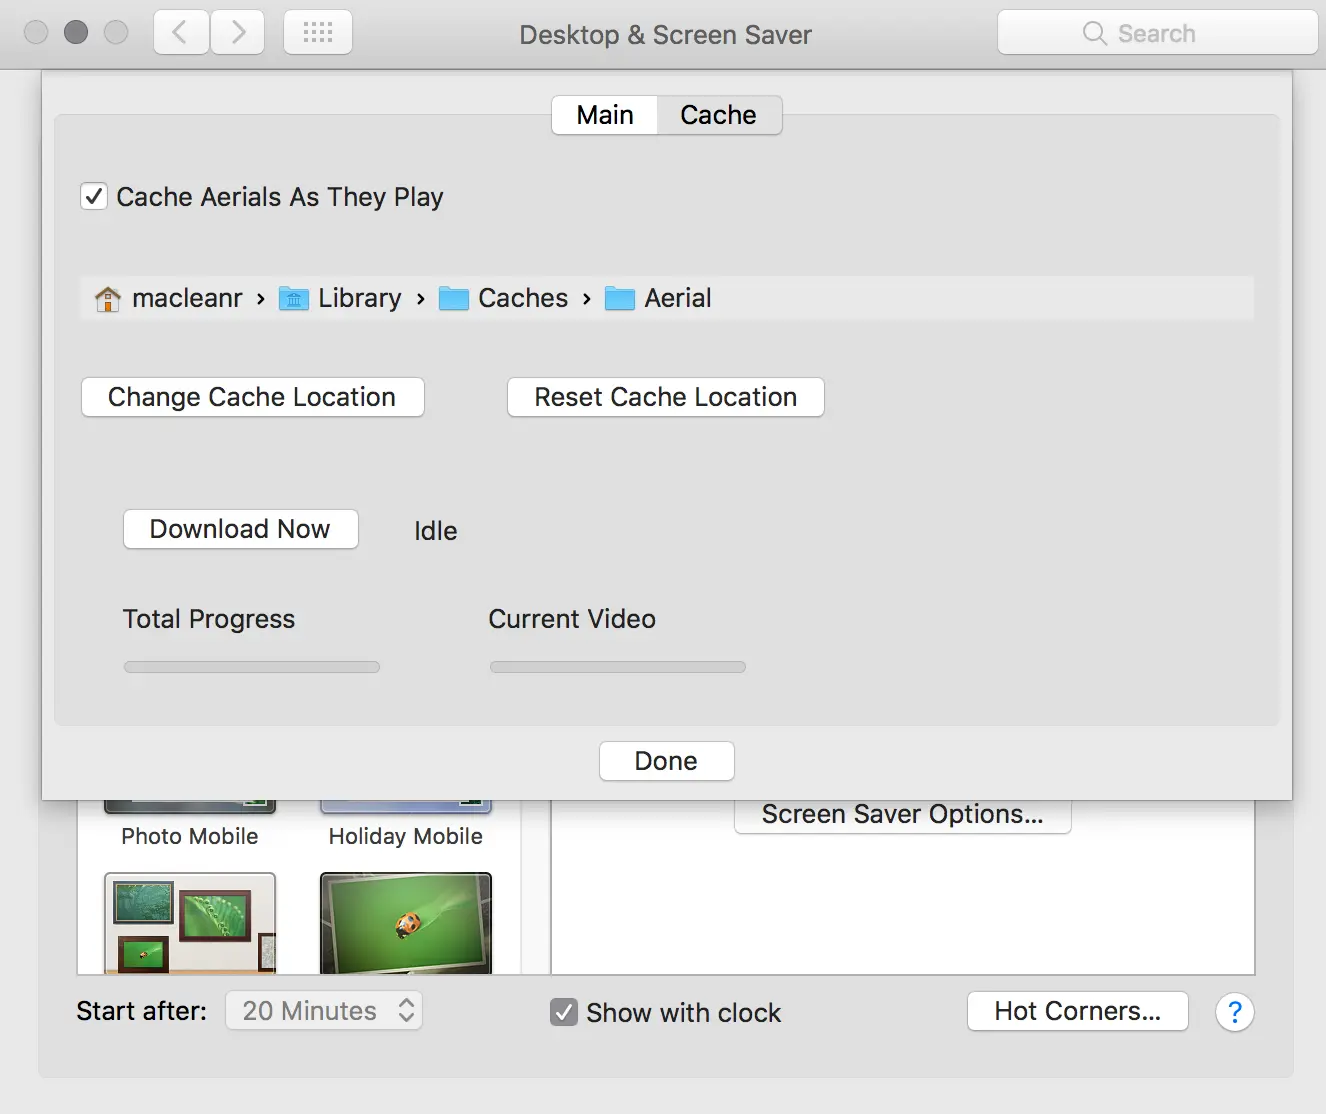
Install with Brew: brew install caskroom/cask/aerial More info
Fish
Bash is nice, but Fish is nicer—it just feels like what you’d expect in a modern world. Install with Brew: brew install fish More info
Fish Node Manager
Part of my job involves working with multiple projects, which means juggling multiple versions of Node—and that was a pain, until I found a Node Manager for Fish. It lets you easily switch between Node versions. Unfortunately, setup isn’t as straightforward as installation: you first need Fisherman, which is like Brew for Fish, leading to this 3-step process to install and configure it:
curl -Lo ~/.config/fish/functions/fisher.fish --create-dirs https://git.io/fisher
fisher fnm
fnm use latest
More info
Amphetamine
Amphetamine is a massively useful tool for macOS—especially in DevOps, where you might wake up at night and need your machine to behave exactly as you want. Its core use? Preventing your Mac from sleeping, with configurable triggers (automatic or manual). Get it from the Store
Status Clock
Another very useful tool is Status Clock, which displays a second time in the menu bar—exceptionally handy if you work across different time zones. Get it from the Store
Settings Tweaks
Beyond useful tools, here are some handy macOS settings tweaks:

