Tripping over logs: A story of Unity - Part 2


Recap + Intro
In part 1, we looked at the problem with simply adding logging code and how it quickly becomes messy. We also explored how the more loosely coupled the code is, the easier it is to effect changes painlessly. Now, we’ll take that “nicer” code (compared to the first version) and integrate Unity into the mix. Note: You can get Unity with the Enterprise Library from the p&p group.
As I mentioned in part 1:
What I’m going to do is walk through a practical approach to using Unity. I won’t delve into DI or IoC, as people smarter than me have covered those topics far better. If you want theory, look elsewhere—if you want to get running with Unity, this is for you.
This is a multi-part series, so here’s the series guide in case you’re looking for the rest:
- Part 1 – Introduction to the problem
- Part 2 – Changing the code to use basic Unity functions
- Part 3 – Lifetime management
- Part 4 – Changing the code to use interception
- Part 5 – Interception supplementary
- Part 6 – Wrap-up
Applying Unity
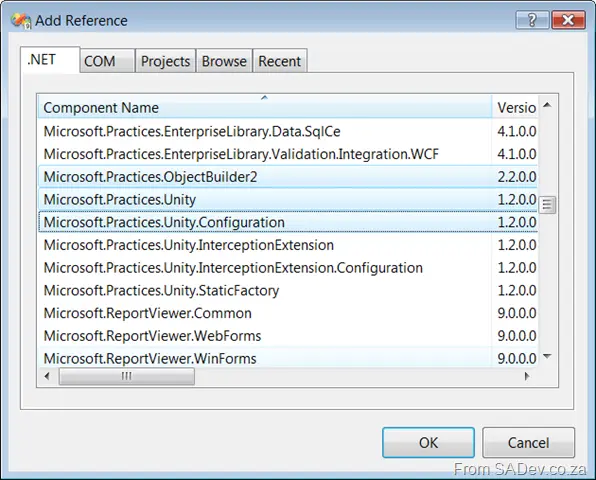
The first step to using Unity is setting it up. To do this, you need to add three references to your solution (highlighted below):
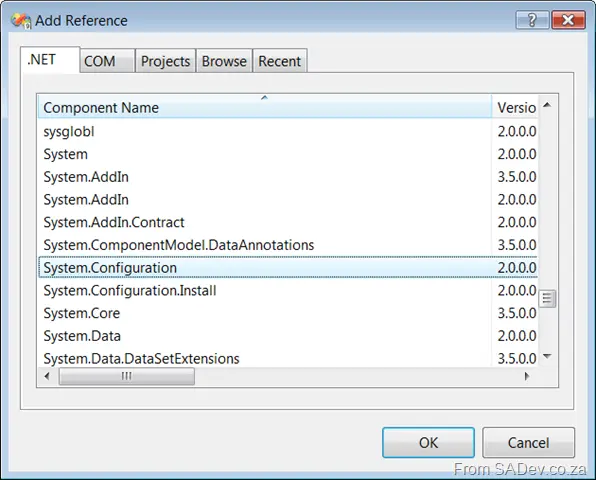
Unity has two configuration options: one in code and one in an external configuration file (typically your app/web.config). Both serve their purpose, but for this series, I’ll use the configuration file—which means you’ll also need to add a reference to:
I generally prefer the config file approach in production while using the in-code configuration for unit tests (often to override config settings).
Now, add the references to your code:
using System.Configuration;
using Microsoft.Practices.Unity;
using Microsoft.Practices.Unity.Configuration;
In the Main method of your application, I’ll create an instance of a UnityContainer (line 21 below). Think of it as a “magic bag”—you reach in, specify what you want, and it delivers it, just like Mary Poppins. Before doing that, we configure it to read the settings (lines 23–24) and then pull out the logger (line 26). Note that we do not manually instantiate a logger (as we did before)—instead, resolving it from the container creates it.
   1: using System;
   2: using System.Configuration;
   3: using Microsoft.Practices.Unity;
   4: using Microsoft.Practices.Unity.Configuration;

   5:
   6: namespace BigSystem
   7: {
   8:     class Program
   9:     {
  10:         static ILogger logger;

  11:         static void DoSomething(string username)
  12:         {
  13:             logger.LogThis($"DoSomething called with Username Parameter set to: {username}");
  14:             Console.WriteLine($"Hello {username}");
  15:             logger.LogThis("DoSomething completed");
  16:         }

  17:         static void Main(string[] args)
  18:         {
  19:             IUnityContainer container = new UnityContainer();

  20:             UnityConfigurationSection section =
  21:                 (UnityConfigurationSection)ConfigurationManager.GetSection("unity");
  22:             section.Containers.Default.Configure(container);

  23:             logger = container.Resolve<ILogger>();

  24:             logger.LogThis("Application started");
  25:             DoSomething("Robert");
  26:             Console.ReadKey();
  27:             logger.LogThis("Application completed");
  28:         }
  29:     }

  30:     public interface ILogger
  31:     {
  32:         void LogThis(string message);
  33:     }

  34:     public class DebugLogger : ILogger
  35:     {
  36:         public void LogThis(string message)
  37:         {
  38:             System.Diagnostics.Debug.WriteLine($"{DateTime.Now}: {message}");
  39:         }
  40:     }

  41:     public class ConsoleLogger : ILogger
  42:     {
  43:         public void LogThis(string message)
  44:         {
  45:             Console.WriteLine($"{DateTime.Now}: {message}");
  46:         }
  47:     }
  48: }
Finally, we dive into the app.config (add one if you’re following along) to configure Unity.
Unity Config
Start by adding a configSection to register Unity (lines 3–5). Then, on line 7, open the <unity> tag. The first key element is <typeAliases> (line 8). I recommend using type aliases—they let you map a type (e.g., BigSystem.ILogger) to a friendly name. In this example, it’s minor (since we could directly reference ILogger on line 16), but as your solution grows, type aliases become invaluable for avoiding tedious find-and-replace operations.
Lines 9–10 alias the DebugLogger and ILogger to friendly names. On line 13, we define the <containers> section, which holds settings for a container (in this case, our single unnamed container). Inside, <types> (line 15) maps interfaces to their implementing classes. When we call container.Resolve<ILogger>() (line 23 in the code above), Unity knows which class to return.
   1: <?xml version="1.0" encoding="utf-8" ?>
   2: <configuration>
   3:     <configSections>
   4:         <section name="unity"
   5:                  type="Microsoft.Practices.Unity.Configuration.UnityConfigurationSection,
   6:                  Microsoft.Practices.Unity.Configuration" />
   7:     </configSections>

   8:     <unity>
   9:         <typeAliases>
  10:             <typeAlias alias="logger" type="BigSystem.DebugLogger, BigSystem" />
  11:             <typeAlias alias="ILogger" type="BigSystem.ILogger, BigSystem" />
  12:         </typeAliases>

  13:         <containers>
  14:             <container>
  15:                 <types>
  16:                     <type type="ILogger" mapTo="logger" />
  17:                 </types>
  18:             </container>
  19:         </containers>
  20:     </unity>
  21: </configuration>
When you run the code, it logs to Visual Studio’s Output window! If you change line 10 to use ConsoleLogger instead:
<typeAlias alias="logger" type="BigSystem.ConsoleLogger, BigSystem" />
It will now log to the console.
This isn’t revolutionary yet—we’ve just made it possible to switch implementations externally without recompiling. But Unity truly shines in part 4, where we’ll unlock its full potential. For now, we’re moving in the right direction!