LightSwitch: Passing data between screens - Example 5: Passing information to an "add" screen


For other posts in this series, see our series list.
In the previous examples, we have always passed data to a simple browse screen. Passing data to a screen where you add an item is slightly more complex, so we will explore how to solve that. It may seem that what we did in example 3 wasn’t useful, since example 4 showed a better way—however, there are times when you can’t do that, so we will also cover that. Finally, we will conclude with a better approach: using a
This post, and the rest in the series, will be a bit shorter as we are covering the same theme but applied in different ways—so make sure you read the preceding parts, or you may feel a bit lost.
As with each part of this series, the code can be found on GitHub
The corrected version of the GitHub link section is:
As with each part of this series, the code can be found on GitHub.
Example 5a: Passing information to an “add” screen with JavaScript
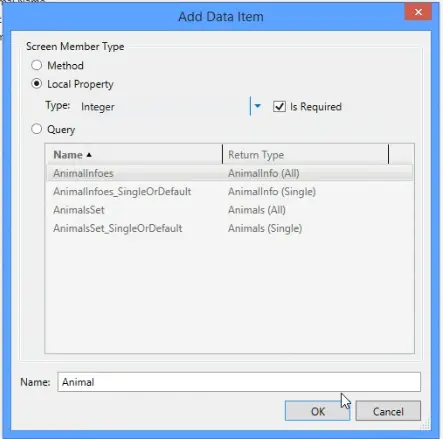
- On our add screen, we start by adding a data item. We will name it Animal and set the type to Integer. The point of using Integer is to show that the type of the property doesn’t matter to JavaScript. Setting it to a different type than we expect only affects tooling. Lastly, we set it to be a parameter.
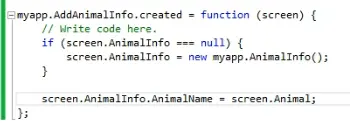
- Now we will do the code for the create event, and here we need to do two things. As this is an “add” screen, the first bit of code ensures we have an object defined. AnimalInfo is the object the screen monitors and will persist to the backend—so if it isn’t defined (
null), we must create our own. We do this with:
if (screen.AnimalInfo == null) {
    screen.AnimalInfo = new myapp.AnimalInfo();
}
And then we follow that with the simple line of code to assign the name of the animal from our data item: screen.AnimalInfo.AnimalName = screen.Animal;
Note: even though we set the property (which is of type string) to an integer—it just works.
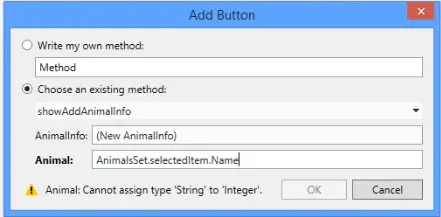
- I mentioned that tooling becomes a problem if we don’t use the right types, so to see how that occurs, we’ll add a button to the browse screen (the one we used in the last example) and try to open it, then set the name—but Visual Studio doesn’t allow this.
- We can just work around this in code, starting on the browse screen by adding a button with the method named ShowAnimalInfo.
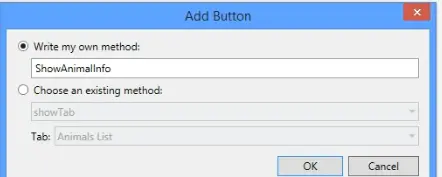
- The code we use in the button is very simple:
myapp.showAddAnimalInfo(null, screen.AnimalsSet.selectedItem.Name);
This should look very similar to example 4, except for the null in the first parameter (since we want the add screen to create the object associated with the screen, which we covered in step 2). The second parameter passes the selected item's name to the screen. Once again, the tooling expects an integer, but JavaScript is dynamic, so it accepts a string.

- That’s it! It all just works!
Example 5b: Passing information to an “add” screen—working with the tooling
This final example demonstrates how nice the tooling is when you pass the correct types and how you can achieve the same result without JavaScript. If you check the demo code, this is in the AddAnimalsInfoSmart screen.
- The main difference here is the type of the data item we add as a parameter. For this, we set the type to Animals (Entity).
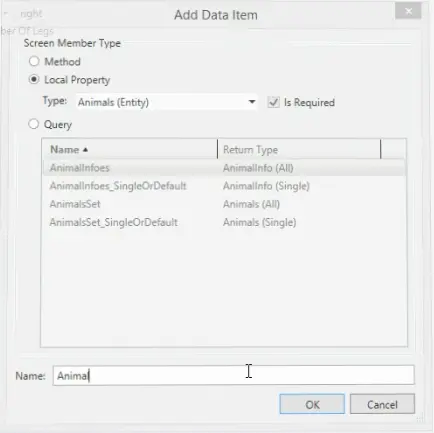
- Now we need to write some code again in the create event. Since we’ll only use the tooling to launch this screen, we don’t need to check if the object is set. All we need to do is set the values.

- Finally, we add the button to the browse screen using Visual Studio without JavaScript, and we can use IntelliSense to select the right options:
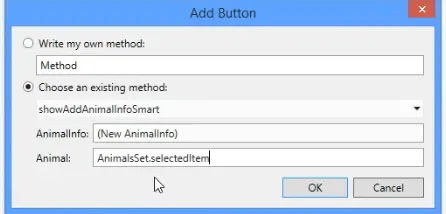
This second route is way better and what I recommend using—but it’s great to know that if you ever find yourself in a situation where two types don’t match up, you can work around it with a trivial amount of code.